 |
||||||||||||
| Home |
|
Products For Sale |
FAQs, Tips, Manuals |
Referral List |
|
Photo Gallery |
|
Links |
|
Contact Us |
|
|
||||||||||||||||||
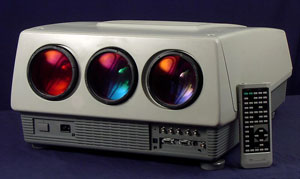
The Adjustments
Have everything plugged in, and ready to go. A source signal will be required
to give the PG
something to lock onto. The first step is to open the hood. Loosen the top 2
screws on the cover and
hinge it open to it's locked position. Remove the 2 screws on each side of the
front bezel (decorative
front panel) that surrounds the lenses, and pull the bezel off.
Now take a screwdriver and carefully remove the 4 screws that hold each lens
in position. On the
PG6000 and 9000, these are long black slotted screws that almost look like
dowels. On the
PG6100/9100 and up, these are plain brass coloured Philips head screws. A
magnetic screwdriver is
helpful here. The lenses are HEAVY, so be careful.
|
|
|||||||||||||||||
 NEC PG Series


© Copyright CurtPalme.com. All Rights Reserved. |