Step 8: Neck Boards
Sorry for all the lines in this pic. Just remove the SIX screws that I've
pointed to from the top. Then, remove the covers by lifting up and back. The
covers stay with the projector and are NOT part of the Neck Board.

Please take caution when removing the connectors.
Hold the neck board steady as you do this, or the pins on the back of it could
be bent/damaged.
Top arrow: Pull the red plug off.
Middle arrow: Wiggle the mini-RCA plug towards you and off.
Bottom arrow: Wiggle this tab off. It's a pain, but just keep wiggling it while
you pull backwards.

Again, please take caution when removing the
connectors. Hold the neck board steady as you do this, or the pins on the back
of it could be bent/damaged.
Top two arrows: Pull these plugs off by wiggling them upwards.
Middle arrow: Pull this black plug off (this is the G2 cable).
Bottom arrow: This connector has two tabs that must be lifted upwards, in order
to pull the plug off. I usually pull up on one tab, while simultaneously pulling
BACK on the connector from that end. Then do the same on the other side. If you
break a tab, it's not a big deal. But try not to. :)
Now that you've got all the connectors removed, it's time to remove the Neck
Board itself. Do this by gently wiggling back on forth on it, as you
simultaneously pull the Neck Board towards you (away from the Marquee).
Repeat the above steps for the two remaining Neck Boards.

This picture is just to show you what it looks like behind the neck boards. All
those little pins you see, are what you're trying to avoid bending, by holding
the neckboards steady as you remove it's connectors.

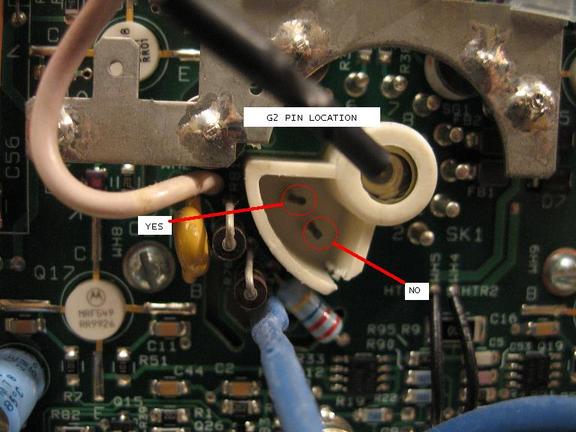
WARNING: When it is time to re-connect the neckboards
be very careful to re-connect the G2 cable to the correct pin. If you put the
connector back onto the wrong pin, you may spot-burn your CRT tube when you
power the set up.
Below are a couple of pictures showing the correct pin for the the G2 cable.

| Did you find this information useful? Please consider making a
donation to help defray the cost of managing and hosting future
articles, tips, and documents. |
|
|
|
Or
purchase
from
Amazon.com
and a small percentage automatically
goes to support this site at no extra cost to you! Visit their
Blu-ray and
4K UHD
stores for sales.
Want to show off your
home theater? See our
Blu-ray Release List & Must-Have Titles. |
|

|
|

|

