The following procedure was written by Curt Palme.
I get a lot of emails asking how to set G2 controls on Barco and Electrohome
projectors, so I thought I’d put together this basic setup procedure if you have
a gray scale that is out of whack. This procedure can also be used for the Sony
10XX projectors as well as the Ampro sets that use ES focusing.
Some basics: Any color TV picture is based on two individual images: The b/w
image and the color image. Gray scale adjustment is a procedure that changes the
tint of the B/W image. If you do not have a good B/W image to start with, the
color image that is produced will be off. Every projector has an adjustment
within the set somewhere to adjust the G2 level or ‘screen’ of each CRT. These
G2 controls adjust the master brightness level of each tube. If one tube is set
too low or too high, you will not get a well balanced B/W picture, it will be
tinted. Similarly as CRTs age, you will get varying emissions of each tube, and
the G2 controls will need to be adjusted. Tubes that have phosphor wear will
probably never achieve a perfect B/W picture, but you can probably get closer
than what the set is showing if it hasn’t been tweaked in quite some time.
Let’s identify the various aspects of the G2 procedure. For the most part,
each tube will simply get the G2/screen control adjusted , a procedure that
takes all of 5 minutes, but knowing what to look/adjust for is the key here.
Shown below is the AVIA stepped gray scale image off the AVIA test disc. It
shows a distinct tint to the image, and does not show a good stepped gray scale
as it’s supposed to. The image also shows the R and G tubes to have massive spot
burns in the middle of the screen. (These images were taken from my Barco 800
test set that has been used and abused for years.)
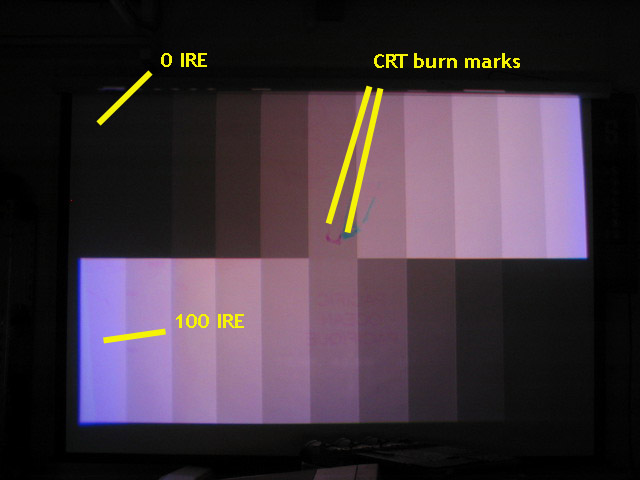
The picture shows tinting towards the purple end of the spectrum, there’s not
enough green in the image, the R and B tubes are predominant in the above image.
The stepped gray scale shows 10 distinct steps between 0 IRE which should be
completely black to 100 IRE which should be perfectly white. All steps in
between should be a gradual steps of gray.
What I do first with the Barco sets is to make sure my color balance is set
in the menu to 6500 degrees. This electronically sets the projector to output
what should be a B/W picture that is not tinted towards the blues or reds. Go
into the ‘color balance’ menu and select ‘6500 K’ (see below):


I then set my contrast and brightness to 60% (see below):

This puts the projector in an approximate normal operating state. You have room
to bump up the contrast and brightness to make up for low level video sources,
but you don’t risk the chance of overdriving your tubes heavily if someone
accidentally turns the contrast or brightness up too high.

|

