 Barco 808/Cine8 Barco 808/Cine8
Layout and Setup Tips
|
(Page 6)
|
Page: 1 2
3 4
5 6
7 8
9 10 |
SMPS sub board:
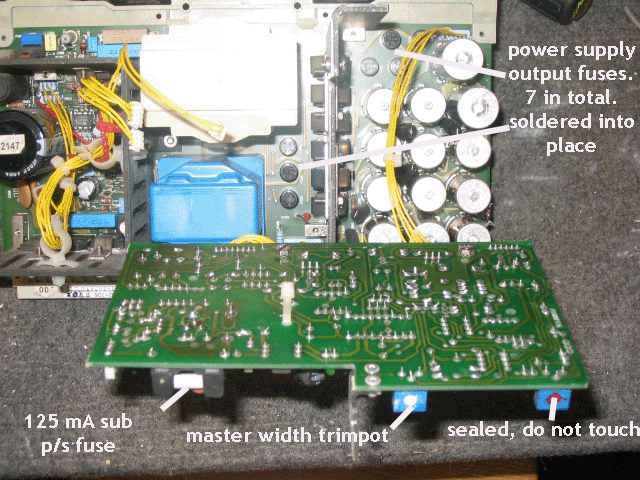
Looking at the SMPS, the sub board on the top of the main board
houses the standby supply that drives the back red/green LED, the
CPU/processor board and the IR sensors. The sub board also contains the
master width circuits for the H deflection board, and the temperature
control thermistor that determines the fan speed, depending on the
internal temperature of the set.
The 125mA fuse protects the standby supply. Should a fault occur on the
standby board, this fuse will blow. Note that the stock Barco fuses are
sand filled, and must be measured with an ohmmeter to determine if they
are blown. 125mA fuses are hard to find, do not install anything over a
½ amp fuse in this slot, or serious damage can occur if there’s a short
on the board. Note also that these fuses are European ‘F’ fuses, a good
electronics supply shop will carry them, Radio Shack may not.
Staying on the sub board for a moment, the only user adjustment on this
board is the master width control. Under normal operation , this pot
will not need adjustments, however if the power supply has been repaired
or replaced, the pot might need adjusting. The Barco service manual
outlines one method of setting this pot, here’s how I do it:
Go into the geometry menu and set the H width to 50%. Put up the test
grid (genlocked test pattern) and set this trimpot so that the test
pattern _just_ overshoots the sides of the tubes. The regular video
image should then fall within the phosphor area of the tubes, and have
good width. Note that setting this pot too high or too low may trigger a
‘scan fail’ condition on the G2 board, and cause the set to shut down
the HV section.
SMPS Back View:
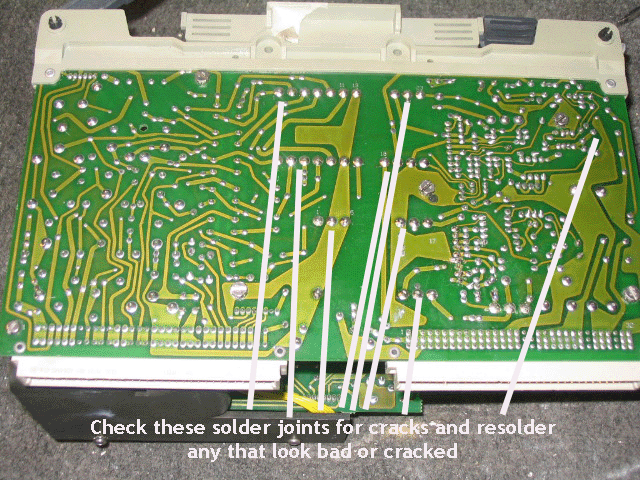
One of the common causes of failure of the Barco SMPS’s are bad solder
connections, the most common ones are pointed out in the picture. Check
all solder connections with a magnifying glass, and resolder all suspect
connections, using resin core solder of course. If you don’t know how to
solder, please leave even this step to an expert.

|
|

