CurtPalme.com Home Theater sales, calibration, service, and discussion forum. Hundreds of free manuals & setup tips.


Sign up and receive the latest newsletters by email!     Join the Forum discussions!    
    Site Map  
Home Products
For Sale
Referral
List
Photo
Gallery
Links Contact
Us
CRT Primer
Troubleshooting Tips
Mounting Methods
Definitive CRT
Projector Setup Guide
Tube/Raster Setup
Tube Condition (Wear)
Advanced Procedures
Projector
Specifications
Projector Rankings
Video Processors
Ampro 1500/2000
Ampro 2300/2600
Ampro 3600/4600
Barco (Older Analog)
Barco 70x/Cine7  
Barco 500/800/801
Barco 808/Cine8
Barco 120x/Cine9
Dwin 500/700
Electrohome ECP 
Electrohome Marquee 
Mitsubishi
NEC PG
NEC XG
Runco
Seleco
Sony 10xx
Sony 125x/127x
Sony 1292
Sony D50
Sony G70
Sony G90
Zenith 841/851
Zenith 895/900
Zenith 1200


Panasonic 1083/1085

      >> Introduction 
      >> Layout and Setup Tips 
      >> Manuals / Downloads 


Layout and Setup Tips

 (Page 1)

Page: 1 2 3 4
 

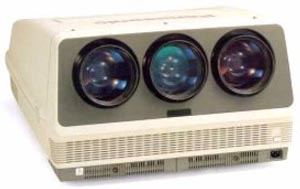
The information below is courtesy of forum member JaniH. Thanks Jani!:

Specification and setup are pretty similar to the Sony 1272/1252. You should be able to manage with a Sony manual if you have set up a CRT before. (Sony manuals are available on the Sony 125x/127x page of this web site).

Basic setup is like every other CRT projector. You have to place it the right distance from the screen. This is a trial and error task. Move the projector closer and farther away from the screen so that you use as much phosphor are as possible but make sure that active image doesn't go over tube edge. Leave about 3/8" of unused phosphor on each side. The manual doesn't help here as it suggests to place the projector farther than optimal and thus use smaller tube area. Focusing lenses is done as in every other CRT projector.

There are 3 sizes of spacers to install between tubes and lenses according to used image size: 60-79", 80-120" or 121-300" (diagonal sizes of a 4:3 screen). If you don't have spacers for your screen size you have to use washers as I don't know where to get these spacers*. I have the medium size spacers (80-120") in my projector. Tubes are toed-in horizontally for the same screen sizes with a couple of screws you see if you open the hood. All this is similar to Sony 125x/127x setup.

Setting geometry and convergence: First press the "test" button on your remote (projector cannot be set without remote). Every adjustment has to be done after you press test button. You should see a test pattern. Now just press the setting you want to adjust (for example Keystone) and then select the color (R, G or B) and do the adjustment using the arrow buttons (up, down, left, right) on your remote.

To reset all adjustments to midpoint (128) without resetting each one manually,  press: Test, Cut-off, 1, 5, 6, 5, Store, Store.  Don't mind about the "key not applicable" errors, just keep pressing the buttons.

*Yener from Germany provided the following information on spacers:

The small Lens spacers (70) have the following dimensions:

Blue Spacer (70):
Left Upper Corner 5.2mm
Left Lower Corner 5.2mm
Right Upper Corner 5.7mm
Right Lower Corner 5.7mm

Green Spacer (70):
All corners 5.2mm

Red Spacers (70):
Left Upper Corner 5.7mm
Left Lower Corner 5.7mm
Right Upper Corner 5.2mm
Right Lower Corner 5.2mm


Next Page ...


© Copyright CurtPalme.com. All Rights Reserved.