|
As this forum is rarely used anymore, we've locked it. Feel free to browse and read. Questions? Please reach out to us directly. Cheers! |

|
 |
|
|
| Author |
Message |
Cinenut
Joined: 06 Feb 2008
Posts: 12
Location: Seattle, WA
|
| Posted: Wed Feb 06, 2008 3:58 am Post subject: HELP! Miserable Barco708 setup & scan noise? Frustrated! |
|
|
Hey all -- newish member of the CRT world, glad to finally sign up here. I've having a VERY discouraging week with my Barco 708s, and I need some advice. I think I wore out my welcome on AVS after my barrage of questions, but I just don't know how to progress. I thought I'd condense my 2 major issues into one topic here and pray that I can get some expert help from you guys. 
1) Geometry problems. I've gotten by with scant skill over the last couple weeks using Iris3, but after getting a bad "line of coincidence", I decided to do a real resetup. After setting everything to midposition, however, my geometry is just way out of whack for a starting point... Pin cushion, odd key stoning, and the tubes are not lined up rotationally.
Here is my situation in photos:


The geometry looks like this on the tube faces as well, which leads me to believe this is a mechanical issue? I don't want to poke around with a screwdriver and makes things worse. I can get the tubes to move left and right, but not up, down, or rotated (yet I fear the patterns would still not line up). I got my chassis open to have a look at the Yokes, but I admit have no idea what to adjust. My stand is level and square to the screen, so this is extremely discouraging. Can someone point me in the right direction?
Here's the original topic where I posed this:
http://www.avsforum.com/avs-vb/showthread.php?t=988970
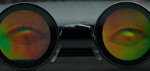
2) NOISE! I'm also getting what I can best describe as light horizontal "scan noise" that travels vertically on my image. It's particularly noticeable on brighter colors, and it happens on all 3 tubes. I tested 2 sources (HTPC via RGBHV and Wii via component), as well as the CRT run- in cycle, and all exhibit this issue. Tried a shorter power cable, different cabling, but no change.... A video I shot below shows it somewhat well. It's not an extreme issue by any means, but it's certainly not desirable, and as far I know, not normal. Please take a look -- and of course, ignore the huge yellow "block scans" the camera picked up. My problem is the more subtle stuff on light colors:
Condensed MOV here (2.4 MB): http://www.mediafire.com/?54yuom9dyy9
Full AVI here (11 MB): http://www.mediafire.com/?a4jmp1yj9xd
The original topic on AVS where I asked this:
http://www.avsforum.com/avs-vb/showthread.php?t=988191
Photo that slightly shows the issue (video is much more revealing):

I simply don't have the money for a pro setup, so this is my only hope at this point. I've enjoyed my Barco for the last month, but the only way I could do that is using Iris3 with a lot of settings at extreme high and low numbers, which as far as I know is well advised against. I don't know how to get a good square starting point, and I'm starting to get very discouraged. Can anyone help diagnose and hopefully get me back on track?
I thoroughly appreciate your advice and input. Thank you!
Cinenut

|
|
| Back to top |
|
 |
Brooklyn

Joined: 17 Sep 2007
Posts: 494
Location: Morgan Hill, CA
|
| Posted: Wed Feb 06, 2008 4:44 am Post subject: |
|
|
You should probably start from scratch and do a complete setup, which means taking off the lenses and maxing the rasters, and then going from there. If it turns out that your current raster size was not optimal, you like likely have to move the projectors distance from the screen.
Start here:
http://www.curtpalme.com/TubeRasterSetup.shtm
Also read this if you haven't already:
http://www.curtpalme.com/Barco701_Layout1.shtm
And this will be helpful to you, although it doesn't have any pictures:
http://www.curtpalme.com/Barco_Setup_Quick_Reference_Guide.shtm
If you can find someone local to help you out, it would be very helpful to you, so you don't mess up the projector or yourself. I figured out projecto setup a lot on my own by just reading information online.
|
|
| Back to top |
|
|
CRT_Ben
Joined: 28 Aug 2006
Posts: 1684
Location: Northern Virginia
|
| Posted: Wed Feb 06, 2008 5:14 am Post subject: Re: HELP! Miserable Barco708 setup & scan noise? Frustra |
|
|
| Cinenut wrote: | | 2) NOISE! I'm also getting what I can best describe as light horizontal "scan noise" that travels vertically on my image. It's particularly noticeable on brighter colors, and it happens on all 3 tubes. I tested 2 sources (HTPC via RGBHV and Wii via component), as well as the CRT run- in cycle, and all exhibit this issue. Tried a shorter power cable, different cabling, but no change.... A video I shot below shows it somewhat well. It's not an extreme issue by any means, but it's certainly not desirable, and as far I know, not normal. Please take a look -- and of course, ignore the huge yellow "block scans" the camera picked up. My problem is the more subtle stuff on light colors: |
Hey man, stick with it.
I tried to watch your video, but I really couldn't see what you're talking about, but then again it was hard for my brain to get past the yellow blocks that the camera picked up due to refresh.
HOWEVER, if what you're talking about are horizontal lines traveling vertically through the picture - I had that problem before I moved, and it's a ground loop showing up in your video. If you've ever had a 60Hz hum in your audio, this is the same thing. My problem looked like horizontal bars moving slowly from the bottom of the picture to the top (as seen on screen). Maybe power filtering of some kind could help??
Good luck,
Ben
|
|
| Back to top |
|
|
Cinenut
Joined: 06 Feb 2008
Posts: 12
Location: Seattle, WA
|
| Posted: Wed Feb 06, 2008 5:58 am Post subject: |
|
|
| Brooklyn wrote: | You should probably start from scratch and do a complete setup, which means taking off the lenses and maxing the rasters, and then going from there. If it turns out that your current raster size was not optimal, you like likely have to move the projectors distance from the screen.
Start here:
http://www.curtpalme.com/TubeRasterSetup.shtm
Also read this if you haven't already:
http://www.curtpalme.com/Barco701_Layout1.shtm
And this will be helpful to you, although it doesn't have any pictures:
http://www.curtpalme.com/Barco_Setup_Quick_Reference_Guide.shtm
If you can find someone local to help you out, it would be very helpful to you, so you don't mess up the projector or yourself. I figured out projecto setup a lot on my own by just reading information online. |
Thanks for the links, I do intend a complete resetup! I've gone through and followed most of those pages already, but some of the advanced stuff is well over my head. I've centered and maxed the rasters a few times with the digital controls during guided installation, but I haven't removed the lenses to do anything mechanical (is that what you mean?) other than Scheimpflug adjustment.
This problem seems beyond simple raster size, considering that when I look directly into the tube faces, all of my genlocked and internal patterns exhibit some "pincushion" effect, and the patterns don't seem equally rotated+level across the 3 tubes.  I don't want to screw with H & V knobs if they can't affect geometry, especially since it looks like the raster is already centered and using max phosphor area. (For instance, why is my blue squished into a diamond shape?) I don't want to screw with H & V knobs if they can't affect geometry, especially since it looks like the raster is already centered and using max phosphor area. (For instance, why is my blue squished into a diamond shape?)
I'm not exactly a technician, and unfortunately I don't know any local CRT'ers who would give me pro bono help. My stand and screen/wall seem very level, even when I move the PJ up and down, so if I could just get mechanical geometry closer, Iris3 can finish the job again... But how do I do that on a digital set like the 708?
| CRT_Ben wrote: | Hey man, stick with it.
I tried to watch your video, but I really couldn't see what you're talking about, but then again it was hard for my brain to get past the yellow blocks that the camera picked up due to refresh.
HOWEVER, if what you're talking about are horizontal lines traveling vertically through the picture - I had that problem before I moved, and it's a ground loop showing up in your video. If you've ever had a 60Hz hum in your audio, this is the same thing. My problem looked like horizontal bars moving slowly from the bottom of the picture to the top (as seen on screen). Maybe power filtering of some kind could help??
Good luck,
Ben |
Hey CRT_Ben, sorry about the low quality video...! I used whatever was inside my Canon A520. A friend of mine has an HDV camcorder, and hopefully I can capture a better shot and post it. The noise is visible in the current video, but I guess the yellow stuff is obscuring it too much...
You make an interesting point about power and grounding. I'll see what I can do, and I intend to stick it out.  What I'm getting is definitely not a slow phenomenon, though... It's some kind of horizontal noise across the entire image, moving vertically (generally top down), and isn't clearly defined -- just sort of crudely "scanning", almost like static. What's weird is that it's slightly reduced when I increase the refresh rate from an HTPC. It's happening on all sources, though, so it's gotta be something fundamental. What kind of filtering do you recommend? What I'm getting is definitely not a slow phenomenon, though... It's some kind of horizontal noise across the entire image, moving vertically (generally top down), and isn't clearly defined -- just sort of crudely "scanning", almost like static. What's weird is that it's slightly reduced when I increase the refresh rate from an HTPC. It's happening on all sources, though, so it's gotta be something fundamental. What kind of filtering do you recommend?
P.S. Another general dumb question, but can someone define what "toe in" is?
|
|
| Back to top |
|
|
AnalogRocks
Forum Moderator
Joined: 08 Mar 2006
Posts: 26706
Location: Toronto, Ontario, Canada
TV/Projector: Sony 1252Q, AMPRO 4000G
|
| Posted: Wed Feb 06, 2008 6:13 am Post subject: |
|
|
| Cinenut wrote: |
P.S. Another general dumb question, but can someone define what "toe in" is?
|
Funny I was just thinking your Blue could use some more toe in. It's like this:
If your lenses are set up with tow out they would look like this \R\ |G| /B/
If you have them toed in they will look like this: /R/ |G| \B\
If you haven't toed the lenses in enough you may run out of adjustment on the controls when you do the set up. The toe is a mechanical adjustment. That's when you swing the lenses side to side. Use the + cross hairs test pattern and leave your controls centered. Then physically move the tubes/lenses ( swing them side to side ) until the reg/green/blue centres are on top of each other. That's the first step to getting a good picture.
Make sure your projector is squared up to the screen first.
Edit: Spelling.
_________________
Tech support for nothing
CRT.
HD done right!
Last edited by AnalogRocks on Thu Feb 07, 2008 6:29 am; edited 1 time in total
|
|
| Back to top |
|
|
Cinenut
Joined: 06 Feb 2008
Posts: 12
Location: Seattle, WA
|
| Posted: Wed Feb 06, 2008 6:34 am Post subject: |
|
|
Hey AnalogRocks, thanks for the info! I actually lined up RGB with the crosshairs at first, but then the genlocked pattern ended up way out of whack, so I swung B back to line up RGB as much as possible, as pictured. I'll realign via crosshairs if that was a mistake, though. (Good to know what toe-in means, anyway.)
While we're on this topic, whenever I do crosshair matchup, my R and B are either above or below G, and just barely "rotated" as well. What is the cause of this? I always center the rasters just before this step, but they never match...!
|
|
| Back to top |
|
|
Brooklyn
Joined: 17 Sep 2007
Posts: 494
Location: Morgan Hill, CA
|
| Posted: Wed Feb 06, 2008 6:38 am Post subject: |
|
|
|
Also, the pincushion and off centered-ness is 100% normal when reseting convergence. The reason I said you should check your rasters is that if you are going to spend a lot of time converging and then using it for awhile, you should make sure that the rasters are maxxed and centered, to promote extended tube life. It is just usually easier to take off the lenses to do it, rather than try to look in the lenses.
|
|
| Back to top |
|
|
AnalogRocks
Forum Moderator
Joined: 08 Mar 2006
Posts: 26706
Location: Toronto, Ontario, Canada
TV/Projector: Sony 1252Q, AMPRO 4000G
|
| Posted: Wed Feb 06, 2008 6:41 am Post subject: |
|
|
I don't know Barco's but there's probably and adjustment to vertically align the cross hairs. It may be on the board and you may have to turn something.
For the rotated pattern you will probably need to rotate the yoke on the tube. You'll need to study up before diving in.
WARNING: do not turn anything untill you understand exactly what you are doing! You can damage the projector or hurt yourself if you poke a screw driver in the wrong place. There are leathal voltages in there.
_________________
Tech support for nothing
CRT.
HD done right!
|
|
| Back to top |
|
|
Cinenut
Joined: 06 Feb 2008
Posts: 12
Location: Seattle, WA
|
| Posted: Wed Feb 06, 2008 7:33 am Post subject: |
|
|
Again, I appreciate the help, guys -- I definitely won't touch any critical parts unless I know exactly what I'm doing. Also, I've made it a habit of maxing my phosphors as much as possible, so I assume I'm OK in that department!
A couple followup questions:
1) If I were to just start converging and adjusting geometry from my current funky starting point again, what would be the drawbacks? I had Iris3 do everything before now, and the pic was fine until I got the line of coincidence. But, if I can get a decent pic with exaggerated settings, could I damage the equipment, or is it more an issue of losing image quality?
2) Brooklyn, you say pincushion and being off-center is normal after a mid position reset -- if that's true, how far are my photos from normal? Sort of an extension of my first question, but could I just forget the advanced stuff and set up as is (and hope to avoid another line of coincidence)? Or, do I need to do some physical work first, like yokes, pots, etc?
Thanks! Cinenut
|
|
| Back to top |
|
|
Cinenut
Joined: 06 Feb 2008
Posts: 12
Location: Seattle, WA
|
| Posted: Wed Feb 06, 2008 10:11 pm Post subject: |
|
|
Could anyone at least tell me exactly how far off the mark I am?  Even if I rotate yokes and adjust toe-in, I'd still have a "diamond" effect on blue, pincushion on all tubes, and some vertical misalignment. Is there a way to adjust these factors mechanically on a 708? Even if I rotate yokes and adjust toe-in, I'd still have a "diamond" effect on blue, pincushion on all tubes, and some vertical misalignment. Is there a way to adjust these factors mechanically on a 708?
|
|
| Back to top |
|
|
whats6x7
Joined: 04 Oct 2006
Posts: 5924
|
| Posted: Thu Feb 07, 2008 5:55 am Post subject: |
|
|
Disclaimer - These are my half-assed opinions about a projector I half-assed setup about a year ago.
You'll need a fairly long driver (9mm I think) to loosen the screws and move the lenses (if you haven't done that already). After you you line it up mechanically, step back a little and look at the lenses. It the Red and Blue don't look like they are towed in at the same angle, your mechanical setup is screwed and you'll fight it forever or overwork the electronics. Make sure that it is Dead center and flush to the screen. I was never brave enough to try to turn the tubes manually.
As long ans the projector is . . .
1. Centered
2. Flush
3. Level
You should be able to line everything else up with the electronics. Start with the green and work your way out.
_________________
it takes a village, but not just any villageand certainly not the village of Corleone on the outskirts of Palermo, Sicily!
|
|
| Back to top |
|
|
Brooklyn
Joined: 17 Sep 2007
Posts: 494
Location: Morgan Hill, CA
|
| Posted: Thu Feb 07, 2008 6:21 am Post subject: |
|
|
You could set it up all electronic now as is if you want, but if you want to do it right, you should start with the mechanicals. Here is where I would start:
Take off the lenses
Use the electronic controls to center and "max" the rasters on each CRT (turn down the brightness/contrast so you arent blinded)
Put the lenses back on
Using the green as the base, mechanical toe blue and red so the vertical crosshairs are as close to aligned as you can get.
CAREFULLY loosen and adjust the yokes so the horizontal cross hairs as aligned as you can get. Make sure you know what you are touching, and that it is safe.
Now if you want, you can adjust the centering magnetics to center the red and blue crosshairs if it is significantly off. (does the 708 have centering magnetics?)
Now you can work on electronic convergence.
I might have forgotten something... you can read over this mechanical setup document if you like. It is for an EM focus Nec, but some of it applies to any projector.
http://www.curtpalme.com/NECPG_MechSetup1.shtm
|
|
| Back to top |
|
|
Cinenut
Joined: 06 Feb 2008
Posts: 12
Location: Seattle, WA
|
| Posted: Fri Feb 08, 2008 6:59 am Post subject: |
|
|
Thanks for your help, guys. I think I've got the toe-in and raster part down, I just need to figure out how to tackle my messed-up starting geometry!
Back to my "scan noise" issue... I posted this at AVS, thought I'd see if you guys have any ideas -- Just tried the projector with everything in my apartment unplugged... no change. I even plugged in a 900-watt space heater on the same block to see if I could influence the scanning, but it doesn't affect it. MAN!
Does anyone have any idea what could be happening? What should I do? This is just a miserable situation. I'm sorry to say I watched a movie on my 32" TV last night because I'm getting fed up with this issue. If anybody has any other suggestions, please advise. I'm not sure if this is a power problem after testing tonight, though I admit I don't know enough about the tech to be sure. This is getting discouraging, to say the least! Why in the world is my Barco doing this?
EDIT 2: Just found a GIF producer and thought I'd see if I could create my OWN animation of this. Success! Here's the most accurate representation of the noise I'm getting, minus the dim image:

Again, it's not quite this bad, but this is the best I can do to describe it... What the heck is it?!
|
|
| Back to top |
|
|
AnalogRocks
Forum Moderator
Joined: 08 Mar 2006
Posts: 26706
Location: Toronto, Ontario, Canada
TV/Projector: Sony 1252Q, AMPRO 4000G
|
| Posted: Fri Feb 08, 2008 5:17 pm Post subject: |
|
|
Is everythig you have connected plugged into the same wall outlet?
I'm also thinking maybe dirty connectors inside the projector somewhere?
_________________
Tech support for nothing
CRT.
HD done right!
|
|
| Back to top |
|
|
Cinenut
Joined: 06 Feb 2008
Posts: 12
Location: Seattle, WA
|
| Posted: Fri Feb 08, 2008 9:23 pm Post subject: |
|
|
| AnalogRocks wrote: | Is everythig you have connected plugged into the same wall outlet?
I'm also thinking maybe dirty connectors inside the projector somewhere? |
Hey AnalogRocks -- I actually unplugged everything in my apartment except the PJ to see if it's a power draw issue, and the noise remained. I even went the other extreme and flipped on a 900W space heater in the same outlet to see if I could affect the image, but no change.
I hope it's just a case of dirty connections! The PJ was a tad dusty inside when I first fired it up. Where do you think I should start checking, and what's the best cleaning method?
|
|
| Back to top |
|
|
AnalogRocks
Forum Moderator
Joined: 08 Mar 2006
Posts: 26706
Location: Toronto, Ontario, Canada
TV/Projector: Sony 1252Q, AMPRO 4000G
|
| Posted: Fri Feb 08, 2008 11:01 pm Post subject: |
|
|
What source are you using to the projector?
The best cleaning method I've read about here is to take the projector's board's out, clean all the contacts with Deoxit (sp?) and replace everything. Making sure to have the power disconnected before doing this. Also get a 1" paint brush to brush off the dust and maybe a can of compressed air. Be careful around IC chips, brushes and fast moving air can cause a static build up and maybe zap them. Although I've never had a problem and I clean my computers that way.
_________________
Tech support for nothing
CRT.
HD done right!
|
|
| Back to top |
|
|
Cinenut
Joined: 06 Feb 2008
Posts: 12
Location: Seattle, WA
|
| Posted: Sat Feb 09, 2008 12:25 am Post subject: |
|
|
So far, I've run HTPC, DVD, and a Wii console through the Barco. The noise shows up on the built-in "run in cycle" with full white, though, so it appears to be an issue further up the ladder. I'll see if I can get my hands on that Deoxit stuff -- I also have a spare parts 708s, so perhaps I could try swapping boards too (though I worry about my skill in this area).
Thanks again for your help. I just found a brand new video chair for $10 at a thrift shop, so I'm dying to get back in action. 
|
|
| Back to top |
|
|
AnalogRocks
Forum Moderator
Joined: 08 Mar 2006
Posts: 26706
Location: Toronto, Ontario, Canada
TV/Projector: Sony 1252Q, AMPRO 4000G
|
| Posted: Mon Feb 11, 2008 7:11 am Post subject: |
|
|
| Cinenut wrote: | I just found a brand new video chair for $10 at a thrift shop, so I'm dying to get back in action.
|
What's a video chair?
_________________
Tech support for nothing
CRT.
HD done right!
|
|
| Back to top |
|
|
tommo2

Joined: 03 Jun 2006
Posts: 226
Location: Ireland
|
| Posted: Mon Feb 11, 2008 8:40 pm Post subject: |
|
|
Hey, my 2 cents.
First, I dont think your tube geometry is bad at mid-position. You mention that tube rotation seems to be off. If you look at the blue tube for example, on your crosshatch pattern:
The bottom-left pattern suggests that the blue tube needs to be rotated clockwise. But the top-right of the pattern would suggest you need to rotate anti-clockwise. Impossible yes?
The same applies for red.
Now, first off, set everything to mid-position, DELETE ALL BLOCKS. This deletes all previously saved settings for specific frequencies. Your projector can "learn " where your screen is if you have set up a couple of different picture sizes or source frequencies, so that when it sees a new signal the projector can "guess" geometry settings. This can be quite close, making setting up all your different signals easier.
Next, make sure your raster is maxed out ( but not too much) and is centered.
Then connect a signal you will be using (resolution, frequency etc).
Center your tubes using the crosshairs. Dont worry too much about vertical alignment.
I know what you are talking about when you say that when you go to genlocked pattern they are out of alignment. So, swing the tube to get them aligned again and dont worry about it.
The pin-cushion and keystone effects are normal. Just use the controls to get your green picture perfect, and then use convergence to get the rest right. The pic will look fab if you do the setup propery. And by the way, dont use the IRIS, it sucks.
Just another tip, once you have it all setup, go back and adjust keystone/bow/size linearity/ and H and V sizes again.
Each adjustment you make to each of these settings affects each other. So doing it a couple of times will make it absolutely perfect.
Hope this all helps, I went through a lot to set up my barco data 701s, and learned a lot along the way. The guys here are cool, so you wont run out of welcome here with your questions.
_________________
pull up the handbrake and walk away
Barco Data 701s
iScan HD scaler with sdi mod
Oppo 981HD with sdi mod
Xbox 360
Playstation 2
Denon AVR 1507 7.1 AV receiver
Wharfedale Diamond 9.4 floorstanders (front)
Wharfedale EVO2 (center)
Pioneer 100W (sides)
Wharfedale Diamond 9.1 (rear)
Wharfedale SW150 active subwoofer
Photos on the way!
|
|
| Back to top |
|
|
royuk
Joined: 28 Dec 2007
Posts: 41
|
| Posted: Sat Feb 23, 2008 2:19 am Post subject: |
|
|
Hi cinenut,
I too only recently got a barco 1209s.
Had to set it up myself and have had a few problems as a result.
Only getting to the bottom of the problems now after 2 months.
It is difficult but you don't be long learning and the info posted, especially on curt's site is priceless as well as the input from the many members. I've had great help all round and from the top guys too.
If you haven't all ready go to the set-up tips and manuals and look in the Advanced procedures, under the General section. Here you will see the yoke adjustment heading where you will find detailed info on how to rotate them. Of course you need to manually toe in the red and blue first so they are aligned on top of the green cross hair. (This only allows left to right (horizontal) movement). If you find either colour cross hair is not level with the green then do the yoke adjustment to make them square (ie. clockwise or anti-clockwise). Next you may find the cross hairs are square and the vertical line is spot on but either colour horizontal line is above or below the green one. Well then it's on to the vertical deflection board where the small blue pots (colour coded red/blue and H or V shift named). With small rotation of this (clockwise/anticlockwise) tiny screw head, on the appropriate blue pot the horizontal line will move up or down (in the vertical plane). This should allow perfect convergence of each colour in the set-up stage of the pj.
And if you go to cinemasource.com there is an old sony crt set-up guide which applies to pj crt in general, which shows in basic illustrated form the order of set-up (convergence). I found it helpfull!
See the barco 800's specific hints and tips projector parts and layout to see pics of the boards in question (vertical deflection with pots etc)
Note: take extreme caution when doing any of this. Lethal voltages and damage to you or the pj!
Also have all tools handy and know for sure what you are doing so you only have the access covers open for as little time as possible to avoid overheating of any parts.
In my case when closing the hatch the many small yellow wires got caught in the hinge and one was damaged which shorted the smps. Caused the pj to shut down and blew a fuse. I was lucky but it cost me a few weeks with no pj and lots of posts to find the problem!!
I read up on curt's site with pics and many posts before attempting the above but i managed it.
Remember to warm up the pj first and when you go into the convergence grids after pj set-up (above) things still won't be perfect but i found having only to do minor adjustments to some areas.
I'm only a newbie myself so the above is only my own experience. You may not need to be so exact at this stage and indeed i couldn't get the red perfect however the blue was!
|
|
| Back to top |
|
|
|
|
|
|
|
You cannot post new topics in this forum
You cannot reply to topics in this forum
You cannot edit your posts in this forum
You cannot delete your posts in this forum
You cannot vote in polls in this forum
You cannot attach files in this forum
You can download files in this forum
|
Forum powered by phpBB © phpBB Group
|
|


