| Author |
Message |
lyd
Joined: 15 Sep 2007
Posts: 390
Location: Lake Mills, Wi
|
| Posted: Mon Nov 26, 2007 11:55 pm Post subject: Getting ready to put my hand in the scary place... |
|
|
I was working on final positioning of the 8500 last night, and with the crosshatch screen up, after centering the raster by looking through the lenses, was trying to align on the screen. When I finished leveling the horizontal lines in relation to the screen I stood back and was shocked to see that the projector itself was not level at all. It is off by about an inch over its width. Double-checked the level of the screen -- right on the bubble. Everything in geometry is set at 50.
So it looks like I need to adjust the yoke that controls tilt. About all I know of this is from the otherwise pretty comprehensive Bill Blue document, which has this to say about it:
"9. Adjust Tilt. On the crosshatch display, check the center horizontal line for each color. They should be perfectly horizontal to each other and the screen. If not adjust the forward-most yoke on each tube to achieve perfect level. (mechanical details omitted for now)"
Do I just rotate it until things are level?
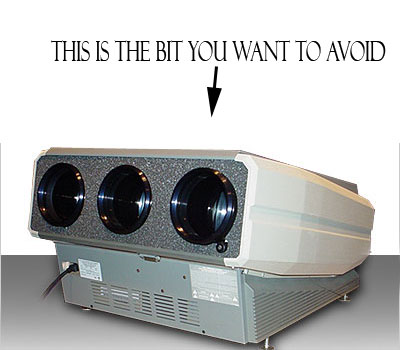
As long as I have to go in there, it seems that I might as well follow the rest of that document and do the complete magnetic setup, but I am a bit concerned about ignorance killing me. I have worked with other high-voltage equipment before, and can certainly operate with the proper care and respect, but it would be nice to know a little more about this specific equipment (the 8500) or at least the general class (CRT projectors) going in. I have never seen any really good "these are the bits you really want to avoid" type annotated images, which would be really nice about now. Any such things out there?
Thanks.
lyd
|
|
| Back to top |
|
 |
perisoft

Joined: 29 Aug 2007
Posts: 2920
Location: Ithaca, NY
|
| Posted: Tue Nov 27, 2007 12:05 am Post subject: |
|
|
_________________

|
|
| Back to top |
|
|
lyd
Joined: 15 Sep 2007
Posts: 390
Location: Lake Mills, Wi
|
| Posted: Tue Nov 27, 2007 12:06 am Post subject: |
|
|
ROFL 
|
|
| Back to top |
|
|
papalek

Joined: 08 Mar 2006
Posts: 1536
Location: Longs SC
|
| Posted: Tue Nov 27, 2007 12:20 am Post subject: |
|
|
ANY bare wires. 
_________________
My current list of PJ's AmPro 1 1/2-4600,4200, 1/2-3600,2600.
I do love my AmPro's
|
|
| Back to top |
|
|
garyfritz

Joined: 08 Apr 2006
Posts: 12088
Location: Fort Collins, CO
|
| Posted: Tue Nov 27, 2007 12:33 am Post subject: |
|
|
First do the mechanical setup right, and that includes getting the projector level.
Once you do that, one of the things you can do is to level the yokes. With the projector OFF for a while (let the HV bleed off), check the deflection yokes up against the bells of the tubes. See if you can move them. Sometimes they're hot-glued in place. Get rid of any glue and get them so you can rotate them. Notice the bundle of wires coming off that coil. This is what you'll grab to adjust the yoke when the projector is running. Grab ONLY where it's insulated!! *DON'T* touch any of the bare-metal bits when the PJ is on.
Once you can move the yokes, turn on the PJ, center all the geometry controls, and project a horizontal line. Compare it to a known-level reference line from a laser level, or a leveled black thread, or something similar. Grasp the bundle of wires and carefully rotate the yoke to get the horizontal line level. Do that on all 3 tubes. (Once you're done you can glop on a bit of silicone RTV if you want, to hold them in place, but they're not likely to move.)
And don't forget all the rest of the mech/etc setup...
|
|
| Back to top |
|
|
tony359

Joined: 04 Aug 2006
Posts: 378
|
| Posted: Tue Nov 27, 2007 1:08 am Post subject: |
|
|
about scary place of 8500... on a 8000, I'd like to adjust the focus coil to center rasters. I should unscrew the screws on the coils. But I need a wrench (is it the correct name?) to unscrew them. But that is not exactly the place where I'd like to put a piece of metal while the projector is on...
What do you suggest?
Ciao
A
|
|
| Back to top |
|
|
Tim in Phoenix

Joined: 21 Oct 2006
Posts: 4409
Location: Phoenix
|
| Posted: Tue Nov 27, 2007 1:57 am Post subject: |
|
|
Hello
Have a read here first; you can ruin a yoke if not very careful, those are usually glued into place.
http://www.etechvideo.com/techtip9.htm
.
|
|
| Back to top |
|
|
Zebu Fellenz
Joined: 21 Dec 2006
Posts: 2567
|
| Posted: Tue Nov 27, 2007 1:58 am Post subject: |
|
|
Tony,
What kind of heads do the screws have, you may just need some insulated screwdrivers.

Erik
|
|
| Back to top |
|
|
draganm

Joined: 08 Mar 2006
Posts: 8990
Location: Colorado
|
| Posted: Tue Nov 27, 2007 4:40 am Post subject: |
|
|
| garyfritz wrote: | Notice the bundle of wires coming off that coil. This is what you'll grab to adjust the yoke when the projector is running. Grab ONLY where it's insulated!! *DON'T* touch any of the bare-metal bits when the PJ is on.
Once you can move the yokes, turn on the PJ, center all the geometry controls, and project a horizontal line. Compare it to a known-level reference line from a laser level, or a leveled black thread, or something similar. Grasp the bundle of wires and carefully rotate the yoke to get the horizontal line level. |
i'm not really sure who started this thing about grabbing the yoke wires and pulling on them but pulling on wires is not a good idea, they're only held on by a little blob of solder. To rotate the the front sweep yoke, simply grab the cast iron bell on the outside and don;t touch the windings. It's not as scary as it looks, I have done this dozens of times in many dark home theatres working overhead on the ceiling and never been shocked. The only real danger is with a machine that has a high voltage leak. if that's the case then insualted screwdrivers, gloves, or even rubber underwear won't save you. 
Tony on the old 8000's the focus yoke is clamped with crappy little brass screws, I think they're 7mm? you want to replace those with brass wing nuts like the ones on an 8500. much easier to work with.
|
|
| Back to top |
|
|
perisoft
Joined: 29 Aug 2007
Posts: 2920
Location: Ithaca, NY
|
| Posted: Tue Nov 27, 2007 4:49 am Post subject: |
|
|
Didn't films make Lord Of The Rings?
_________________
|
|
| Back to top |
|
|
Tom.W

Joined: 09 Mar 2006
Posts: 6635
|
|
| Back to top |
|
|
garyfritz
Joined: 08 Apr 2006
Posts: 12088
Location: Fort Collins, CO
|
| Posted: Tue Nov 27, 2007 5:06 am Post subject: |
|
|
| draganm wrote: | | i'm not really sure who started this thing about grabbing the yoke wires and pulling on them but pulling on wires is not a good idea, they're only held on by a little blob of solder. To rotate the the front sweep yoke, simply grab the cast iron bell on the outside and don;t touch the windings. |
I don't remember for sure, but I think it was Curt who told me to do that! I like using the wires because it keeps my fingers far away from anything I don't want to be touching. 4 heavy-duty solder joints should provide more than enough strength for minor tugs.
Cast iron!? Is that what that thing is?? I'm sure you could use that if you were really careful, but it does get your fingers a lot closer to the windings.
|
|
| Back to top |
|
|
Tom.W
Joined: 09 Mar 2006
Posts: 6635
|
|
| Back to top |
|
|
tony359
Joined: 04 Aug 2006
Posts: 378
|
| Posted: Tue Nov 27, 2007 6:01 am Post subject: |
|
|
perisoft
It makes sense, thanks!!
Antonio
|
|
| Back to top |
|
|
AnalogRocks
Forum Moderator
Joined: 08 Mar 2006
Posts: 26706
Location: Toronto, Ontario, Canada
TV/Projector: Sony 1252Q, AMPRO 4000G
|
| Posted: Tue Nov 27, 2007 6:09 am Post subject: |
|
|
| lyd wrote: |
Getting ready to put my hand in the scary place...
|
It's ok, that's called getting to 3rd base with the projector. Just make sure you use protection, laytex gloves work well, or use the 40KV one's in Tom's link above for your pleasure. Go slow and gentel
_________________
Tech support for nothing
CRT.
HD done right!
|
|
| Back to top |
|
|
lyd
Joined: 15 Sep 2007
Posts: 390
Location: Lake Mills, Wi
|
| Posted: Tue Nov 27, 2007 11:01 am Post subject: |
|
|
I appreciate all the advice. Those insulating gloves looked interesting, until I saw that the best prices on class 4 gloves are well over $200 USD, and that they are designed to be used under heavy leather over-gloves. I'm not sure you could even fit all that bulk into the space required, but even if you could it would seem to guarantee that you were contacting both hot and grounded bits when you did it.
Tonight I'll take a look and try to determine how much is glued down. The previous owner told me that he never touched the scan yoke, and I guess what the owner before that did is unknown.
Is there any possibility for the tubes themselves to be off square relative to the frame? Looking into the lens with the crosshatch up, it appears that the raster may be very slightly rotated relative to the tube, but it seems like a small amount. I'm not sure if that accounts for the amount of tilt I wound up with when I tried to level the horizontal on screen by angling the whole projector.
While we're on the subject of level and square, what is the best place on the projector body to place a level when adjusting the mounting position? The "bottom" of the case, which is the top now that it is inverted, is the easiest to see while adjusting the bolts on the threaded rod, but I don't know how close to the actual plane of the tubes I can count on that being. On the other side, I can get a short torpedo level on the part of the frame with the screws that secure the cover, or I could also use my fingers to hold a longer level aligned with the tops of the lens barrels. What works best?
lyd
|
|
| Back to top |
|
|
draganm
Joined: 08 Mar 2006
Posts: 8990
Location: Colorado
|
| Posted: Tue Nov 27, 2007 4:35 pm Post subject: |
|
|
| garyfritz wrote: | | Cast iron!? Is that what that thing is?? I'm sure you could use that if you were really careful, but it does get your fingers a lot closer to the windings. |
I meant Iron Ferrite magnetic core, most likely a ferrite ceramic since this is a high frequency application
http://en.wikipedia.org/wiki/Magnetic_core
|
|
| Back to top |
|
|
JustGreg

Joined: 07 Mar 2006
Posts: 3098
Location: Kenosha, WI
|
| Posted: Tue Nov 27, 2007 6:59 pm Post subject: |
|
|
I pull gently on the wire harness myself but only because I spent a LOT of time nitpicking at the hot glue to remove it all. (except what's melded into the windings of course). They turn very easily now. After I got them where I wanted them I put one single blob of hot glue in the center.
VDC went nuts with the glue IMO. Way more than is required. Worse is they oozed it into the windings and drizzled it all over God's green acre. It's not like these things were whizzing by on a fast moving conveyor belt and there wasn't time to be more precise. I love the machine tho so I forgive them that one little thing.
_________________
Greg
"Is it ignorance or apathy? Hey, I don't know and I don't care!" --Jimmy Buffett
|
|
| Back to top |
|
|
lyd
Joined: 15 Sep 2007
Posts: 390
Location: Lake Mills, Wi
|
| Posted: Wed Nov 28, 2007 12:42 am Post subject: |
|
|
Well, there is definitely hot glue all over everything. My first thought was that nothing had ever been touched, but then I noticed that there seems to be more than one sort of glue, and I am not sure if that is normal. Everything is currently glued down one way or another, though. Here's the blue:

  
I have had this thing powered off for nearly 24 hrs now, is it safe to really get in there and pick away at that glue, or is there some capacitance somewhere that still needs to be discharged?
Any other thoughts? (Including the possibility that I might be better off leaving this alone and adjusting the tilt electronically for now?)
lyd
|
|
| Back to top |
|
|
cmjohnson

Joined: 03 Apr 2006
Posts: 5180
Location: Buried under G90s
|
| Posted: Wed Nov 28, 2007 1:07 am Post subject: |
|
|
The grey silicone on the CPC magnets isn't any concern to you at THIS moment, but you will want to remove that silicone as the final setup SHOULD include adjustments to the CPC magnets.
The Marquee bleeds down all voltages to safe levels in LESS than a minute if everything is working normally.
For additional safety, get some GE Silicone II and cover the exposed pins on the deflection yoke with it. Be sure to get a pretty deep
layer over the pins. I'd want an eighth of an inch or more. You might even go so far as to silicone a plastic protective cap over those pins.
If you DO touch a live (high voltage) HDM pin, it will NOT shock you. No, instead it'll give you an instant deep burn. Just like being
poked with a hot soldering iron with a sharp tip. Burns like a mother. You'll smell burning skin and feel like you REALLY shouldn't have done that.
Up to 1500 volts at low RF frequencies is very different from being nailed by DC or AC house current!
CJ
|
|
| Back to top |
|
|
|
|


