| Author |
Message |
lyd
Joined: 15 Sep 2007
Posts: 390
Location: Lake Mills, Wi
|
| Posted: Mon Oct 22, 2007 2:42 am Post subject: More mounting questions: squaring up |
|
|
I could use some suggestions on ways to extend a line perpendicular to the plane of my screen, in order to then square off that to get a line parallel to my screen at the mounting distance.
I don't really trust measurements off the walls in this old building.
I have found a few ways to potentially do it, all of which are a bit arduous and none of which seem extremely accurate. I very nearly bought a $200 3-axis laser level today, but came to my senses at the last moment. There has got to be a more reasonable approach.
I don't mind shimming my screen square with the projector after mounting, for very fine tuning, but I would like to get as close as possible when I bolt up the unistrut.
What did you guys do?
lyd
|
|
| Back to top |
|
 |
jask

Joined: 17 Mar 2006
Posts: 10187
Location: kamloops BC
|
| Posted: Mon Oct 22, 2007 2:56 am Post subject: |
|
|
|
quick and dirty... center tube to center of screen at planned distance, then use a 3/4/5 triangle to get your perpendicular..confirm and fine tune with measurements from outer top corner of screen to outer side center of each outer tube. drop a plumb line to ensure screen is vertical and you should be good.
|
|
| Back to top |
|
|
Heywood Jablome

Joined: 12 Mar 2006
Posts: 1548
|
| Posted: Mon Oct 22, 2007 12:04 pm Post subject: |
|
|
There's the crossing strings method...
(I can't upload locally, somethings wrong with the forum server, sorry for the big jpg.)

_________________
"Those countries which lag behind in industry, in the application of mechanics and technical chemistry, in the careful selection and utilization of natural products, where the respect for such activities does not permeate all classes of society, will unfailingly decline in prosperity. They will sink faster when neighbor states, with an energetic exchange between science and industry, go forward with renewed vitality."
-- Baron Alexander von Humboldt: 1769-1859
|
|
| Back to top |
|
|
garyfritz

Joined: 08 Apr 2006
Posts: 12088
Location: Fort Collins, CO
|
| Posted: Mon Oct 22, 2007 12:40 pm Post subject: |
|
|
I never cared for the crossed-wire method -- too much of a PITA to set up, and too easy to screw up. None of the other methods tripped my trigger either.
So I invented my favorite method:
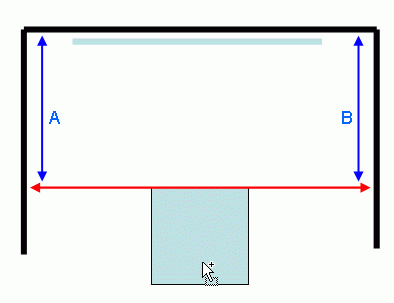
1. Sight along something on the pj that you know to be "straight" to the projector, e.g. mounting feet, or the case on square-bodied projectors like the Marquees. (red line in the pic below) A laser pointer works real well for this but you can just eyeball it.
2. Mark the points on the wall where the sightline falls.
3. Measure the screenwall-to-sightline distances (the blue lines).
4. Distance A and distance B should be equal, assuming your room is anything close to square.
This method is extremely sensitive and accurate. You can easily detect alignment errors of much less than a degree. If A and B are equal, your projector is dead-exact perpendicular to the screen wall.
Now what? Perfectly center your rasters (which is where you want them to run) and project a centered pattern like a crosshair. The point where the crosshair projects onto your screen is the proper center point of your projected image. Either move your screen so the screen's center is on that point, or move the projector the appropriate distance and re-do the alignment process.
Voila. You have a perfectly perpendicular projector, exactly centered on the screen, with perfectly centered rasters.
| Description: |
|
| Filesize: |
4.93 KB |
| Viewed: |
8995 Time(s) |
|
|
|
| Back to top |
|
|
lyd
Joined: 15 Sep 2007
Posts: 390
Location: Lake Mills, Wi
|
| Posted: Tue Oct 23, 2007 10:37 pm Post subject: |
|
|
perfectly perpendicular projector
If you can say it 10 times fast, it ought to just magically happen.
Thanks a lot to all for the suggestions. Some ideas I wasn't aware of there.
lyd
|
|
| Back to top |
|
|
Phil Smith
Joined: 08 Mar 2006
Posts: 7717
|
| Posted: Tue Oct 23, 2007 11:23 pm Post subject: |
|
|
|
I'm sure everyone gets tired of me saying this, but I think just get it close and don't worry about it. 1/4" off this or that way is not going to make a detectable difference in the picture. Blue and green are going to be way off perpendicular and square no matter how perfect you get green. Green is the only tube that will be remotely close to perfect, and it will still be pointing downward 10-12 degrees. Everyone is pretty impressed with Cliffy's side by side stack, which has both PJs mounted completely to the side of the centerline. You can eyeball your PJ and get it 95% closer to center than Cliffy's PJ's are.
|
|
| Back to top |
|
|
lyd
Joined: 15 Sep 2007
Posts: 390
Location: Lake Mills, Wi
|
| Posted: Tue Oct 23, 2007 11:38 pm Post subject: |
|
|
| Phil Smith wrote: | | I'm sure everyone gets tired of me saying this, but I think just get it close and don't worry about it. 1/4" off this or that way is not going to make a detectable difference in the picture. Blue and green are going to be way off perpendicular and square no matter how perfect you get green. Green is the only tube that will be remotely close to perfect, and it will still be pointing downward 10-12 degrees. Everyone is pretty impressed with Cliffy's side by side stack, which has both PJs mounted completely to the side of the centerline. You can eyeball your PJ and get it 95% closer to center than Cliffy's PJ's are. |
I can appreciate that, but I guess this is really more of an aesthetic concern for me. I want to have the screen prefectly centered on the wall and and, since I will have no pan adjustment with a unistrut mount, the better a job I do of mounting that strut perpendicular to the back wall the closer to center I will be able to keep the screen. I am leaving myself a lot of extra strut to dolly and truck the projector, but then that will be off center in the room if I get it too wrong, so I'd just as soon be as exacting as I can initially.
lyd
|
|
| Back to top |
|
|
garyfritz
Joined: 08 Apr 2006
Posts: 12088
Location: Fort Collins, CO
|
| Posted: Tue Oct 23, 2007 11:41 pm Post subject: |
|
|
|
Not everybody has a G90. I know my 8500 was a lot happier (held convergence much better, etc) when I got the mech setup right.
|
|
| Back to top |
|
|
Phil Smith
Joined: 08 Mar 2006
Posts: 7717
|
| Posted: Wed Oct 24, 2007 12:14 am Post subject: |
|
|
|
Oh come on Gary, if small increments of alignment made a difference on holding convergence, blue and red would never hold on any PJ, as they both have LOTS of angle to compensate for even in the best of circumstances.
|
|
| Back to top |
|
|
paw

Joined: 08 Mar 2006
Posts: 1176
Location: Arvada, CO
|
|
| Back to top |
|
|
garyfritz
Joined: 08 Apr 2006
Posts: 12088
Location: Fort Collins, CO
|
| Posted: Wed Oct 24, 2007 10:04 am Post subject: |
|
|
Phil, the differences I saw resulted from centering the raster. Admittedly my situation was a bit extreme, as I had to run the raster very low on the tubes until I re-mounted the pj. But just about any pj will be happier with an accurate mech setup than if you demand the electronics correct for your skewed mount. If you also get rid of unnecessary keystoning/etc, you can only help your stability.
Will most projectors hold their convergence OK with a non-perfect setup? Probably. But a perfect setup would be better.
|
|
| Back to top |
|
|
PJMoore
Joined: 05 Oct 2006
Posts: 99
|
| Posted: Sat Oct 18, 2008 4:11 pm Post subject: |
|
|
A variation on Gary's method - if you do not have convenient walls.
Get a length of anything straight and rigid - I like aluminum shower curtain rod. Mark the center of the rod's length. Place the rod on the projector with duct tape so it extends equally to the right and left of center of the projector. I already had marks on the right and left screen center, so I measure from the extreme right of screen center to the right tip of the curtain rod. Now measure the left. They should match. Double check the centerline of the projector is aimed at the centerline of the screen with a lazer pointer.
This way you are not relying on the walls, which have a nasty habit of not being convenient is some instances.
In the long run, the effect on picture quality due to small variations in "squareness" is inconsequential compared to errors in focus, contrast, brightness, white balance, and source quality so don't get all bogged down in this part. Get it reasonably close and move on.
One note, however. On ceiling mounting, make sure the throw distance is such that you have a bit of give and take left on raster size so you can fill the screen. It really reeks to be almost in the right position and realize the projector should have been just a wee bit farther back than you thought. That is why I always start out maximizing and centering the raster on all three guns first, and then set up the projector on the floor, square it up, and fire an image at the screen wall. I check to make sure the width of the projected raster is a few inches larger than the screen. I then plumb bob a reference point on the ceiling down to the projector and use this reference point to position the ceiling mount.
I've never had to move one using this method.
|
|
| Back to top |
|
|
|
|


