| Author |
Message |
Untuned
Joined: 03 Dec 2011
Posts: 93
Location: Pooler, GA
|
| Posted: Sat Jan 14, 2012 1:40 pm Post subject: Setup help for Newbie - Throw distance |
|
|
|
I'm going through the process of setting up my Runco-933. According to the setup manual for the NEC 6PG Xtra, the throw distance for a screen 80" wide should be 116". However, in order for me to fit the width of my projected image on the screen, the pj is something like 86" away! What gives? Is my raster too big? What am I missing? Also, is it normal not to be able to focus the blue as sharply as the green or red?
|
|
| Back to top |
|
 |
Nashou66

Joined: 12 Jan 2007
Posts: 16171
Location: West Seneca NY
|
| Posted: Sat Jan 14, 2012 1:53 pm Post subject: |
|
|
Throw the throw distance calculator out the window and do the hands on way ! 
First maximize the raster on the Tube face leaving about 4-5 mm to the edge of the tube.
Once you have that done position your PJ in a floor mount position for now if you plan on celling mounting it.
Put up an grid pattern from the source you plan on using( EX blu ray player) and then move the PJ to a position where it
fills the screen .
Then you will have your position. If ceiling mounting transfer the measurements of the mounting holes to ceiling and that is where you will mount it.
But do geometry and centering of the patterns on the floor position.
There are some good guides, one is Guy Kuo's focus guide. I'll look for the link and post it here.
Blue should be a little de focused anyhow to get greyscale right .
Nashou
_________________
Don't blame your underwear for your crooked ass~ unknown Greek philosopher
"Republicans believe every day is the Fourth of July, but the Democrats believe every day is April 15." --- President Reagan
One Smart Dog!!!
Marquee High Performance Bellows now shipping!!
Marquee Modifications and Performance Enhancement
Marquee C-element and Bellow removal
|
|
| Back to top |
|
|
CasetheCorvetteman

Joined: 09 Nov 2008
Posts: 6326
Location: Australia
|
| Posted: Sat Jan 14, 2012 2:05 pm Post subject: |
|
|
Youll probably want to leave abit more than 4 or 5 mm on an NEC... Id be going more like 7-10mm...
See what Macgyver and Curt say before you go that close, just to be sure...
|
|
| Back to top |
|
|
kal
Forum Administrator
Joined: 06 Mar 2006
Posts: 18114
Location: Ottawa, Canada
TV/Projector: JVC DLA-NZ7
|
|
| Back to top |
|
|
Untuned
Joined: 03 Dec 2011
Posts: 93
Location: Pooler, GA
|
| Posted: Sat Jan 14, 2012 3:16 pm Post subject: |
|
|
Wow, thanks for all the replies! I do intend to do a ceiling mount, but I'm doing the initial setup from the floor. I've read "Definitive CRT Projector Setup Guide", the article "CRT Projector Focus & Mechanical Aim" by Guy Kuo, and to keep confusion to a minimum, I've been following the "NEC PG Series Mechanical Setup Procedure". But really, 86" throw distance for an 80" wide image? That really buggers my intended ceiling mount in the family room...
After putting all the settings to zero, I thought the raster was pretty well centered. I thought it was wide, so I tried the amplitude setting to decrease it's width, but the change was so little, I put it back to neutral.
|
|
| Back to top |
|
|
Nashou66
Joined: 12 Jan 2007
Posts: 16171
Location: West Seneca NY
|
|
| Back to top |
|
|
kal
Forum Administrator
Joined: 06 Mar 2006
Posts: 18114
Location: Ottawa, Canada
TV/Projector: JVC DLA-NZ7
|
|
| Back to top |
|
|
Untuned
Joined: 03 Dec 2011
Posts: 93
Location: Pooler, GA
|
| Posted: Sat Jan 14, 2012 7:56 pm Post subject: |
|
|
|
Thanks Kal. I want to install it correctly, but the throw distance is quite off what the manual states. My raster is centered and it does not go off the tube face. Maybe once the convergence is done, the image will not be distorted and I'll be able to adjust the final distance. Any tricks for the astig adjustments???
|
|
| Back to top |
|
|
Curt Palme
CRT Tech
Joined: 08 Mar 2006
Posts: 24396
Location: Langley, BC
TV/Projector: All of them!
|
| Posted: Sat Jan 14, 2012 8:01 pm Post subject: |
|
|
| Untuned wrote: | | But really, 86" throw distance for an 80" wide image? . |
That sounds completely off unless you have some weird lenses on the set. The 'standard' accepted throw distance for most CRT proijectors is roughly 1.4 X the width of the screen, so for an 80" wide screen, it's 112". I don't know how you can get the test pattern or image to fill the screen properly at 86". That simply doesn't make sense.
What lenses are on the set HD 144? 145?
|
|
| Back to top |
|
|
Nashou66
Joined: 12 Jan 2007
Posts: 16171
Location: West Seneca NY
|
| Posted: Sat Jan 14, 2012 8:06 pm Post subject: |
|
|
| Untuned wrote: | | Thanks Kal. I want to install it correctly, but the throw distance is quite off what the manual states. My raster is centered and it does not go off the tube face. Maybe once the convergence is done, the image will not be distorted and I'll be able to adjust the final distance. Any tricks for the astig adjustments??? |
Yeah throw distance in the manuals usually use a very conservative sized raster that most of us would never use on our PJ's.
A larger raster will give you brighter picture help with vertical resolution.
For the astigmatism adjustment i would just practice, practice and practice....then when your done practice again!!
it took me a few days with at least two 3 hour sessions for each tube. Id practice on just one tube till you understand how its done. Once you master Astig it takes jut a few minutes for each tube. But the marquee has the added focus coil adjustment
so it takes longer.
If you get frustrated, stop have a beer and go back to it later.
Athanasios
_________________
Don't blame your underwear for your crooked ass~ unknown Greek philosopher
"Republicans believe every day is the Fourth of July, but the Democrats believe every day is April 15." --- President Reagan
One Smart Dog!!!
Marquee High Performance Bellows now shipping!!
Marquee Modifications and Performance Enhancement
Marquee C-element and Bellow removal
|
|
| Back to top |
|
|
Untuned
Joined: 03 Dec 2011
Posts: 93
Location: Pooler, GA
|
| Posted: Sat Jan 14, 2012 10:38 pm Post subject: |
|
|
| Curt Palme wrote: | | Untuned wrote: | | But really, 86" throw distance for an 80" wide image? . |
That sounds completely off unless you have some weird lenses on the set. The 'standard' accepted throw distance for most CRT proijectors is roughly 1.4 X the width of the screen, so for an 80" wide screen, it's 112". I don't know how you can get the test pattern or image to fill the screen properly at 86". That simply doesn't make sense.
What lenses are on the set HD 144? 145? |
Curt,
How do I know what lenses are on it? Is it written somewhere?
|
|
| Back to top |
|
|
kal
Forum Administrator
Joined: 06 Mar 2006
Posts: 18114
Location: Ottawa, Canada
TV/Projector: JVC DLA-NZ7
|
|
| Back to top |
|
|
Untuned
Joined: 03 Dec 2011
Posts: 93
Location: Pooler, GA
|
| Posted: Tue Jan 17, 2012 5:47 pm Post subject: |
|
|
I think I spoke too soon on the throw distance. Since the geometry has not been corrected yet with blue being wide on it's opposite side, ditto for red, I thought things were way out of wack. Once I correct geometry, then I think the throw distance will make more sense.
I was reading the Guy Kuo document on mechanical set up, and he talks about Scheimpflug: is that what the lens rings are for? Do I need to do anything else for that?
Also, is there a simple and accurate way to square up the pj to the screen? It is not as simple as I thought it would be and obviously affects my adjustments. How far do I go setting up on the floor before I hang it on the ceiling in final position? The document on astig adjust was helpful for understanding which rings did what; I just have to do it now...
|
|
| Back to top |
|
|
Curt Palme
CRT Tech
Joined: 08 Mar 2006
Posts: 24396
Location: Langley, BC
TV/Projector: All of them!
|
| Posted: Tue Jan 17, 2012 6:05 pm Post subject: |
|
|
The lens types are on a sticker under the top cover. Should be HD-145s.
You really need to start on page 1 of the manual. It sounds like you're jumping around, and are jumping to conclusions. Guaranteed that will result in a mess. (no offense). Start on page 1 of the manual, and work through it. If you get stuck, then post as you go along. The manual covers the lens rings, and everything you need to know, and it's written in the order that you need to do it. If you jump around, you'll miss a crucial step, and you'll end up frustrated.
|
|
| Back to top |
|
|
Untuned
Joined: 03 Dec 2011
Posts: 93
Location: Pooler, GA
|
| Posted: Wed Jan 18, 2012 5:19 pm Post subject: |
|
|
Ok Curt, no offense taken. I did start at the beginning of "Mechanical Setup Procedure" for the Nec PG series, but I also read "The definitive CRT projector setup guide" and "Focus and Mechanical aim basics" (Guy Kuo write-up). It was Mr Kuo's discussion on Scheimpflug that caught my attention since it did not appear to be emphasized in the procedure I was following. I did not realize that was what the rings were for. Anyway, I started at page 1, and I got stuck at the astigmat part, and that's where I'm at still.
About optical focus: I understand that the blue should be slightly out of focus, for reasons I do not full understand, but Mr Kuo says that blue optical focus should be accurate, it's the electronic focus that should be a little out. Notwithstanding, with the cross-hair pattern, I cannot get the blue line as sharp as the green or red: the line always stays fatter and looks slightly fuzzy. Is that normal?
|
|
| Back to top |
|
|
Curt Palme
CRT Tech
Joined: 08 Mar 2006
Posts: 24396
Location: Langley, BC
TV/Projector: All of them!
|
| Posted: Wed Jan 18, 2012 5:30 pm Post subject: |
|
|
|
What he means is that optically, the blue tube is no different than the R and G. Same lenses, etc. So optically your focusing ability should be the same, but the blue will appear to be a bit less focused due to the phosphor and nature of the blue tube itself. If you can't see a halo sticking out of the edges of the R and G image, caused by the blue tube, I think you're fine.
|
|
| Back to top |
|
|
draganm
Joined: 08 Mar 2006
Posts: 8990
Location: Colorado
|
| Posted: Wed Jan 18, 2012 5:43 pm Post subject: |
|
|
| CasetheCorvetteman wrote: | Youll probably want to leave abit more than 4 or 5 mm on an NEC... Id be going more like 7-10mm...
See what Macgyver and Curt say before you go that close, just to be sure... |
yeah everything I've read about NEC's is if you run the raster like you would on a Barco or MArquee the deflection circuitry runs hot and you can burn up an STK chip or transistor soemhwere. Doug Baisey quote "you've been warned".
IMO, it makes this machine one that really need's a video processor to increase the porch sizes and bring the projected image right up to the raster edge. Otherwise, with both a reduced raster and cut-off image you wind up using like half of the tube.
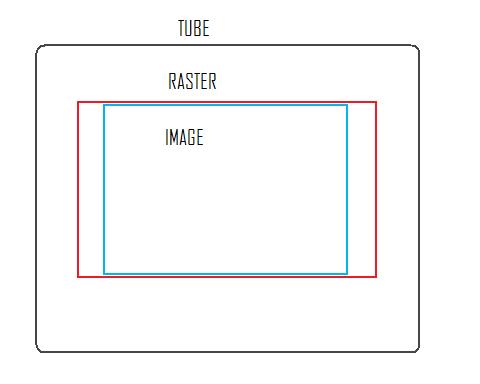
Based on my limited experience with these, without a scaler on an NEC / 16:9 screen you wind up with tube usage that looks like this IMO
| Description: |
|
| Filesize: |
12.66 KB |
| Viewed: |
8743 Time(s) |
|
|
|
| Back to top |
|
|
Untuned
Joined: 03 Dec 2011
Posts: 93
Location: Pooler, GA
|
| Posted: Thu Jan 19, 2012 6:55 pm Post subject: Newbie setup: Amplitude and Linearity |
|
|
Draganm: I would say that is what my tube face looks like except my raster sides look closer to the tube edges. The gap between image and raster is very small top and bottom, and much wider on the sides.
When I am adjusting geometry, do I use the amplitude control to ensure that the grid pattern shows squares and not rectangles? Or do I just verify that the height vs width ratio is correct? It seems like a strange question, but I have a 4:3 screen (that came with the pj) but I am setting up for widescreen material.
|
|
| Back to top |
|
|
draganm
Joined: 08 Mar 2006
Posts: 8990
Location: Colorado
|
| Posted: Thu Jan 19, 2012 9:45 pm Post subject: Re: Newbie setup: Amplitude and Linearity |
|
|
| Untuned wrote: | | Draganm: I would say that is what my tube face looks like except my raster sides look closer to the tube edges. The gap between image and raster is very small top and bottom, and much wider on the sides. |
yup and the difference between raster size and image size will vary greatly depending on the signal and source. A used $150. video processor would be a good investment, especially with an NEC
| Untuned wrote: | | When I am adjusting geometry, do I use the amplitude control to ensure that the grid pattern shows squares and not rectangles? Or do I just verify that the height vs width ratio is correct? It seems like a strange question, but I have a 4:3 screen (that came with the pj) but I am setting up for widescreen material. |
I am not an NEC guy but AFAIK amplitude is strictly size, what your looking for is linearity.
A proper 16:9 screen is worth $250. IMO. Either that or just paint the unused portions of your 4:3 Black 
|
|
| Back to top |
|
|
Untuned
Joined: 03 Dec 2011
Posts: 93
Location: Pooler, GA
|
| Posted: Fri Jan 20, 2012 4:42 am Post subject: |
|
|
|
I actually picked up a DVDO Iscan HD. I needed to convert to the VGA output, and I thought it was a good idea until I realized I'd have trouble with the HDCP bit. Theoretically, my Blu-ray player will put out 720p and 1080i via component with a blu-ray disc (as long as nothing is plugged into the HDMI port). Supposedly the iscan will passthrough to the vga out. Anything that is not high-def will leave the player as 480p and be upconverted by the iscan to 1080i. In theory...At least having a constant output sounds like a good idea.
|
|
| Back to top |
|
|
|
|


