| Author |
Message |
Nashou66

Joined: 12 Jan 2007
Posts: 16171
Location: West Seneca NY
|
| Posted: Tue Feb 02, 2010 5:53 am Post subject: OH SH00T!!! Broken HV lead Boot!! No problem !!! |
|
|
I was working on an LC chamber for one of the Thomas Tubes , it was one I am going to
test Epoxy paint over the aluminum to see how it holds up to Glycol. Well while working
on re assembly I broke off the HV cable from the boot end.
I was pissed!! So I removed it and was going to replace it with one off a broken Tube Tim
sent that was connected to an LC chamber i needed.
But being the curious and adventurous person I am , I decided to dissect the HV lead boot.
I found out that the HV wire is not that thick and its not even welded or soldered to the HV
clip, its just held in by pressure!
So I was able to remove the clamp and replace the HV cable after stripping it a bit.
I did not replace it to the tube yet but will do so and report back if it works. Some one
might have done this before but for me it was new so I decided to take pics and post them here.
Clip inside boot

Clip Removed from boot

Clip Is actually two pieces, notice the oxidation on the one piece

Strip HV lead Wire

Clean Clip Oxidation


Put one section back in

Feed wire through Boot and over first clip section

Instal second section of clip pressing down on one side till it "snaps" under inside boot lip

I then Used Rubber Electrical tape instead of heat shrink, as you can see i added some
extra beef to it by wrapping it around the boot knob. next time it wont twist of as easy 
Electrical Rubber tape added

Now I just need to get some RTV and install it to the tube let it cure for a few days and test.
Athanasios
_________________
Don't blame your underwear for your crooked ass~ unknown Greek philosopher
"Republicans believe every day is the Fourth of July, but the Democrats believe every day is April 15." --- President Reagan
One Smart Dog!!!
Marquee High Performance Bellows now shipping!!
Marquee Modifications and Performance Enhancement
Marquee C-element and Bellow removal
|
|
| Back to top |
|
 |
LOTREE

Joined: 19 Mar 2006
Posts: 401
Location: Paradise, Newfoundland
|
| Posted: Tue Feb 02, 2010 8:16 am Post subject: |
|
|
| Nashou66 wrote: | | Now I just need to get some RTV and install it to the tube let it cure for a few days and test. |
Here you go 

_________________
Zenith Pro 1200x | Electrohome ECP 4500 | Yamaha HTR-5740 | HTPC & Speaker build to follow
|
|
| Back to top |
|
|
psilvest
Joined: 27 Jan 2007
Posts: 44
|
| Posted: Tue Feb 02, 2010 5:51 pm Post subject: |
|
|
This is useful stuff - it seems that, since the wire is not soldered, it is unlikely that the contact under the cup is damaged by twisting the wire. Only by (also) pulling the wire one can break the contact, right?
As mentioned in another thread ( https://www.curtpalme.com/forum_archived/viewtopic.php@t=19781.html ), I thought that a broken HV connection was the reason of an M9000 tube being apparently dead, but further checks showed this is not the reason (which leaves me puzzled as to what could have gone wrong with the tube, I can only imagine some failure in the electron gun).
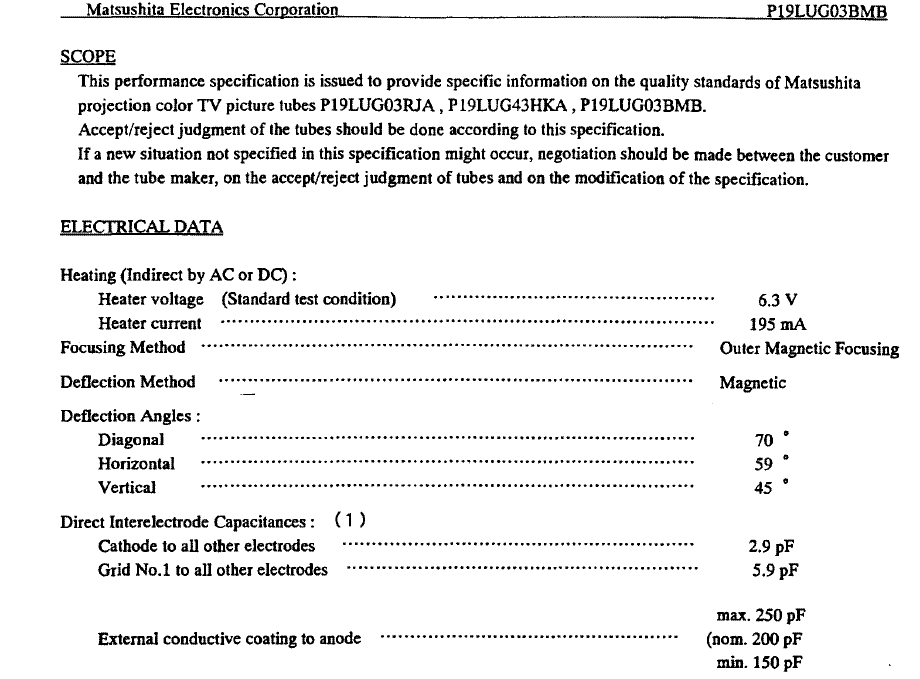
By the way, does anybody know the approximate capacitance between anode and aquadag for a P19 tube?
Pier
|
|
| Back to top |
|
|
stefuel

Joined: 07 Mar 2006
Posts: 3353
Location: Green Harbor MA USA
|
| Posted: Tue Feb 02, 2010 11:01 pm Post subject: |
|
|
The little nub on the splitter end is soldered on. You can remove the end along with the old plastic tubing to inspect and clean the cable. Then slide on new tubing for better insulation. Not rocket science
_________________
Chip
A Barco is only a AmPro with training wheels
Card carrying member of the AVS chain gang.
|
|
| Back to top |
|
|
tse
Joined: 03 May 2006
Posts: 1014
Location: Sweatbucket, Fl.
|
| Posted: Wed Feb 03, 2010 12:24 am Post subject: |
|
|
| psilvest wrote: | This is useful stuff - it seems that, since the wire is not soldered, it is unlikely that the contact under the cup is damaged by twisting the wire. Only by (also) pulling the wire one can break the contact, right?
As mentioned in another thread ( https://www.curtpalme.com/forum_archived/viewtopic.php@t=19781.html ), I thought that a broken HV connection was the reason of an M9000 tube being apparently dead, but further checks showed this is not the reason (which leaves me puzzled as to what could have gone wrong with the tube, I can only imagine some failure in the electron gun).
By the way, does anybody know the approximate capacitance between anode and aquadag for a P19 tube?
Pier |
The anode doesn't need a real sturdy connection because the current is max about 0.01 Amps. Sometimes a bad anode connection will make the image bigger than it should be then it shrinks down to the right size goes large again and repeats.
The capacitance spec:
Scott
| Description: |
|
| Filesize: |
31.41 KB |
| Viewed: |
2566 Time(s) |
|
_________________
"Were we directed from Washington when to sow and when to reap, we would soon want bread."
Thomas Jefferson
|
|
| Back to top |
|
|
Nashou66
Joined: 12 Jan 2007
Posts: 16171
Location: West Seneca NY
|
| Posted: Thu Feb 04, 2010 3:25 am Post subject: |
|
|
Well, It didn't work this time, it snapped from the boot, but I had a bit of a problem when i was putting it on the tube. I first put the RTV on and tried to match up the anode hole with the clips, it was moving all over before i got it snapped into place. So i removed it again and noticed the clip inside shifted up in the boot recess and was not connected well to the anode wire on the one side. Also there was some rtv on the Anode hole and on one of the clips. So i cleaned it all up and this time i connected the Boot to the anode hole, pulled back the boot and touched the hole and the end of the HV wire that goes to the splitter to make sure there was a connection between the clips and the hole contact. I then put the tip if the rtv tube under the boot and squeezed it out as I went around the boot. I then pressed on the boot to squeeze the RTV evenly under the boot. I'll try to fire it up again tomorrow.
Athanasios
_________________
Don't blame your underwear for your crooked ass~ unknown Greek philosopher
"Republicans believe every day is the Fourth of July, but the Democrats believe every day is April 15." --- President Reagan
One Smart Dog!!!
Marquee High Performance Bellows now shipping!!
Marquee Modifications and Performance Enhancement
Marquee C-element and Bellow removal
|
|
| Back to top |
|
|
|
|


