|
As this forum is rarely used anymore, we've locked it. Feel free to browse and read. Questions? Please reach out to us directly. Cheers! |

|
 |
|
|
| Author |
Message |
WayneB
Joined: 24 Dec 2008
Posts: 113
Location: Victoria, BC
TV/Projector: Marquee 9500LC Ultra
|
| Posted: Sun Jun 21, 2009 4:17 am Post subject: Marquee 9500LC Ultra Installation Experiences |
|
|
Well I finally did it. I bought a Marquee 9500LC Ultra from Curt.
I had owned a Runco 980 Ultra (Nec 9 PG Xtra) for the last 9 years, and I put 12,000 hours on the tubes. But it finally died.
After having the Marquee for one week, I have it up on the ceiling and am watching a very good picture. Here is my story and my lessons learned.
The process was as follows:
1. Decide whether to fix/upgrade the Runco, or buy either a Plasma TV, Digital Projector, or a reconditioned CRT projector from Curt.
2. How to take down the old Runco projector and get it to Curt
3. Make the selection between a 9 PG Xtra, Marquee 8500, Nec XG 110LC, or Marquee 9500LC Ultra
4. Determine the throw distance for 9500LC
5. Install the ceiling mount in the right position
6. Lift the 9500LC to the ceiling
7. Setup the projector
The whole process took a little over a month, but once we purchased the 9500LC it took only a week and could have been less if I had not obsessed over squaring the projector to the screen while it was still on the floor.
1. Deciding what to buy: We looked at plasma TV but could not see ourselves with a small 50 inch and the 65 inch cost over $7,000. Even at 65, the viewing size was less than half my existing 83 diagonal (72 wide) screen. The digitals were rejected due to long-term ongoing maintenance costs (repairs and bulbs). The decision was made to stick with a CRT projector.
Lesson learned: Once you get spoiled with a big screen CRT, you will have trouble going to anything less.
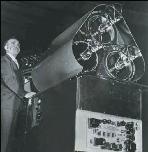
2. Taking down the old Runco was a challenge. We dont have enough young(strong) friends that can hold a weight over their heads. I installed (4) 3/8 eyelet screws into the ceiling-mounting platform and used nylon ropes to lower the projector. We almost lost it!

Taking down the old Runco
Lessons learned: Projectors are heavy. Take off the lenses to save 30-40 lbs. Place the eyehooks equi-distant from the center of gravity of the projector (where the ceiling mount hooks are). Tie the 4 ropes to form a type of cradle so the ropes cant slip forward or back from where you need them. Put lots of cushions on the floor.
3. Curt graciously invited us to his home and shop to view the top three of the projectors. The 8500 and 9500 were in an A/B configuration with the same BluRay (1080p) and TV (1080i) sources. All had great pictures, but the 9500 had the sharpest picture and we chose it.
Lessons learned: You can look at specs all day, but until you actually see the differences side by side, it is a hard choice. If we had seen just one projector in isolation, we would have thought the picture was great and been happy with it.
4. To determine the throw distance, I set up the 9500LC on a Black and Decker WorkMate workbench. I centered my projector with the two string method. It did not work well. String stretches, so I tried different types and even fishing line. Not good enough. The best link I found was this picture:
http://archive.avsforum.com/avs-vb/attachment.php?postid=1670050&fullpage=1
and Gary Fritzs method in these articles:
https://www.curtpalme.com/forum_archived/viewtopic.php@t=7172.html
http://archive2.avsforum.com/avs-vb/showthread.php?p=5662278&highlight=sight - post5662278
Once squared and centered, (not an easy task!) I looked into the green lens and centered the raster and got it the right distance from the edges and within the wear pattern. I initially had a lot of confusion with raster, image, and wear pattern. I then moved the projector back and forth until the image on the screen was the right size. That was the correct throw distance. In my case, for my 72 wide screen and my lenses, it was 104 ½ horizontal throw.
Lessons learned: The string method can produce big errors. String stretches. Use a metal tape measure. Dont fuss too much with the projector on a table, since you have to do it all over again on the ceiling. Just get the throw distance right.
To install the Marquee ceiling mount, I had to rebuild my ceiling mount platform to accommodate the different throw from the Runco (further back). My platform is two ¾ pieces of plywood glued together and screwed to the rafters and cross-braces between rafters. I used a rotating laser level set on its side to project the laser on the centerline of the screen (bottom to top), along the ceiling, and down to the center of the green tube. Then using the ceiling line, I marked my ceiling platform with the centerline. I dropped a plumb bob down from that ceiling centerline to the front edge of the green tube, once it was at the correct throw, and marked the point on the ceiling. That was were the green tube needed to be once the projector was inverted and mounted on the ceiling. Next, I flipped the projector over on its side and mounted both halves of the ceiling mount on to the projector. Then using a framing square, I measured the distance from the ceiling portion of the mount to the front edge of the green tube. I transferred that measurement to the ceiling platform back from the mark made with the plumb bob, and then mount the ceiling part of the ceiling mount on the ceiling, aligned along the center line. Next, I installed the threaded eyehooks that will hold the lifting chains to the projector. The projector-side of the ceiling mount has 4 extra holes that will accept the eyehooks.

Threaded eyelet on projector bracket
Then I removed the projector-side of the mount from the projector and hooked it into the ceiling mount on the ceiling.

Both halves of the bracket mounted on the ceiling
Then I leveled and squared it to the screen. So much easier when there is not a projector attached to it. With both halves of the ceiling mount on the ceiling, I marked the ceiling platform above each eyehook for the matching eyehooks on the ceiling. I removed the projector-side of the bracket and screwed in the ceiling eyehooks. Then I hung the 4 chains from the ceiling eyehooks using quick-links.

Quick-Link between ceiling eyelet and chain
I re-attached the projector-side of the ceiling mount to the projector and connected the hanging chains to the projector eyehooks also using chain quick-links, lifting each corner of the projector slightly before connecting them. The projector was now suspended from the ceiling by four chains.

Chain attached to the eyelet on the projector
Lessons learned: Even with my careful planning and measuring while on the ground, I mounted the ceiling mount too far forward. The throw should have been closer to 108 rather than 104, based on trying to keep the raster within the wear pattern. Fortunately, the mounting bracket can slide back about 3 inches, so I am living with it showing a little bit of the wear pattern. Otherwise, I have to take it all down again, move the ceiling bracket back, and put it back up. I guess I should have spent more time with it on the ground and done two complete setups; one for 1080i and one for 1080p.
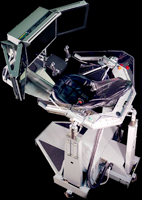
5. To lift the 9500LC to the ceiling, I used the chains and S Hook method. I first removed all three lenses to lighten the load by 40 lbs or so. Then I lifted one corner of the projector a few inches, while my wife lifted one of the links up and put an S-Hook, effectively shortening the chain by one (or two) links.

Using an s-hook to shorten the chain
By repeating for each chain, we raised the projector about 2-3 inches.

Projector lifted off the cushion
We kept doing this until the projector was a couple of inches below the ceiling bracket.

Projector just under the ceiling bracket
Then with one person on a step ladder on each side, so we could see the mating hooks, we lifted the projector 1-2 inches onto the hooks and the projector was locked into the ceiling bracket. Notice the slack in the chains.

Projector locked into the ceiling bracket
I bought all the chains (800 lb load), quick links, S-Hooks, and threaded and screw eyelets from Home Depot for under $50.
Lessons learned: Take off the lenses. Move the WorkMate or table out from under to give more room to stand, but leave cushions on the floor. Have your partner say Ready when they want you to lift, and Done when the hooks are in place. Lift on ready and release on done. That projector is heavy. By the end, there was only 2-3 seconds between Ready and Done. Leave the eyelets in the bracket and in the ceiling platform for when you need to take it down again.
6. To setup the projector, I got a lot of advise from Curt and this forum, but basically ended up using a Marquee Setup Guide from user DraganM. Thanks Dragan.
The instructions make use of the Marquee built-in Help-Guided Mechanical Setup, and Convergence guides. I had a very good picture within two hours.
The first thing I had to do was reverse the scan. A perfect guide (with pictures):
http://www.etechvideo.com/techtip3.htm
Lessons learned: Go through an entire setup while the projector is on the table/bench. It is much easier to identify parts because the help guides assume the projector is in that position. It might be easier to do the scan reversal while on the bench and just before mounting the projector on the ceiling.
Now that I have run through the setup, I plan on doing it all over again, and exploring all the menus, knowing I can reset the values and redo it in a few hours. I plan to be able to fine-tune my new projector to the point where everyone who walks in says WOW.
I watched the Penguins beat the Red Wings at 1080i and I LOVE MY PROJECTOR. (and I havent even hooked up BluRay or 1080p yet).
Well, I did a full convergence for 1080p (not BluRay yet, just up-converted from DVD) and that is when I noticed that I am NOT within the wear pattern.

Wear lines visible by differences in brightness of the image
I took another day and started over from scratch. I ended up moving the projector back as far as it would go on its adjustable mount which reduced the amount of wear I can see, but did not eliminate it. I also did a full physical alignment while on the ceiling and this time the toe-in of the blue and red tubes is not as extreme. I ended up with an even better picture than the first time, especially at 1080p.
Lesson Learned: I like doing this stuff. It is fun. But there is SO MUCH to learn. I will be counting on you guys in the coming months to help me squeeze the most I can out of my new toy. For now, I think I will watch a few movies and wait for my Oppo BDP-83 BluRay to arrive. For other new or wannabe CRT owners wondering if they can do this; You CAN. Just approach it as a fun project with no deadlines and read a lot and experiment. You can always start over and have a great picture in less than a day. Thanks again to Curt and Dragan, and everyone who contributes to this forum.
General Comments:
1. The fan runs even when the projector is off. Although I am not bothered by the noise when the projector is on, the fan noise is quite an irritation when it is off.
2. The projector produces a lot of hot air. Much more than my old Runco, I think.
3. Buy a long-neck (9) hex-key ball point 3/16 screwdriver for the mechanical setup and a 9/64 one for removing the lenses (Bondhus 3708 3710 - try crawfordtool.com). You also need a 7/16 box end wrench.
4. The Marquee remote uses a higher frequency (336KHz) than most other Home Theater components. My Harmony H628 universal remote would not control the Marquee. I ended up buying a Harmony 1000 remote, which works beautifully with the Marquee.
Wayne
Last edited by WayneB on Tue Jul 07, 2009 12:12 am; edited 1 time in total
|
|
| Back to top |
|
 |
draganm

Joined: 08 Mar 2006
Posts: 8990
Location: Colorado
|
| Posted: Sun Jun 21, 2009 4:35 am Post subject: |
|
|
congrats Wayne on a successful install. I think having the PJ with maxed rasters and a little wear showing is better than squeezing it down and losing resolving ability. The wear looks fairly minor and even to me so it shouldn't be distracting.
For the fan noise, I have my Marquee on a Tripp Lite power bar that I simply turn off when I'm done watching. When your ready to squeeze a little more out of the beast let me know. 
|
|
| Back to top |
|
|
WayneB
Joined: 24 Dec 2008
Posts: 113
Location: Victoria, BC
TV/Projector: Marquee 9500LC Ultra
|
| Posted: Sun Jun 21, 2009 4:42 am Post subject: |
|
|
Thanks Dragan.
I WILL let you know when the time comes, but I think I will try to get some experience (and enjoyment) out of it first.
....Wayne
|
|
| Back to top |
|
|
r.bauer
Joined: 08 Apr 2006
Posts: 280
Location: The Netherlands
|
| Posted: Sun Jun 21, 2009 5:33 am Post subject: |
|
|
Nice detailed description of the whole selection and installation process. I also use measuring method 4 when installing a CRT, it gives excelent results and the projector is always square to the screen.
But what surprises me is that you considered and bought a 9" with wear. Why? Didn't Curt have a wear free projector?
|
|
| Back to top |
|
|
draganm
Joined: 08 Mar 2006
Posts: 8990
Location: Colorado
|
| Posted: Sun Jun 21, 2009 4:00 pm Post subject: |
|
|
| r.bauer wrote: | | what surprises me is that you considered and bought a 9" with wear. Why? Didn't Curt have a wear free projector? |
sure, but it comes down to cost. New 9" tubes are exepensive, over a grand a piece. When Curt, or anyone else, has to replace them that price get's rolled right over into the selling price. Plus those tubes look pretty good, I personally would run them a long time before replacing.
IMO, a much bigger concern with any LC Marquee is
A) the condition of the bellows
B) condition of the electronics
both of these will have a much bigger impact on the machines performance and reliability than a little bit of light wear. You could address both of those issues and get them close to "like new" condition for less than the cost of just 1 tube.
|
|
| Back to top |
|
|
Curt Palme
CRT Tech
Joined: 08 Mar 2006
Posts: 24396
Location: Langley, BC
TV/Projector: All of them!
|
| Posted: Sun Jun 21, 2009 4:29 pm Post subject: |
|
|
Nice writeup Wayne, Kal, you might want to add this on the main site in the area where there are a couple of installation guides. I really like Wayne's! 
I know you emailed me Wayne, I think I didn't respond to the last email. This upcoming week is catchup week, I'm not going anywhere save to ship out stuff.
|
|
| Back to top |
|
|
WayneB
Joined: 24 Dec 2008
Posts: 113
Location: Victoria, BC
TV/Projector: Marquee 9500LC Ultra
|
| Posted: Sun Jun 21, 2009 4:40 pm Post subject: |
|
|
| Quote: | | Didn't Curt have a wear free projector? |
Yes, of course he did. But I had a budget and I stuck to it. 
(Well, at least I stuck to the very highest end of the budget )
The other three choices I looked at all had brand new tubes.
And I am VERY happy with what I got.
This is what the tubes looked like on my OLD Runco projector:

My old Runco had really bad wear after 12,000 hours
...Wayne
|
|
| Back to top |
|
|
WayneB
Joined: 24 Dec 2008
Posts: 113
Location: Victoria, BC
TV/Projector: Marquee 9500LC Ultra
|
| Posted: Sun Jun 21, 2009 4:59 pm Post subject: |
|
|
| Quote: | | Nice writeup Wayne, |
Thanks for the compliment Curt.
I would be happy to have my experiences shared with others via your installation tips section. I have the writeup in a Word document, and I intended to keep it updatated as my knowledge and experience grows.
My next step will probably be to try Bill Blue's Marquee Magnetics Setup 101 procedure, although I know, Curt, that you have already done some of that on my Marquee.
http://www.curtpalme.com/docs/MARQUEE%20MAGNETICS%20SETUP%20101%20by%20Bill%20Blue.pdf
...Wayne
|
|
| Back to top |
|
|
perisoft
Joined: 29 Aug 2007
Posts: 2920
Location: Ithaca, NY
|
| Posted: Sun Jun 21, 2009 7:41 pm Post subject: Re: Marquee 9500LC Ultra Installation Experiences |
|
|
| WayneB wrote: | | I think I will watch a few movies |
Lunacy! 
_________________

|
|
| Back to top |
|
|
cmjohnson

Joined: 03 Apr 2006
Posts: 5180
Location: Buried under G90s
|
| Posted: Mon Jun 22, 2009 12:05 am Post subject: |
|
|
For a Marquee, with HD-10GT17 lenses, OR with HD-8B lenses, the projector should be 10 feet away from the screen for an 8 foot wide picture. Measured from the center of the green lens at its face, to the center of the screen. This simple 10/8 ratio works very well and
is well within the abilities of the projector to compensate for.
As for mounting, I installed a simple pulley system in the attic, giving a 4:1 mechanical advantage. Threadall is used to mount
from the projector's mount through the ceiling and through 2x4s laid across the joists, with large fender washers for load distribution.
I can drop and reinstall my 9500LC all by myself in about half an hour, including going back and forth into the attic a few times to
tweak the alignment as it's raised.
A cheap electric winch would be even better.
CJ
|
|
| Back to top |
|
|
WayneB
Joined: 24 Dec 2008
Posts: 113
Location: Victoria, BC
TV/Projector: Marquee 9500LC Ultra
|
| Posted: Mon Jun 22, 2009 5:19 pm Post subject: |
|
|
| Quote: | cmjohnson:
This simple 10/8 ratio works very well and is well within the abilities of the projector to compensate for. |
I can't see how this could work for me. I have a 72" wide 16x9 screen. Your formula would put me at 90 inches. When I was at 104 inches, both my red and blue tubes were toed-in to the maximum (backs bumping against the case sides). Moving back to 108 inches helped, but I should probably move back even further. Although my raster was not maximized to the edges, in order to minimize the effect of the existing wear pattern, I was reasonably close. Perhaps, your formula works only for 8 foot wide screens or larger?
| Quote: | | As for mounting, I installed a simple pulley system in the attic, |
That sounds like an effective solution.
Can you post any pictures?
....Wayne
|
|
| Back to top |
|
|
cmjohnson
Joined: 03 Apr 2006
Posts: 5180
Location: Buried under G90s
|
| Posted: Tue Jun 23, 2009 12:41 am Post subject: |
|
|
I'd have to climb into the attic to get them. I'll pass for today. The lower part of my mount system is the lower half of an Electrohome
Marquee mounting system, the factory type. It has its own pulleys in it already. I just added more up in the attic and ran the rope.
On my setup, I'm REALLY maximizing the rasters. When I did this installation, I put in brand spanking new tubes and am more than
happy to run the rasters out to the limit. But I did have to draw them back in a little bit so as to not spill over the sides of the screen.
I could easily get another 8 inches of total screen width out of this setup. And, I think I still have some toe-in available. I'm pretty
sure of it, actually.
I firmly believe in using all the raster area on the CRT face that you can. The advantages are many: Greater potential light output as
more phosphor area is active. Greater resolution capacity as the scan lines aren't as crowded together on the CRT face when the raster
size is maximized. Greater tube life at any given contrast level as you don't have to drive a larger phosphor area as hard to get the
same brightness level.
CJ
|
|
| Back to top |
|
|
aliceana
Joined: 24 Jun 2009
Posts: 1
|
| Posted: Thu Jun 25, 2009 9:33 am Post subject: |
|
|
Where can I buy a smps for my cpu? My Dell Dimension 8400's power supply (smps) is fused so can anyone please tell me a good website where I can order a replacement. The smps is a Dell Dimension 2n333. Thank you for your help!
_________________
yahoo keyword tool ~ overture
|
|
| Back to top |
|
|
WayneB
Joined: 24 Dec 2008
Posts: 113
Location: Victoria, BC
TV/Projector: Marquee 9500LC Ultra
|
| Posted: Sat Jun 27, 2009 9:42 pm Post subject: |
|
|
Update on the universal remote for the Marquee 9500LC Ultra:
I have been using a Logitech Harmony H628 remote for my home theater for 5 years and it worked well with the Runco projector. But it did not control the Marquee unless I pointed it directly at the projector. (which is hard to do when you are sitting under the projector  ). I discovered the Marquee uses 336Mhz. I contacted Logitech support and they suggested the Harmony 800 series, 1000, 1100 or Harmony One would work. I bought a Harmony 1000. ). I discovered the Marquee uses 336Mhz. I contacted Logitech support and they suggested the Harmony 800 series, 1000, 1100 or Harmony One would work. I bought a Harmony 1000.
See this threat for the full story.
https://www.curtpalme.com/forum_archived/viewtopic.php@t=16619.html
It works great, but it seems the Harmony 1000 is the worst/buggiest remote that Logitech has made. It has a tendency to freeze up. Mine froze up twice in two days and it requires you take the battery out to reboot it. I contacted Logitech again and they said I should replace it and offered an RMA but suggested I try to return it to the seller. London Drugs replaced it for me, no questions asked. (They are a great place in Canada to buy electronics).
So far it has not frozen again. I will keep you posted.
Lessons Learned: Do your own research on the web before purchasing. Even the Logitech forum "gurus" recommend NOT purchasing a Harmony 1000. (They say the Harmony 1100 and Harmony One are OK)
Don't trust the vendor to make recommendations. 
...Wayne
|
|
| Back to top |
|
|
Nashou66

Joined: 12 Jan 2007
Posts: 16171
Location: West Seneca NY
|
|
| Back to top |
|
|
dturco

Joined: 06 Feb 2009
Posts: 3778
Location: Eastern Shore Maryland
TV/Projector: Runco DLP VX-3000i Marquee 9500 parts doner
|
| Posted: Sun Jun 28, 2009 2:57 am Post subject: |
|
|
On my setup, I'm REALLY maximizing the rasters. When I did this installation, I put in brand spanking new tubes and am more than
happy to run the rasters out to the limit. But I did have to draw them back in a little bit so as to not spill over the sides of the screen.
CJ[/quote]
What was the H size when you were off the tube faces? I am at 90 anything further and the picture shows the arc of the tube or lense or something bows at the lower left corner of the screen.
_________________
Firefly rules. Can't stop the signal.
http://www.hulu.com/firefly
|
|
| Back to top |
|
|
WayneB
Joined: 24 Dec 2008
Posts: 113
Location: Victoria, BC
TV/Projector: Marquee 9500LC Ultra
|
| Posted: Sun Jun 28, 2009 4:37 am Post subject: |
|
|
| Quote: | | What was the H size when you were off the tube faces? |
Hi Dave,
My H size is 55, V size 4
I am quite a bit away from the edges of the tube due to trying to minimize the visibility of the existing wear. Quite frankly, I don't even notice it once the movie starts. I watched King Kong on DVD up-converted to 1080p tonight. I don't have my BluRay player yet, but this picture was still very good.
| Quote: | | My 1000 has only froze a few times in a few years. it works great for the marquee power on and power off. I still use the main remote for set up. |
Hi Athanasios,
I use the Harmony to also select Recall=01 for 1080i and Recall=02 for 1080p. It also has common commands such as "*". But I use the Marquee remote for everything else.
Logitech support said the "freeze" problem was "mostly" solved by Firmware 5.0 which is the current firmware.
I am hoping this remote will not freeze up, but if it is only a few times a year, I would certainly put up with that for the convenience of the remote. My wife says "What's not to like? You touch "Watch TV" and it does everything. She even likes the little tune it plays to remind you to keep the remote pointed at the screen.
...Wayne
|
|
| Back to top |
|
|
WayneB
Joined: 24 Dec 2008
Posts: 113
Location: Victoria, BC
TV/Projector: Marquee 9500LC Ultra
|
| Posted: Wed Jul 01, 2009 11:01 pm Post subject: |
|
|
A Multi-Colored Experience
My latest experience involves a strange multi-colored prism-like blob of light about two feet below my projection screen. It must have been there for the last month; ever since I installed the projector on the ceiling, but I only just noticed it. I guess I was so focused on how great the picture looks that I never glanced down.
The full experience and the awesome support of the forum is documented here:
https://www.curtpalme.com/forum_archived/viewtopic.php@t=16824.html
but here is a quick summary:

Marquee white-screen test pattern with prism-like image below
This picture is a blow-up of the prism-like image

Enhanced closeup of the Prism-like image
Within 24 hours I had 10 people helping me and we solved the problem.
They quickly narrowed it down to an air bubble in the tubes. The solution is to take the projector down, top up the glycol, and put it back up on the ceiling. However, they also offered a workaround. The workaround is to put electrical tape over the area of the bubbles on the tube faces. It took about two hours to do and it fixed the problem.
I used very thin plastic black electrical tape. By keeping it on the glass and off the rim on the tube, I don't think it filled the small air gap between the tube and the lens. The only problem was the curvature of the tube. Putting on the tape was a trial and error effort and each time I removed the tape, I left a little adhesive behind that I had to wipe off with water and a cotton towel. The other problem was that I did not know how much to mask. It took three tries to get it right. That involved taking the lens off, cutting the tape and installing the tape. Putting the lens back on and running the test pattern again to see if it worked. I did NOT even have to do a re-convergence.
It was easy to see the bubble with the lens off, by tapping the side of the projector to wiggle the fluid level.
It is the bowl-shaped object above the upper black line.

The bubble is clearly visible on the tube

The first attempt at masking the bubble

The second attempt made the tape a little bigger

This one seems big enough

For comparison, here are the three tape mask sizes
With the final size of tape masking the upper portion of the tubes, I no longer see any colors below the screen.
Lesson Learned: The members of this forum are extremely knowledgeable and willing to help. Long live the CRT. Workarounds can allow you to fix a problem now and give you time to fix it properly at your own schedule.
Wayne
|
|
| Back to top |
|
|
draganm
Joined: 08 Mar 2006
Posts: 8990
Location: Colorado
|
| Posted: Thu Jul 02, 2009 4:03 pm Post subject: |
|
|
| WayneB wrote: | | My H size is 55, V size 4...Wayne |
wow, your only using half the tube! If you had an 8500LC with maxed out rasters it would actually be activating more Phosphor and throwing a sharper pic from the increased re-trace timing. 
|
|
| Back to top |
|
|
WayneB
Joined: 24 Dec 2008
Posts: 113
Location: Victoria, BC
TV/Projector: Marquee 9500LC Ultra
|
| Posted: Thu Jul 02, 2009 10:47 pm Post subject: |
|
|
| draganm wrote: | | WayneB wrote: | | My H size is 55, V size 4...Wayne |
wow, your only using half the tube! If you had an 8500LC with maxed out rasters it would actually be activating more Phosphor and throwing a sharper pic from the increased re-trace timing. |
I don't understand anything you just said, but it looks like there is room for improvement on my system. 
Are you saying my raster is so small that I am giving up potential sharpness?
But if I make it much bigger, I will be farther outside the existing wear pattern, and the picture on the "new" phosphor will be more obvious, maybe even much more obvious if the picture is sharper.
What is "typical" for H and V size for a 16x9 screen?
...Wayne
|
|
| Back to top |
|
|
|
|
|
|
|
You cannot post new topics in this forum
You cannot reply to topics in this forum
You cannot edit your posts in this forum
You cannot delete your posts in this forum
You cannot vote in polls in this forum
You cannot attach files in this forum
You can download files in this forum
|
Forum powered by phpBB © phpBB Group
|
|


