| Author |
Message |
acrawley
Joined: 20 Jun 2006
Posts: 18
Location: Redmond, WA
|
| Posted: Sun Jul 30, 2006 11:59 pm Post subject: Building a screen for under $75 |
|
|
Building a cheap (ghetto, if you must) projector screen
Stuff you'll need:
Four 8' 2x3's: ~$8 (You could use 2x4's, but I decided they were too heavy)
Four corner brackets: ~$2
Large piece of blackout drapery: ~$40 (Here's what I used: Roc-Lon Blackout Drapery Liner, 105"x80:)
Gaffer's tape (If you want a border): ~$15
Stuff you'll do:
First thing I had to do was cut the boards according to the following diagram:

For this, I broke out my trusty miter-box. Those of you lucky enough to have power tools at your disposal would probably be better off using them, but I figured my apartment complex (and my neighbors) wouldn't really appreciate the extra noise.

Once all the boards were cut to length, I assembled the 8' and 6' sections into a frame. I basically laid the boards out on the floor, then attached the brackets to the inside corners to hold them in place. Once all the brackets were screwed down, I drove large screws through both pieces of wood from the outside corners. (Excuse the mess, I was building this screen shortly after moving in.)

Next, I took the four 1' pieces and attached them in the corners for stability:

With the frame complete, the next step is to attach the screen material. It comes wadded up into a tiny package, which sucks because it puts some serious wrinkles into the material:

The material has two sides, one with a soft texture, and one with a canvas-like texture. I decided that I wanted the soft side to be the projection surface, since the canvas side had a very visible texture to it. I laid the material on the floor, soft side down, then laid the frame on top of it, centered as close as I could get it:

Getting rid of the wrinkles in the material means stretching it tight. Really tight. My rule of thumb was to pull it until I thought it was tight enough, then pull it a bit more. It's pretty tough stuff - I never managed to tear it. The basic procedure for stretching is to start on one of the long sides, then move to the opposide side, then do the short sides the same way. Repeat the whole process, moving outwards from the center of each side, and always stapling opposite sides as mirror images of each other.
First the long sides:

...then the short sides:

...then repeating until the whole thing is stretched out and stapled down:


At this point, the screen is basically complete:

To make things look a lot nicer, though, I decided to put a border on my screen. I started by putting a strip of gaffer's tape around the outside of one edge of the screen:

Then, I put another strip of tape along the front of the screen, lining up with the tape on the edge:

...repeat for the other two sides:

...and you've got yourself a screen!

|
|
| Back to top |
|
 |
kal
Forum Administrator
Joined: 06 Mar 2006
Posts: 18114
Location: Ottawa, Canada
TV/Projector: JVC DLA-NZ7
|
| Posted: Mon Jul 31, 2006 12:56 am Post subject: |
|
|
I love it!
I've been looking for a good set of intructions for a DIY curtain blackout screen that's a lot like the one I built to post on the main site (but without me having to build another one and take pics)...
Do you mind if I steal your instructions and pics and put them in the "Advanced Procedures" section of Curt's main site? I'd give you credit of course.
I'll probably add my painting instructions with Behr Ultrawhite & Floetrol (see my photo album for details) to get the gain up a bit.
Kal
_________________

Support our site by using our affiliate links. We thank you!
My basement/HT/bar/brewery build 2.0
|
|
| Back to top |
|
|
acrawley
Joined: 20 Jun 2006
Posts: 18
Location: Redmond, WA
|
| Posted: Mon Jul 31, 2006 1:38 am Post subject: |
|
|
|
Sure, if you want to use my pictures, you're welcome to them. If you want to give me credit, my name's Andrew Crawley.
|
|
| Back to top |
|
|
AnalogRocks
Forum Moderator

Joined: 08 Mar 2006
Posts: 26706
Location: Toronto, Ontario, Canada
TV/Projector: Sony 1252Q, AMPRO 4000G
|
| Posted: Mon Jul 31, 2006 2:09 am Post subject: |
|
|
|
I love this too. So simple. Well done.
|
|
| Back to top |
|
|
PsychoDogBeast

Joined: 09 Mar 2006
Posts: 97
Location: Huddersfield, Fenay Bridge, Earth :)
|
| Posted: Mon Jul 31, 2006 9:44 pm Post subject: |
|
|
Excellent thread.
Nice one Acrawley, welcome to the forum
Best regards
James
_________________
Rockford Fosgate made me deaf!! 
|
|
| Back to top |
|
|
kal
Forum Administrator
Joined: 06 Mar 2006
Posts: 18114
Location: Ottawa, Canada
TV/Projector: JVC DLA-NZ7
|
|
| Back to top |
|
|
garyfritz

Joined: 08 Apr 2006
Posts: 12088
Location: Fort Collins, CO
|
| Posted: Fri Aug 04, 2006 9:32 pm Post subject: |
|
|
I prefer to put a cross-brace across the middle (vertically, bracing the long sides) so the long sides don't bow when you tighten the BO.
You can often get BO very cheaply on sales. E.g. if you have a Joann in your area, they often do 40% off sales. I think I paid about $12-18 for the BO (3 yd x 60in) for my 48x87 screen. Works fine for a 16:9 screen, but you'll need a large piece like acrawley listed if you want a big 4:3.
Gaffer's tape looks interesting. I've never bothered to put a frame on my screen (the walls are very dark) and that looks like a simple solution. Duve Pro (Duvetyne) tape is supposed to be even better. Goo Systems Flok tape is the best but it's $40 for 2" x 25'.
|
|
| Back to top |
|
|
AnalogRocks
Forum Moderator
Joined: 08 Mar 2006
Posts: 26706
Location: Toronto, Ontario, Canada
TV/Projector: Sony 1252Q, AMPRO 4000G
|
| Posted: Sat Aug 05, 2006 1:31 am Post subject: |
|
|
| garyfritz wrote: | I prefer to put a cross-brace across the middle (vertically, bracing the long sides) so the long sides don't bow when you tighten the BO.
You can often get BO very cheaply on sales. |
Try a local fabric store or custom drapery warehouse.
Last edited by AnalogRocks on Mon Aug 21, 2006 4:40 pm; edited 1 time in total
|
|
| Back to top |
|
|
Brian Hampton

Joined: 22 Apr 2006
Posts: 1173
|
| Posted: Sun Aug 06, 2006 11:05 am Post subject: |
|
|
Having read this,.. I'm considering redoing my screen again.
I went from Blackout Fabric to Melimine (sp?) board but I think I may actually prefer the look of the blackout fabric.
And,.. I'm thinking I ought to build a 4:3 screen and then have masking plates for 16:9 and 2:33 or whatever. (I'll have to rethink the mounting of the center channel.)
There's lots of compelling 4:3 stuff that I have these days and I feel bad about using such a small portion of the tubes to show it.
-Brian
|
|
| Back to top |
|
|
Ridebreck

Joined: 08 Mar 2006
Posts: 943
Location: Colorado Springs, CO
|
| Posted: Mon Aug 14, 2006 8:52 pm Post subject: |
|
|
After hauling my 3/4" melamine screen from the garage up to my HT, I was wishing that I had done something like this. 
_________________
"Hooray Beer!!"
|
|
| Back to top |
|
|
JaceTheAce

Joined: 09 Mar 2006
Posts: 80
Location: San Diego, CA
|
| Posted: Tue Aug 15, 2006 8:42 pm Post subject: |
|
|
|
Here's my DIY screen........Click here.
|
|
| Back to top |
|
|
kal
Forum Administrator
Joined: 06 Mar 2006
Posts: 18114
Location: Ottawa, Canada
TV/Projector: JVC DLA-NZ7
|
|
| Back to top |
|
|
BradTheAggie

Joined: 08 Mar 2006
Posts: 651
Location: Oak Point, Texas
|
| Posted: Mon Aug 21, 2006 2:26 pm Post subject: |
|
|
I built the DIY screen using blackout cloth this weekend. Took less than three hours start to finish. A few observations.
I thought using the metal angle brackets mentioned somewhere in another related thread works very well. Lowes has them in a pack of 4 including screws.
I also used a vertical brace in the middle to add rigidity. Lowes has packs of T-brackets to help with this brace.
My Lowes (God I wish I had bought stock in Lowes before i bought my house!) had a pretty crappy supply of Pine 2x3 lumber, so I went with Douglas Fir instead.
Pre drill your screw holes! Douglas Fir can split pretty easily if you are not careful.
I also used to soft white side of the fabric, not the textured side. And the directions regarding how to staple the fabric were spot on. Start in the middle of one side. Stretch the opposite side. Switch to an arbitrary diagonal and do the same. Circle around the frame stretching and stapling. Made a really good taught screen with no wrinkles quite easy to do.
My final bill was around $20 for 3 yards of 54" blackout cloth from Handcock Fabric + $35 for the lumber and brackets at Lowes. Already had the staples and gun to staple the fabric to the frame. Built it to 89x50 inches, and it looks great!
thanks to everyone for posting instructions and observations on this project. It is VERY easy to do, looks great, and is cheap to boot!
Brad
_________________
(bholman on the AVS forum)
|
|
| Back to top |
|
|
wallace123456
Joined: 14 Aug 2006
Posts: 2236
Location: Northwest VA area
|
| Posted: Fri Nov 10, 2006 8:49 pm Post subject: |
|
|
| Quote: | | I built the DIY screen using blackout cloth this weekend. Took less than three hours start to finish. |
I also built the same screen. Very easy! Just follow directions listed in the post. Kal's idea of getting the screen material from a fabric store was great. No wrinkles. Mine only cost $8.95 for 4 yards (the girl gave me 4 as it was the end of the roll).
| Quote: | | My Lowes (God I wish I had bought stock in Lowes before i bought my house!) had a pretty crappy supply of Pine 2x3 lumber |
Home Depot wasn't much better. Come to think of it, the hardest part of this entire project was finding good straight lumber...
The screen still needs to be painted and I hope to get to that this weekend. But for now, it is great and like you said, cheap!
|
|
| Back to top |
|
|
wallace123456
Joined: 14 Aug 2006
Posts: 2236
Location: Northwest VA area
|
| Posted: Fri Nov 17, 2006 2:34 am Post subject: |
|
|
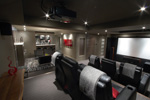
Ok, so the 2X3's I bought are worse than I thought (Home Depot and Lowes stink!!). The lower right corner is bowed outward. And I have a sticky situation; the screen is hanging from the ceiling as I can't (or don't want to) attach it to the wall. See photo. (yes, that is real stone and concrete on the wall)
Anyone know how to get the bow out of the screen? Maybe like run some tension wire behind on the frame??
Other than that, I am willing to take a piece of drywall and paint it with good quality product for a screen??.........
Thought, comments?? Thanks.
| Description: |
|

Download |
| Filename: |
100_0702.JPG |
| Filesize: |
432.3 KB |
| Downloaded: |
659 Time(s) |
_________________
Life Is Good, But BBQ Is Better! BBQ Competition Team
|
|
| Back to top |
|
|
Clarence

Joined: 08 Mar 2006
Posts: 3827
Location: Smith Mtn Lake, VA
|
| Posted: Fri Nov 17, 2006 3:31 am Post subject: |
|
|
| wallace123456 wrote: | | Other than that, I am willing to take a piece of drywall and paint it with good quality product for a screen |
If you're considering drywall, your reasonable screen size is perfect for a $25 4'x8' sheet of white melamine on 3/4" MDF from HomeDepot.
|
|
| Back to top |
|
|
wallace123456
Joined: 14 Aug 2006
Posts: 2236
Location: Northwest VA area
|
| Posted: Fri Nov 17, 2006 6:01 am Post subject: |
|
|
| Quote: | | $25 4'x8' sheet of white melamine on 3/4" MDF |
Does Home Depot sell the melamine? Or, do they sell it already glued to the MDF like as in cabinet making stock? Better yet, am I lost???
wallace
_________________
Life Is Good, But BBQ Is Better! BBQ Competition Team
|
|
| Back to top |
|
|
AnalogRocks
Forum Moderator
Joined: 08 Mar 2006
Posts: 26706
Location: Toronto, Ontario, Canada
TV/Projector: Sony 1252Q, AMPRO 4000G
|
| Posted: Fri Nov 17, 2006 7:06 am Post subject: |
|
|
Which way is your screen bowed, in or out? It's hard to tell in that picture
_________________
Tech support for nothing
CRT.
HD done right!
|
|
| Back to top |
|
|
kal
Forum Administrator
Joined: 06 Mar 2006
Posts: 18114
Location: Ottawa, Canada
TV/Projector: JVC DLA-NZ7
|
|
| Back to top |
|
|
wallace123456
Joined: 14 Aug 2006
Posts: 2236
Location: Northwest VA area
|
| Posted: Fri Nov 17, 2006 8:15 pm Post subject: |
|
|
| Quote: | | Which way is your screen bowed, in or out? |
The lower right hand corner is bowed outward.
I put some cross-hair (diagonally pieces of thread) to see how much it was bowed. To get the cross-hair to just touch in the middle, I have to push the lower right hand corner in about 5 inches.
| Quote: | | it hasn't shifted or warped in 6 years. |
That is great! 1x6 being straighter than 2x3 makes sense too.
If I can't find a way to straighten the bow out, I will probably go with Clarence's idea and use the melamine on 3/4" MDF. I went to Home Depot at lunch today and found what appeared to be melamine, but, it was not labeled or priced. As usual, no body could help with identifying the stuff by name, or even find a price. I found it in the kitchen counter area.
I am going to check at the Home Depot closer to my house, and at Lowes tomorrow as well.
wallace
_________________
Life Is Good, But BBQ Is Better! BBQ Competition Team
|
|
| Back to top |
|
|
|
|


