| Author |
Message |
draganm

Joined: 08 Mar 2006
Posts: 8990
Location: Colorado
|
| Posted: Sat May 16, 2009 11:40 pm Post subject: New Marquee Bellows Test/install |
|
|
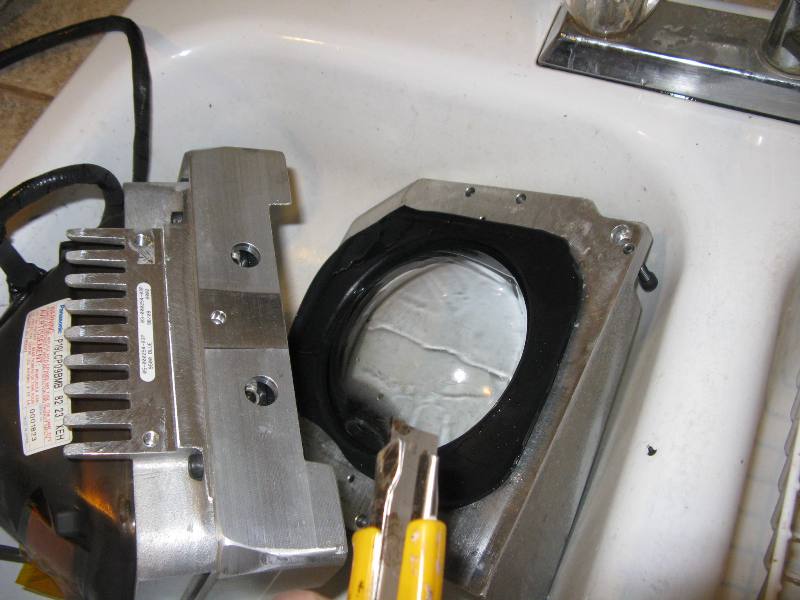
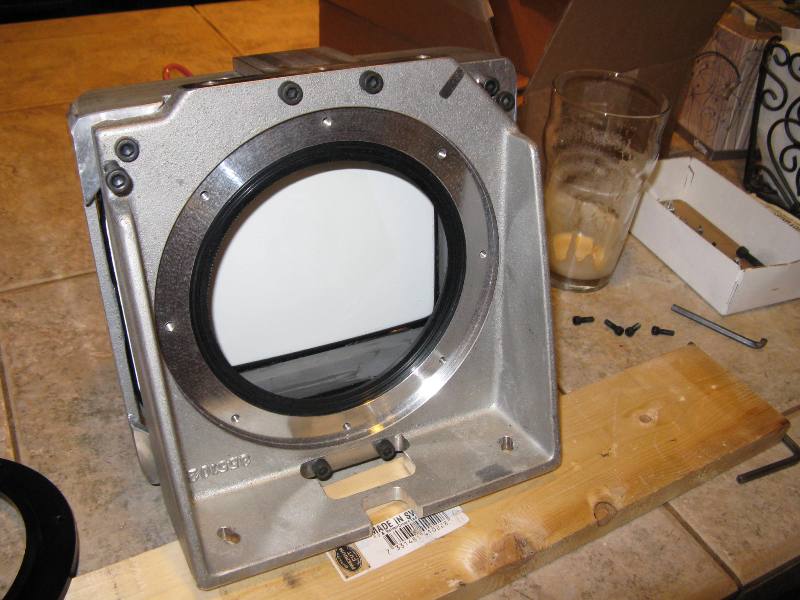
ok, took some pics of an install for a new Bellow's that Athanasios had made by Apple Rubber company in New York. First off I decided the old Silicone Bellow that Electrohome installed 12 years ago was not worth even trying to salvage. I started by removing the upper/lower pivot plates which allow Scheimphlug adjustment left/right. Then with a sharp knife, and the C-element side hanging over the sink, I cut around through the bellow. Be sure to have only a little of the knife blade exposed so you don't nick the plastic C-element. The old Glycol will simply drain out into the sink, run some water to flush it down the pipe, it is poisonous after all.
| Description: |
|
| Filesize: |
56.89 KB |
| Viewed: |
23370 Time(s) |
|
Last edited by draganm on Tue May 19, 2009 4:10 pm; edited 1 time in total
|
|
| Back to top |
|
 |
draganm
Joined: 08 Mar 2006
Posts: 8990
Location: Colorado
|
| Posted: Sat May 16, 2009 11:43 pm Post subject: |
|
|
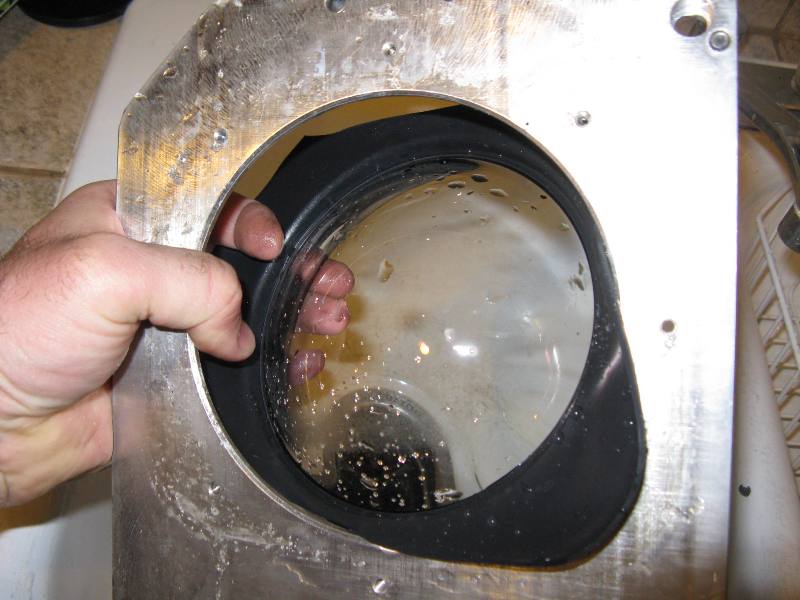
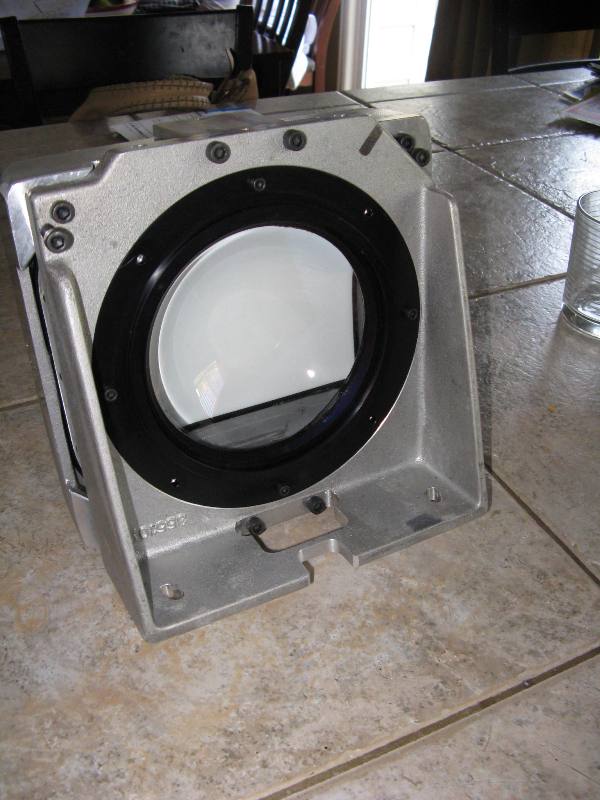
I then simply pushed the C-element with half a bellow attached through the front plate. For the back, I carefully scraped off the back-half of the bellow with a sharp knife. Keep a shallow angle on the knife so you don't gouge the Alum. and protective Anodize coating.
| Description: |
|
| Filesize: |
60.65 KB |
| Viewed: |
23368 Time(s) |
|
|
|
| Back to top |
|
|
draganm
Joined: 08 Mar 2006
Posts: 8990
Location: Colorado
|
| Posted: Sat May 16, 2009 11:49 pm Post subject: |
|
|
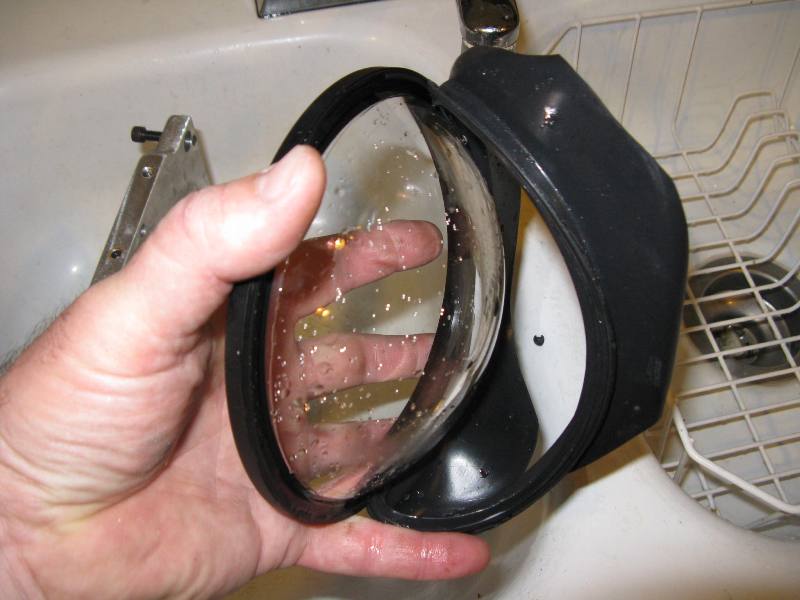
to seperate the old bellow from the C-element, simply peel it off with your fingers.
| Description: |
|
| Filesize: |
53.16 KB |
| Viewed: |
23361 Time(s) |
|
|
|
| Back to top |
|
|
draganm
Joined: 08 Mar 2006
Posts: 8990
Location: Colorado
|
| Posted: Sat May 16, 2009 11:50 pm Post subject: |
|
|
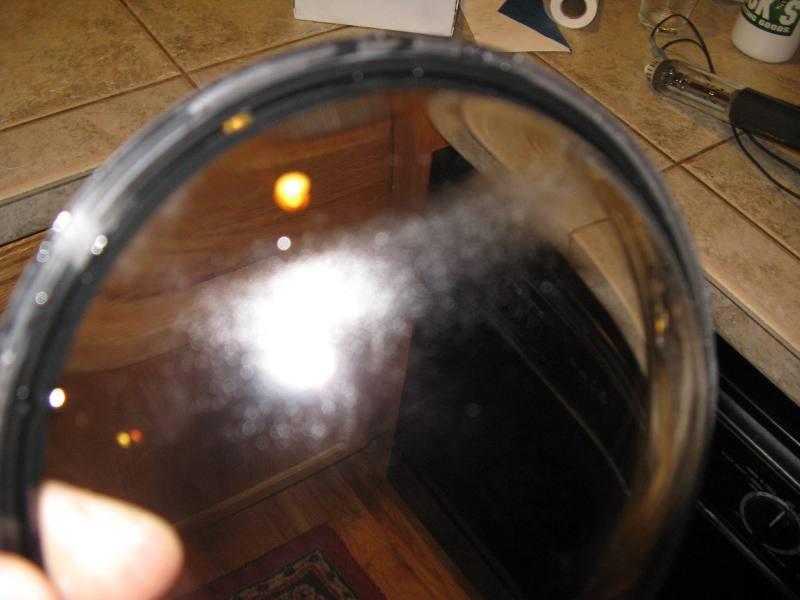
This tube had leaked and where the fluid level line had been the C-element was all pitted and etched. I have no idea why this happened but luckily the clear C-elements are easy to find and I had some minty spares laying around.
| Description: |
|
| Filesize: |
47.18 KB |
| Viewed: |
23362 Time(s) |
|
|
|
| Back to top |
|
|
draganm
Joined: 08 Mar 2006
Posts: 8990
Location: Colorado
|
| Posted: Sat May 16, 2009 11:51 pm Post subject: |
|
|
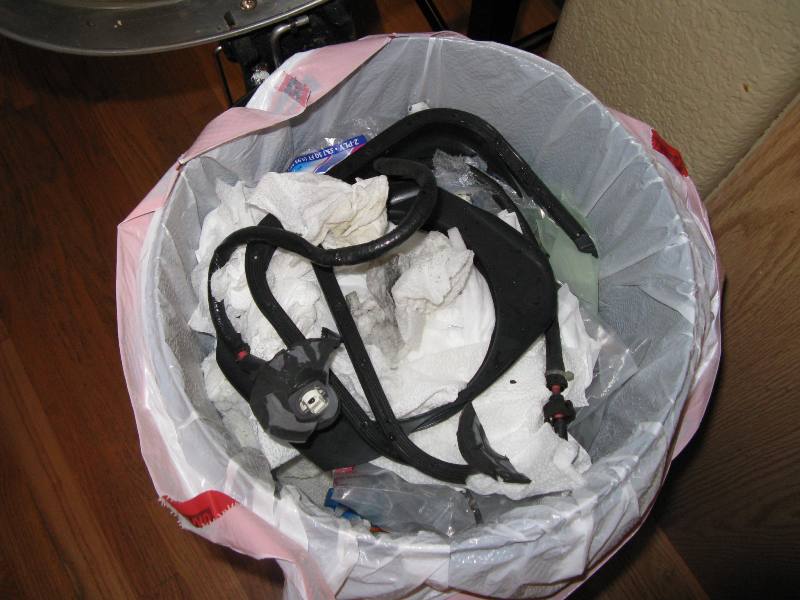
the old bellow chunks were then stored in the proper location 
| Description: |
|
| Filesize: |
66.63 KB |
| Viewed: |
23361 Time(s) |
|
|
|
| Back to top |
|
|
draganm
Joined: 08 Mar 2006
Posts: 8990
Location: Colorado
|
| Posted: Sat May 16, 2009 11:56 pm Post subject: |
|
|
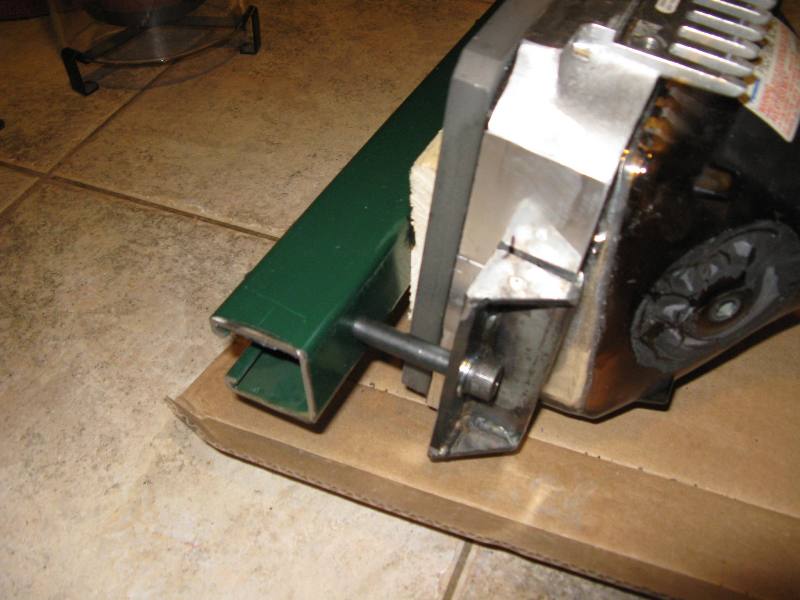
Next came the arduous task of digging out the potted Silicone from the tube mounting. I used a short bladed pocket knife because it's sturdy and cut down 3/8" ata time. Then dug out the chunks with a small cheap flat blade screw driver that I sharpened on a bench grinder. You have to dig down about and inch before you get to the bottom. At this point the face of the tube is still glued into the frame. People have used all types of clamps and wood blocks to remove the tube, even smashing it with a hammer  , but I decided to make a custom puller that grabs the Alum. frame and uses a pair of 3/8ths cap screws to draw a small piece of 2 x 4 towards the tube. A couple of turns of the cap screw and tube popped right out. , but I decided to make a custom puller that grabs the Alum. frame and uses a pair of 3/8ths cap screws to draw a small piece of 2 x 4 towards the tube. A couple of turns of the cap screw and tube popped right out.
| Description: |
|
| Filesize: |
56.94 KB |
| Viewed: |
23356 Time(s) |
|
|
|
| Back to top |
|
|
draganm
Joined: 08 Mar 2006
Posts: 8990
Location: Colorado
|
| Posted: Sun May 17, 2009 12:00 am Post subject: |
|
|
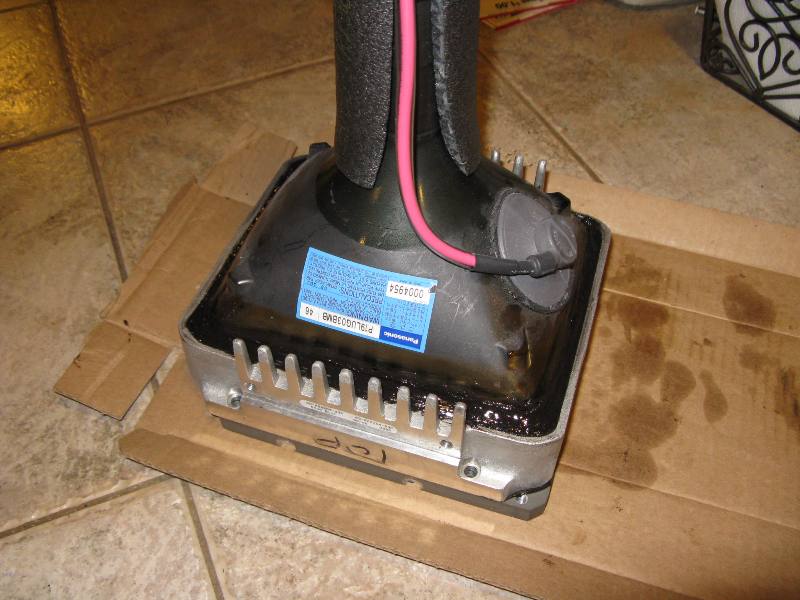
the final step is cleaning off all the old Silicone. Remeber that new silicone, or RTV, will not stick to old RTV that has cured. You have to get down to bare clean metal. Once clean I wiped everything with Acetone and potted the replacement tube in place. Be sure to get the Anode lead on the right side when looking from front of tube so it exits the marquee plastic tube housing through the notch and the clocking window on tube neck pointing the right way for VNB to sit properly. Let this cure for 48 hours at 75 degree's toom temp. and 50% humidity so tube is securely locked in place. If you live in a dry or cold place the curing can take much longer.
Here in CO avergae humidity in the winter is less than 10%, so I'll bring the tube inside the house and wrap a damp cloth around the bell to aid curing.
Edit: Since I wrote this thread I have added a couple of extra steps ot insure everything goes smoothly. After the new tube is potted and cured, or at the point where you ready to start re-assembly on your old tube, rinse the front of the LC chamber liberally with Isopropyl Alchohol prior to re-assembly. This will kill any mold spores that might have accumulated or were floating around in your tap-water, from growing in the new coolant. Also, if your anodize coating is starting to fail, see this thread
https://www.curtpalme.com/forum_archived/viewtopic.php@t=18105.html
You will want to paint the LC chamber with a Black Epoxy paint to seal the Aluminum from corroding with the coolant.
| Description: |
|
| Filesize: |
68.54 KB |
| Viewed: |
23349 Time(s) |
|
Last edited by draganm on Sun Nov 30, 2014 6:58 pm; edited 3 times in total
|
|
| Back to top |
|
|
draganm
Joined: 08 Mar 2006
Posts: 8990
Location: Colorado
|
| Posted: Sun May 17, 2009 12:04 am Post subject: |
|
|
Now it was time for Athans new EPDM boot. I placed the steel ring over the boot which fit like a glove. I then ran all the screws just far enough into the boot but not sticking out the other side. the boot is nice and tight and will hold all the screws for you. It's pretty niceand beats fumbling for them while the RTV is curing too. Athan suggested no RTV is needed but I am not taking any chances, replacing LC tubes sucks.
with all screws started, I ran a very thin bead of black RTV (GE Silicone II in a caulk gun tube, about $6.) This is the old packaging, the new one is all white
http://www.homedepot.ca/webapp/wcs/stores/servlet/CatalogSearchResultView?D=941920&Ntt=941920&catalogId=10051&langId=-15&storeId=10051&Dx=mode+matchallpartial&Ntx=mode+matchall&recN=118524&N=0&Ntk=P_PartNumber
then line up the boot to the tube housing and started running the screws in. Don't go too tight, when the boot starts to squeeze out a little on the sides then stop. wipe off an excess RTV that squeezes out the sides.
| Description: |
|
| Filesize: |
58.19 KB |
| Viewed: |
23346 Time(s) |
|
Last edited by draganm on Sat Jul 25, 2009 5:47 pm; edited 1 time in total
|
|
| Back to top |
|
|
draganm
Joined: 08 Mar 2006
Posts: 8990
Location: Colorado
|
| Posted: Sun May 17, 2009 12:10 am Post subject: |
|
|
slip the Scheimphlug pivot plate over the tube potting plate, it's a tight squeeze on the sides and if the boot is pushed out it will not go. Loosen the side cap screws a little and simply push the boot in away from the frame. Install the little threaded pivot pins and swage them with a hammer knock on a nail set. This is from the E-tech web-site http://www.etechvideo.com/techtip8.htm

Last edited by draganm on Tue Nov 09, 2010 4:11 pm; edited 1 time in total
|
|
| Back to top |
|
|
draganm
Joined: 08 Mar 2006
Posts: 8990
Location: Colorado
|
| Posted: Sun May 17, 2009 12:12 am Post subject: |
|
|
put the Horizontal pivot plate up against the tube and gently pull the boot through the window. Put the pivoting plates back on and use a dab of Lithium grease on the pivot pins so your Scheimphlug works smoothly. Important: center everything with the Scheimphlug screws so the boot is sitting centered in the round opening.
| Description: |
|
| Filesize: |
68.7 KB |
| Viewed: |
23341 Time(s) |
|
Last edited by draganm on Tue Nov 09, 2010 4:12 pm; edited 4 times in total
|
|
| Back to top |
|
|
draganm
Joined: 08 Mar 2006
Posts: 8990
Location: Colorado
|
| Posted: Sun May 17, 2009 12:14 am Post subject: |
|
|
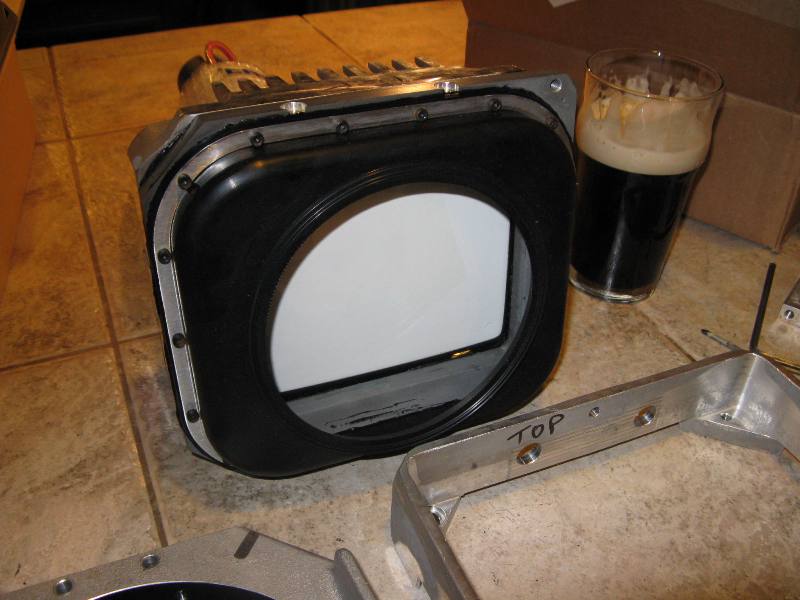
EDIT: I quite using RTV around the C-element, it's just not needed. clean off any residue on the back side of the c-element , try not to put any deep scratches our gouges on the back of the lip where gasket will seat.
Carefully put the C-element in making sure it doesn't push the bellow lip off it's seating area. Clamp it in place using the 4 shorter screws at 3,6,9, and 12 o-clock. Remember the other 4 longer screws hold the lens on.
If you replaced the tube, wait 3 or 4 days for the deep Silicone cavity around the tube to cure.
If your doing just the bellow 24 hours at 70 degree's and 50% humidity is fine.
Fill CRT coolant and do a 24 hour leak check over a paper towel before installing in chassis.
AHHH, fresh LUG ready to go, ain't it beautiful
| Description: |
|
| Filesize: |
66.29 KB |
| Viewed: |
23338 Time(s) |
|
Last edited by draganm on Sat May 19, 2012 4:27 pm; edited 3 times in total
|
|
| Back to top |
|
|
dturco

Joined: 06 Feb 2009
Posts: 3778
Location: Eastern Shore Maryland
TV/Projector: Runco DLP VX-3000i Marquee 9500 parts doner
|
| Posted: Sun May 17, 2009 12:22 am Post subject: |
|
|
That didn't look to hard. It does take time though it looks like you finished at least one glass of guinness 
How much time did that take?
_________________
Firefly rules. Can't stop the signal.
http://www.hulu.com/firefly
|
|
| Back to top |
|
|
Elaine Benes
Joined: 25 Apr 2006
Posts: 1416
|
| Posted: Sun May 17, 2009 12:41 am Post subject: |
|
|
Have you ever tried Fuller's London Porter ?
If you ever get the chance, give it a try, I imagine, seeing that beautiful beer, you'd like it...
|
|
| Back to top |
|
|
draganm
Joined: 08 Mar 2006
Posts: 8990
Location: Colorado
|
| Posted: Sun May 17, 2009 1:35 am Post subject: |
|
|
| dturco wrote: | That didn't look to hard. It does take time though it looks like you finished at least one glass of guinness
How much time did that take? |
hey this theads not about Beer but LC tubes drive me to drinking  It took me about 5 hours from the time I started stripping the yokes (magentics ) off to the time I -reinstalled the C-element. Dave if your doing only the C-elment it won't be as bad since you will be leaving the Tube mounting alone. Just the Bellow and lens isn't too bad really. It took me about 5 hours from the time I started stripping the yokes (magentics ) off to the time I -reinstalled the C-element. Dave if your doing only the C-elment it won't be as bad since you will be leaving the Tube mounting alone. Just the Bellow and lens isn't too bad really.
I really like the Fullers but I only remember the London Pride, don't think I tried their Porter? Anyway, that stuff is pricey, the Guinness was $18.99 for an 18 pack at the worlds largest Liquor store. Compare that to a phony 14 oz. Pint for $5. at a typical phony American "pub". 
|
|
| Back to top |
|
|
AnalogRocks
Forum Moderator
Joined: 08 Mar 2006
Posts: 26706
Location: Toronto, Ontario, Canada
TV/Projector: Sony 1252Q, AMPRO 4000G
|
| Posted: Sun May 17, 2009 3:30 am Post subject: |
|
|
Just remember the Guiness goes in your mouth not in the tube.
You make this look easy.
_________________
Tech support for nothing
CRT.
HD done right!
|
|
| Back to top |
|
|
Nashou66

Joined: 12 Jan 2007
Posts: 16171
Location: West Seneca NY
|
| Posted: Sun May 17, 2009 7:15 am Post subject: |
|
|
Looks good Dragan!!!! I'm so glad to see one of my bellows being used after a long and stressful period to getting them made. yes i said stressful, i worry that they might not work and they might not sell. But i too was amazed at how well everything lined up when Dale showed me on the LC housing I gave him for testing. I think giving him that housing really helped in the final touches he put into the design. the screw holes he actually made a bit tighter fitting so there is less a chance of glycol leaking out through the screw holes.
Athanasios
_________________
Don't blame your underwear for your crooked ass~ unknown Greek philosopher
"Republicans believe every day is the Fourth of July, but the Democrats believe every day is April 15." --- President Reagan
One Smart Dog!!!
Marquee High Performance Bellows now shipping!!
Marquee Modifications and Performance Enhancement
Marquee C-element and Bellow removal
|
|
| Back to top |
|
|
CIR Engineering

Joined: 25 Aug 2008
Posts: 4269
Location: Chicago USA & Berlin Germany
|
| Posted: Sun May 17, 2009 3:31 pm Post subject: |
|
|
Pretty new bellow ooooooooo 
Very nice!
craigr
_________________
JETI 1501-HiRes 2nm Spectroradiometer
JETI 1211 Spectroradiometer
Photo Research PR-650 Spectroradiometer
Klein K10-A Colorimeter
Murideo Fresco SIX-G HDMI 2.x Multimedia Generator
Murideo Fresco SIX-A HDMI 2.x Analyzer
Light Illusion ColourSpace XPT Color Calibration Software
Light Illusion LightSpace XPT Pro Version 10.x Color Calibration Software
OMARDRIS JVC Software Patch to use K10-A and Jeti with JVC OEM AutoCal Software!
Sencore CR7000 CRT Tube Analyzer / Rejuvenater
Authorized Dealer for Lumagen & just about everything worth buying 
www.CIR-Engineering.com - craigr@cir-engineering.com
Phone: 865-405-6892
|
|
| Back to top |
|
|
draganm
Joined: 08 Mar 2006
Posts: 8990
Location: Colorado
|
| Posted: Sun May 17, 2009 4:21 pm Post subject: |
|
|
| Nashou66 wrote: | | Looks good Dragan!!!! I'm so glad to see one of my bellows being used after a long and stressful period to getting them made. yes i said stressful, i worry that they might not work and they might not sell. Athanasios |
yeah the bellow is great, How soon can I get the other 2?  I appreciate what you did more than I can express, if it wasn't for this opportunity the Vision 1 in my shop would have to have been converted back into a plain-jane 8500 I appreciate what you did more than I can express, if it wasn't for this opportunity the Vision 1 in my shop would have to have been converted back into a plain-jane 8500 
I can imagine that this was a stressful investment since you put out so much money out of pocket into something that wasn't a guaranteed success. Luckily you found the right company and right people, and that makes ALL the difference. The Marquee LC CRT projector just got a new lease on life.
|
|
| Back to top |
|
|
draganm
Joined: 08 Mar 2006
Posts: 8990
Location: Colorado
|
| Posted: Sun May 17, 2009 4:23 pm Post subject: |
|
|
| AnalogRocks wrote: | Just remember the Guiness goes in your mouth not in the tube.
You make this look easy. |
I don't want to give the impression that I drink while working on Projectors or people's circuit boards. If you notice from the pics that was a "Victory Pint" after all the hard work was done. 
|
|
| Back to top |
|
|
Nashou66
Joined: 12 Jan 2007
Posts: 16171
Location: West Seneca NY
|
| Posted: Sun May 17, 2009 6:12 pm Post subject: |
|
|
| draganm wrote: | | AnalogRocks wrote: | Just remember the Guiness goes in your mouth not in the tube.
You make this look easy. |
I don't want to give the impression that I drink while working on Projectors or people's circuit boards. If you notice from the pics that was a "Victory Pint" after all the hard work was done. |
Looks more like an impearial pint !!!
Athanasios
_________________
Don't blame your underwear for your crooked ass~ unknown Greek philosopher
"Republicans believe every day is the Fourth of July, but the Democrats believe every day is April 15." --- President Reagan
One Smart Dog!!!
Marquee High Performance Bellows now shipping!!
Marquee Modifications and Performance Enhancement
Marquee C-element and Bellow removal
|
|
| Back to top |
|
|
|
|


