| Author |
Message |
spitz
Joined: 26 Oct 2007
Posts: 26
Location: Indianapolis, IN
|
| Posted: Wed Jan 28, 2009 6:43 pm Post subject: Barco Retro 808s 8" C-element swap |
|
|
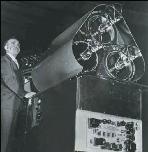
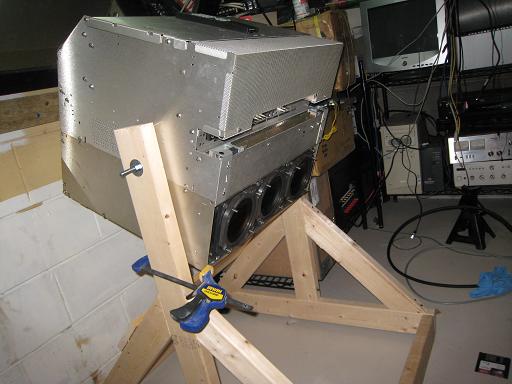
Hi Guys,
I finally got some C-elements and HD-18's for my retro 808s. I've got a couple questions about swapping them in.
1 - I'm assuming I'll need to remove some glycol before pulling the front mounting plate and putting the HD18 c-element in. Is this correct? I'd like to avoid removing the tubes from the chassis to do this swap if possible.
2 - If so, where is the fill screw on the barco 8" LC housings? Are they on the side as shown in the picture I attached?
3 - The housings have bellows and two of the front housing bolts are spring loaded. Does this mean this model can do lens flapping in both directions? The picture shows one of them.
4- Has anyone come across an easier method for mounting HD18's on a retro, other than removing the flanges in a lathe, per Terry's thread over at AVS? http://archive2.avsforum.com/avs-vb/showthread.php?t=665678&page=1&pp=30.
Thanks!
Matt
| Description: |
|
| Filesize: |
115.17 KB |
| Viewed: |
10919 Time(s) |

|
|
|
| Back to top |
|
 |
Mark_A_W
Joined: 15 Mar 2006
Posts: 3068
Location: Sunny Melbourne Australia
|
| Posted: Thu Jan 29, 2009 10:55 am Post subject: |
|
|
I don't know Barco's but I don't think you'll have to drain any glycol.
Make sure the C element is dead level, pop it out, and pop in the new one.
|
|
| Back to top |
|
|
r.bauer
Joined: 08 Apr 2006
Posts: 280
Location: The Netherlands
|
| Posted: Thu Jan 29, 2009 12:36 pm Post subject: Re: Barco Retro 808s 8" C-element swap |
|
|
| spitz wrote: | | 1 - I'm assuming I'll need to remove some glycol before pulling the front mounting plate and putting the HD18 c-element in. Is this correct? I'd like to avoid removing the tubes from the chassis to do this swap if possible. |
No, just level the tube, and take out the C-element.
| spitz wrote: | | 2 - If so, where is the fill screw on the barco 8" LC housings? Are they on the side as shown in the picture I attached? |
That is the fill screw, but it is not used during C-element swap.
| spitz wrote: | | 3 - The housings have bellows and two of the front housing bolts are spring loaded. Does this mean this model can do lens flapping in both directions? The picture shows one of them. |
The spring loaded bolts are for continuous scheimpflug correction. That is something completely different than lans flapping. Lens flapping, aka toe-in, is done by unbolting the screws which are shown on the left side in the image. One bolt has a slot in which it can adjusted.
|
|
| Back to top |
|
|
spitz
Joined: 26 Oct 2007
Posts: 26
Location: Indianapolis, IN
|
| Posted: Thu Jan 29, 2009 2:30 pm Post subject: |
|
|
I'm VERY glad to hear I don't have to pull the tubes or drain the glycol!
My bad on the terminology. I meant scheimpflug. Thought that was the same as flapping
Thanks for all the input. Time to find someone to turn the flanges off of these lenses.
|
|
| Back to top |
|
|
Mark_A_W
Joined: 15 Mar 2006
Posts: 3068
Location: Sunny Melbourne Australia
|
| Posted: Thu Jan 29, 2009 8:28 pm Post subject: |
|
|
Lens flapping is scheimpflug.
Toe-in is the different one.
You were right Spitz.
|
|
| Back to top |
|
|
r.bauer
Joined: 08 Apr 2006
Posts: 280
Location: The Netherlands
|
| Posted: Thu Jan 29, 2009 9:03 pm Post subject: |
|
|
| Mark_A_W wrote: | Lens flapping is scheimpflug.
Toe-in is the different one.
You were right Spitz. |
When adjusting scheimpflug, the lens does not move, so lens flapping to me seems to be the wrong name for it.
Or am I missing something as my first language is not english?
|
|
| Back to top |
|
|
bbfarmht

Joined: 27 May 2006
Posts: 1273
Location: Where the Mississippi runs east to west!!
|
| Posted: Thu Jan 29, 2009 10:37 pm Post subject: |
|
|
More importantly I thought these housings did not have lens flapping/scheimpflug?
I have the same housings and, doing a lc conversion on my graphics 808S chassis with p16 tubes.
_________________
Adam
"Any society that would give up a little liberty to gain a little security will deserve neither and lose both"
Benjamin Franklin
|
|
| Back to top |
|
|
spitz
Joined: 26 Oct 2007
Posts: 26
Location: Indianapolis, IN
|
| Posted: Fri Jan 30, 2009 12:31 am Post subject: Zenith 1200 similarities |
|
|
My retro 808s appears to have the same guts as the Zenith 1200, including the tube housings. If you look, two of the 4 bolts visible from the front are spring loaded and adjust the scheimpflug for both diagonals. After digging around, I found the install manual on Curt's Zenith 1200 page that shows where they are. Can you feel a rubber bellows between the front and rear housings? If so, I'd say you have scheimpflug.
Here's a link to the install manual: http://www.curtpalme.com/docs/Zenith1200_Install.pdf. Check page 7-6.
|
|
| Back to top |
|
|
spitz
Joined: 26 Oct 2007
Posts: 26
Location: Indianapolis, IN
|
| Posted: Tue Feb 03, 2009 3:21 pm Post subject: Done! |
|
|
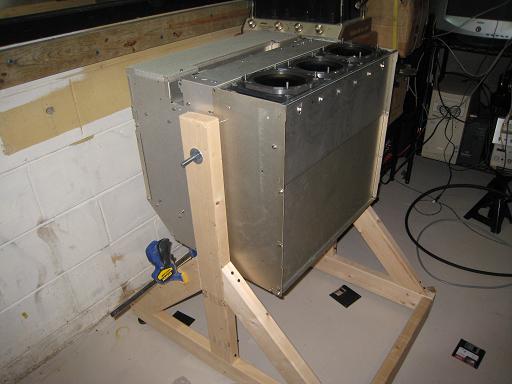
So, last night I got the c-elements swapped in. It was pretty easy, other than the pucker factor of messing with glycol. For posterity, here's what I did.
1 - mark the location of each tube color. I did not want to have to sit and figure out which c-element goes where in the middle of this swap.
2 - orient the projector so the tube faces are level. Make sure it is secure!
3 - remove lenses
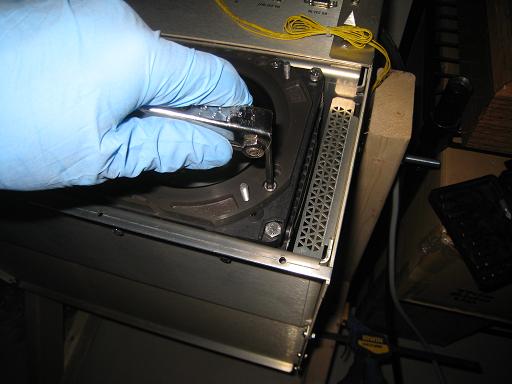
4 - remove the 4 hex screws that hold down the c-element retaining plate and set it aside.
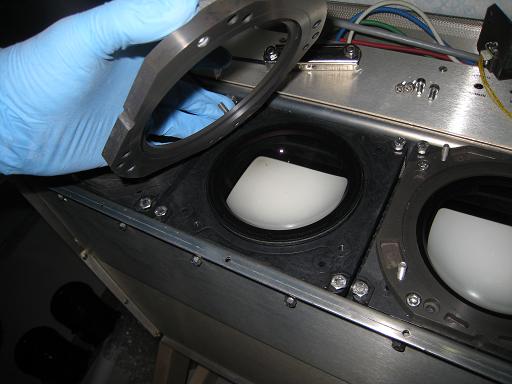
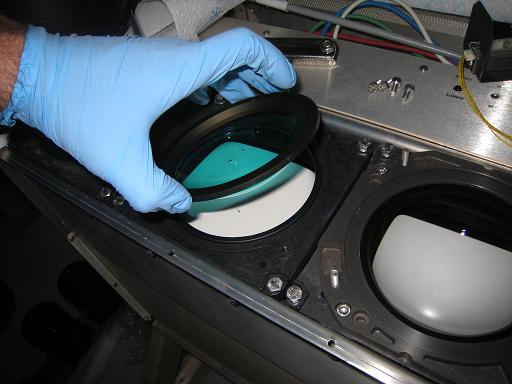
5 - GENTLY lift out the c-element. They feel like they have a vacuum holding them down but some firm pressure will release them. My blue one required some convincing with a screwdriver.
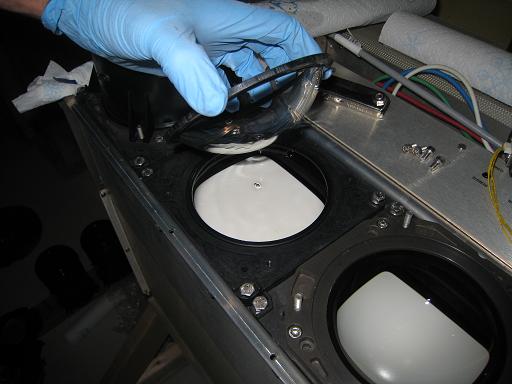
6 - Drain the c-element over the exposed tube face for 30sec or so until most of the glycol drains off.
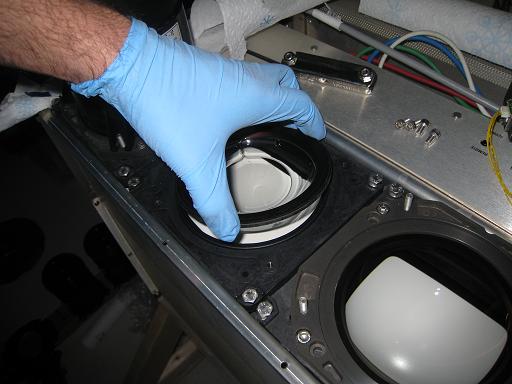
7 - Place the new c-element into the housing and GENTLY push it down by its edges until it sits flat on the housing. The vacuum effect should keep it in place while the retaining plate is replaced.
8 - Put the retaining plate on and replace the 4 hex screws.
9 - Leak check. This may be unecessary but I tilted my projector so the tube faces were down and put some newspaper underneath it so see if any glycol drips out. I had one drip this morning but I hope it was because I was sloppy putting that particular c-element back in the housing.
As mentioned many times before on this forum, ALWAYS handle the c-element by its edges. I used rubber gloves to keep the glycol off my hands. Keeping a roll of paper towels handy is also a good idea.
Now, on to modifying the HD-18's to fit the Barco mounting plate!
-Matt
| Description: |
| Securing the projector so it is level. |
|
| Filesize: |
34.75 KB |
| Viewed: |
10774 Time(s) |
|
| Description: |
| removing the retaining plate screws |
|
| Filesize: |
34.39 KB |
| Viewed: |
10774 Time(s) |
|
| Description: |
| removing the retaining plate |
|
| Filesize: |
36.6 KB |
| Viewed: |
10774 Time(s) |
|
| Description: |
| removing the old c-element |
|
| Filesize: |
37.96 KB |
| Viewed: |
10774 Time(s) |
|
| Description: |
| draining the glycol off the c-element |
|
| Filesize: |
35.11 KB |
| Viewed: |
10774 Time(s) |
|
| Description: |
| in with the new c-element |
|
| Filesize: |
37.16 KB |
| Viewed: |
10774 Time(s) |
|
| Description: |
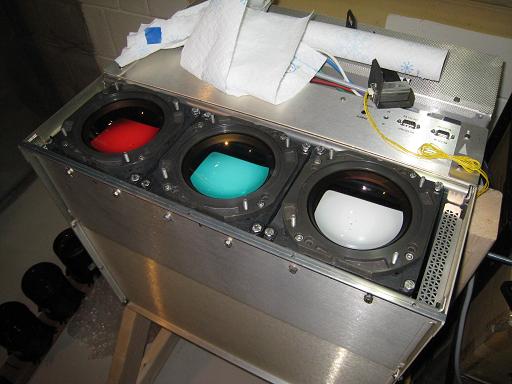
| ooooooooh, color correction! |
|
| Filesize: |
40.51 KB |
| Viewed: |
10774 Time(s) |
|
| Description: |
|
| Filesize: |
39.97 KB |
| Viewed: |
10774 Time(s) |
|
|
|
| Back to top |
|
|
Nashou66

Joined: 12 Jan 2007
Posts: 16171
Location: West Seneca NY
|
|
| Back to top |
|
|
bbfarmht
Joined: 27 May 2006
Posts: 1273
Location: Where the Mississippi runs east to west!!
|
| Posted: Tue Feb 03, 2009 10:39 pm Post subject: |
|
|
Nice work!!!
Very soon I will post the pictures from my AC to LC conversion on my graphics 808s. I am hoping to receive c-elements and lenses from a g-70. 
I just finished making the top and bottom mounts for my LC housings and they are now test mounted in the projector. I have the hardware left to swap over and I am ready to fire up the new P16-LNP tubes.
_________________
Adam
"Any society that would give up a little liberty to gain a little security will deserve neither and lose both"
Benjamin Franklin
|
|
| Back to top |
|
|
AnalogRocks
Forum Moderator

Joined: 08 Mar 2006
Posts: 26706
Location: Toronto, Ontario, Canada
TV/Projector: Sony 1252Q, AMPRO 4000G
|
| Posted: Wed Feb 04, 2009 1:22 am Post subject: |
|
|
I really hope you remembered which way around the red and the blue were or you'll have a 3 eyed, three guned, flying purple people projector 
_________________
Tech support for nothing
CRT.
HD done right!
|
|
| Back to top |
|
|
spitz
Joined: 26 Oct 2007
Posts: 26
Location: Indianapolis, IN
|
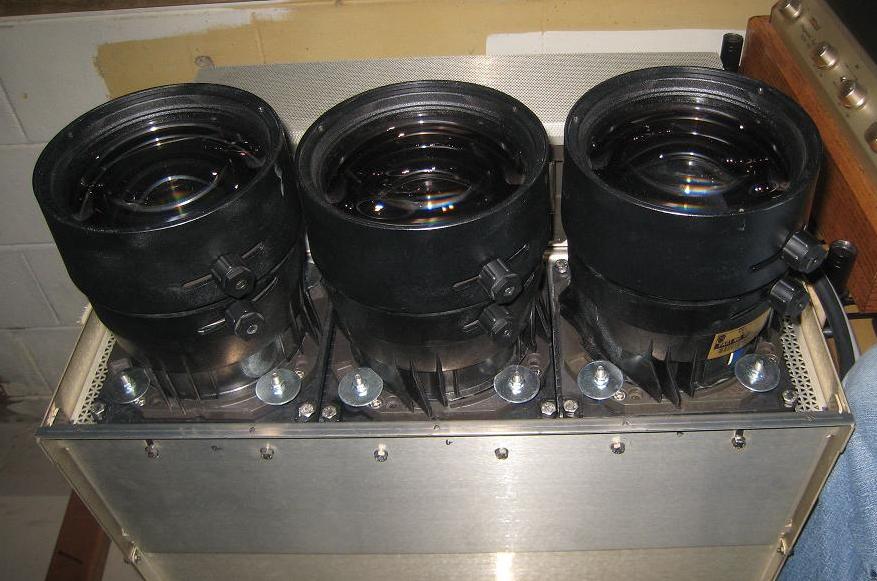
| Posted: Mon Feb 09, 2009 4:16 pm Post subject: All Done! Lens mods for the HD18 |
|
|
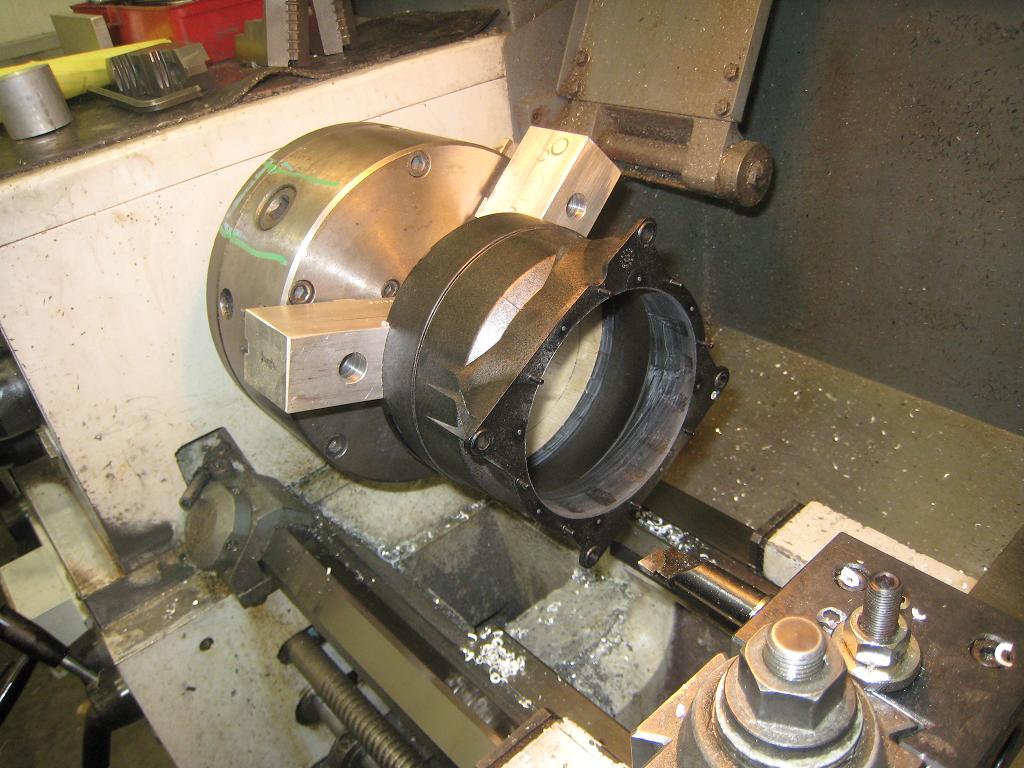
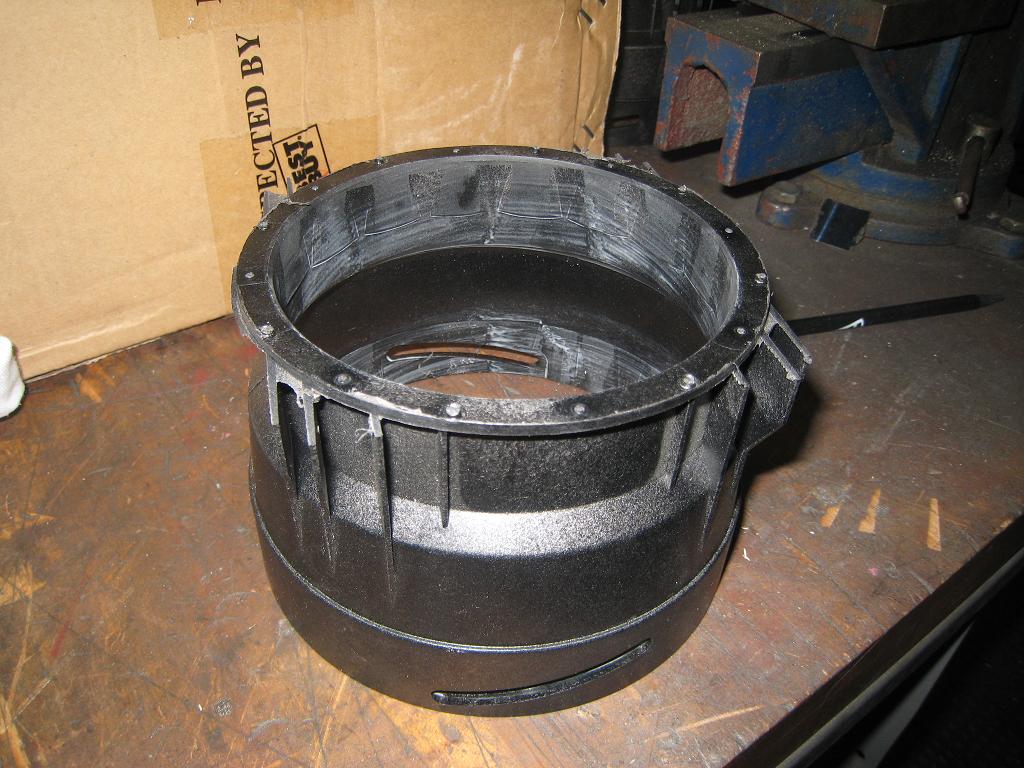
C-elements are in, now for some new lenses. Unfortunately, the HD-18's have a totally different mount than the HD-117's I'm replacing. The HD18's have a flat mount that won't sit into the recess of the Barco tube housings. After some inspiration from Terry and Galen on the other forum, I found a friend with a metal lathe and went to work:
1 - Remove the lens guts. I had to use a square drive drywall screw to fit the square head of the focus screw. I used a small screwdriver to get the screw on the other side out.
2 - Make a wood plug to fit where the lens guts go. This is important because the lens housing is pretty flimsy by itself. If you clamp the lathe jaws down without it, the outside won't be round when your done.
3 - Start cutting! I cut the OD of the HD18 to the same diameter as the old HD117 and went in to a final depth of about 3mm. The only part I had to watch out for was on the last pass where the rest of the flange comes off, make sure you cut to the final depth. Otherwise, the ribs on the mounts start catching on the cutter.
4 - Cut / file off the alignment pins. The old mounts use pins to get the spacing right from the lens to the C-element. They won't fit the Barco mounts.
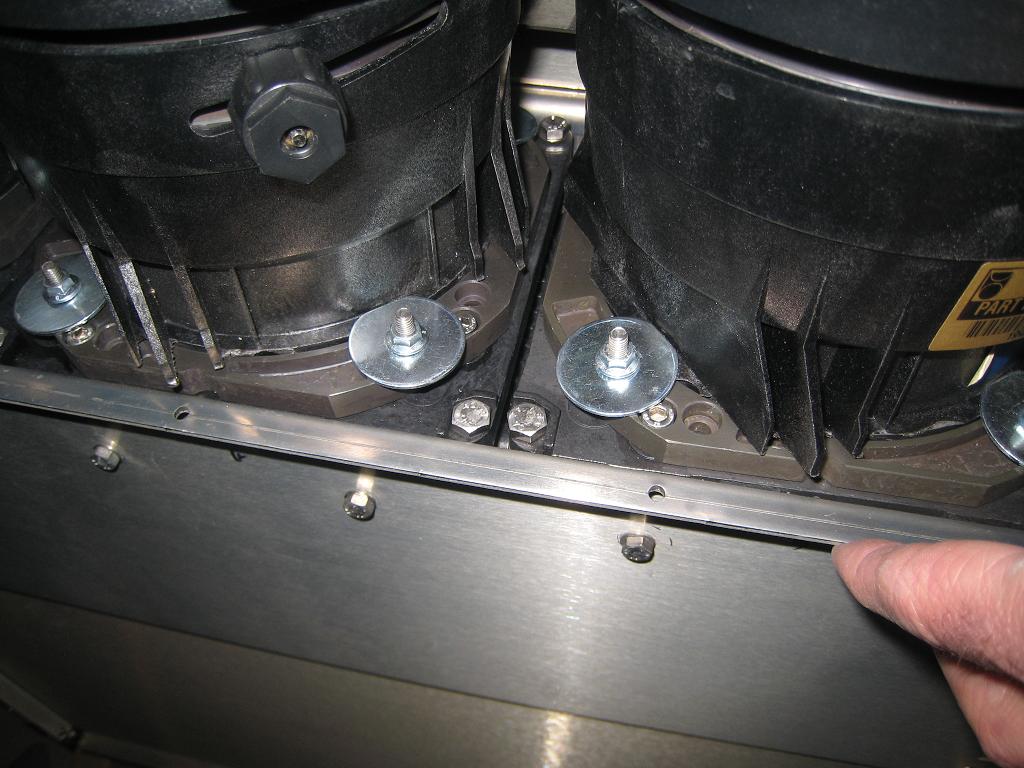
5 - Put the lens back together
6 - Mount the lenses. I think Galen used metal bars recessed into a notch cut into the lens mount ribs. I tried something simpler and it seems to work really well. I bought some fender washers ( 3/16" hole, 1.25" OD) and ground off a small flat spot so they would clear the lens body. These hold down the small flange around the lens.
With that, everything is back together. I was a little worried after putting all three lenses on. They're larger than the old HD117's and there isn't much room for toe-in. I did a quick focus and alignment and thankfully they have enough range for my screen.
These lenses do have a longer throw distance than the old ones which is a good thing for my rear-projection setup. It seems the longer the throw, the less hot-spotting I have. I think its because the light hits the edges of the screen at a lesser angle. Things are much more even now. Now for the hard part - re-aligning and focusing everything.
Many thanks to my friend S.D. for the use of his shop and his expertise.
-Matt
| Description: |
| On the lathe ready for cutting. Note the wood plug that keep the jaws from deforming the housing. |
|
| Filesize: |
126.95 KB |
| Viewed: |
10691 Time(s) |
|
| Description: |
| One lens housing fresh off the lathe. |
|
| Filesize: |
136.33 KB |
| Viewed: |
10691 Time(s) |
|
| Description: |
| Lens is reassembled - note the pins have been filed off. |
|
| Filesize: |
96.88 KB |
| Viewed: |
10691 Time(s) |

|
| Description: |
|
| Filesize: |
113.57 KB |
| Viewed: |
10692 Time(s) |
|
| Description: |
| All together again. Look how close the lenses are! |
|
| Filesize: |
78.68 KB |
| Viewed: |
10691 Time(s) |
|
|
|
| Back to top |
|
|
AnalogRocks
Forum Moderator
Joined: 08 Mar 2006
Posts: 26706
Location: Toronto, Ontario, Canada
TV/Projector: Sony 1252Q, AMPRO 4000G
|
| Posted: Mon Feb 09, 2009 7:07 pm Post subject: |
|
|
Wow, overstuffed lenses.
Where's the cream filling
_________________
Tech support for nothing
CRT.
HD done right!
|
|
| Back to top |
|
|
|
|


