| Author |
Message |
Nashou66

Joined: 12 Jan 2007
Posts: 16171
Location: West Seneca NY
|
| Posted: Fri Aug 15, 2008 3:26 am Post subject: Marquee LC Bellow and C element removal |
|
|
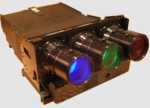
Hi Guys, This procedure is very risky since Bellows wont be sold By VDC anymore, hence the reason i wanted to remove a bellow from a otherwise perfect tube and clear Glycol,also i plan to add a red C-element.
I am going to take this bellow to manufactured to see if they can be made, tooling cost will be the largest cost I think but we will see.
Ok, first off you nee syringe and a small long tube to reach the bottom of the LC chamber. I made on from some hobby store parts. I got a syringe for applying Glue,a piece of 12 inch long 3/32 diameter tubing(aluminum) and some heat shrink tubing of different sizes (radio Shack).
Blurry picture of Syringe , tube and heat shrink assembled

On the top of the LC housing you will see two hex screws , remove them slowly as there might be some pressure and it could squirt out, I was lucky no squirt! Put the tube slowly down into the chamber:
Tube in chamber end all the way to bottom

This is the part that takes a long time, if you have a really large syringe it go a bit faster. Slowly draw up till the syringe is filled then empty into a jar for later use if its nice and clear like mine. i had to do this procedure about 30 times.
Almost there !

Once its all out remove the C-element mounting ring.
Ring removed

i was so concentrated on removing the C-element i forgot to take a picture of me removing the bellow from the C-element !! Any how i only have two hands and I needed both to separate the bellow from the C-Element. What you do is you get something that has a sharp pint to get a grip on the edge of the C-element and pry it out of the mounting plate hole. Be careful you don't slip and scratch the Element ! I used the tip of a 1/4 inch paddle drill bit( I know not normal tool but it had a nice sharp tip to dig into the edge of the C-element). slowly work your way around the edge till you get it to move, you dont have to get it out as the bellow is holding it in place since it is probably adhered to the C-element. Once you feel you loosened it all the way around, this will take some force also, but use controlled pressure when freeing it.It took me about 5 rotations little by little till it finally broke free of its grip of the mounting plate hole. now at the top of the tube side of the C-element i pried it out enough to use my soldering scraper from radio shack to separate the bellow from the lens. Be very carefull here as you can puncture the bellow, then your screwed having to send your tube assembly to VDC for replacement  . This is hard as you need to keep the lens and bellow out enough from the mounting plate to get to the seam of the bellow and lens. I put a lot of pressure with my thump against the edge of the lens to hold it up enough from the mounting plate to pry the bellow down from the lens. wish I could have taken a pic. I'll add one when I do this again for my other red C I need to add. Once i got it free I opened up enough area to stick my finger into the opening and slide it around between the lens and bellow till it was free!!! Yeee ha!!!!!!! I did it!!! . This is hard as you need to keep the lens and bellow out enough from the mounting plate to get to the seam of the bellow and lens. I put a lot of pressure with my thump against the edge of the lens to hold it up enough from the mounting plate to pry the bellow down from the lens. wish I could have taken a pic. I'll add one when I do this again for my other red C I need to add. Once i got it free I opened up enough area to stick my finger into the opening and slide it around between the lens and bellow till it was free!!! Yeee ha!!!!!!! I did it!!!
Free C-element

now pry the bellow from the mounting plate hole being just as carefull, it might be stuck just like the C-element.
Removing Bellow from mounting plate

Run your finger around the mounting plate hole and between the Bellow, the C-element removal explained earlier looked just like this !!

Once you separated the Bellow from the mountin plate remove the screws that hold the mounting plate to the back of the housing assembly.
remove all screws

Mounting plate removed!!

Next remove all the screws from the metal gasket that hold the Bellow to the back of the Housing.
metal gasket and bellow revealed

I used a star socket, the screws came out with just finger pressure for me, not sure if this is how loose they should be?
Rusty Star tool to match rusty screws!

Once all the screws are removed pull off the metal gasket


This part of the bellow is also going to be adhered to the housing, I used my Solder scraper tool again and then my fingers lifting little by little all the way around the bellow. GO SLOW !!!! you don't want to tear it, it took em about 15 minutes to go all the way around.
Use finger to gently pry away bellow

Be carefull near screw holes!!! less material there and easier to tear go SLOW!!!!
Be carefull near screw holes!!

Bellow removed all in one piece!!!

Naked housing

When it comes time to reinstall the bellow you need to clean the edge of the housing as some of the bellow ribs may have stuck to it. Clean the face of your tubes and bellow housing before putting it back together, i have to wait for my red C-element before i can continue.
Athanasios
Just noticed there is an advanced procedure for C-element rmoval!! oh well Mine went one step further
with the bellow removal . 
_________________
Don't blame your underwear for your crooked ass~ unknown Greek philosopher
"Republicans believe every day is the Fourth of July, but the Democrats believe every day is April 15." --- President Reagan
One Smart Dog!!!
Marquee High Performance Bellows now shipping!!
Marquee Modifications and Performance Enhancement
Marquee C-element and Bellow removal
|
|
| Back to top |
|
 |
Arno P

Joined: 01 Jan 2007
Posts: 282
Location: The Netherlands
|
| Posted: Fri Aug 15, 2008 11:04 am Post subject: |
|
|
Perferct Manual, Thanks !
_________________
"Obviously you're not a golfer"
|
|
| Back to top |
|
|
Mark_A_W
Joined: 15 Mar 2006
Posts: 3068
Location: Sunny Melbourne Australia
|
| Posted: Fri Aug 15, 2008 12:15 pm Post subject: |
|
|
Ok, why do you guys constantly need bellows if they can be removed intact with a bit of care?
Why can't you reuse them?
Do they typically degrade?
Did you figure out why the glycol gets discoloured? The housing looks hard anodised, the bellows covers everything else....it should be ok for ever....what can't I see in the pictures?
|
|
| Back to top |
|
|
Nashou66
Joined: 12 Jan 2007
Posts: 16171
Location: West Seneca NY
|
| Posted: Fri Aug 15, 2008 12:31 pm Post subject: |
|
|
If the seal isn't that great I assume air can get in and possibly some micro organism that can cloud the glycol in time. also the screws they use are not stainless and of some other material, when i pushed in the tube to suck out the glycol it pushed some fungus that was clinging to the bottom of the screw down into the chamber.
Its not a bit of care its EXTREME care. this is not as easy as the pics look to separate the bellow. I didn't take pics of the critical part,
removing the C-element, and that is why we need extra Bellows when replacing the C-elements out to colored ones.
If the bellow is damaged it's shot, no way to use it again or repair. There is now Billy Mays super puddy that can fix it 
Also they can degrade and become very spongy and burst if too much pressure is built up over time. Mine were weeping/sweating, I am not sure if that is normal or if I had too much pressure but i want to replace them all with new ones and be assured i'll have a nice seal for the next 10 years or so.
These bellows could be over 15 years old, Don't want them to spring a leak while watching a movie, and ask Gino what happens when you get Glycol on your boards.
Athanasios
Athanasios
_________________
Don't blame your underwear for your crooked ass~ unknown Greek philosopher
"Republicans believe every day is the Fourth of July, but the Democrats believe every day is April 15." --- President Reagan
One Smart Dog!!!
Marquee High Performance Bellows now shipping!!
Marquee Modifications and Performance Enhancement
Marquee C-element and Bellow removal
|
|
| Back to top |
|
|
Mark_A_W
Joined: 15 Mar 2006
Posts: 3068
Location: Sunny Melbourne Australia
|
| Posted: Fri Aug 15, 2008 12:45 pm Post subject: |
|
|
It's not fungus, it's corrosion - a chemical reaction. You could try adding some glycerin if they just used glycol.
Stainless screws may not be a good idea with an aluminium housing - that sets up a galvanic pair, corroding the aluminium. You may want to coat aluminium screws, rather than introduce another material like stainless.
Pity they didn't make them properly in the first place...like a NEC No screws contact the coolant, just the black housing and the bellows. Sorry, I just had to.
|
|
| Back to top |
|
|
stefuel

Joined: 07 Mar 2006
Posts: 3353
Location: Green Harbor MA USA
|
| Posted: Fri Aug 15, 2008 12:54 pm Post subject: |
|
|
I guess I'll have to inject my .02 cents worth, otherwise the price of AmPro stock will increase and I aim to keep the stock down  I know I'm a AmPro fan but that doesn't mean I don't keep up with the lessor projectors. I know I'm a AmPro fan but that doesn't mean I don't keep up with the lessor projectors. 
It's common for Marquee bellows to "sweat" under pressure. If you'd just follow Tim's advice and remove the pressure, you'll most likely be OK. If the pressure was normalized, you could poke a hole in it and the fluid would stay in. Have you ever put your finger over the end of a straw and lifted it out of a glass and noticed that the liquid stayed in the straw.
You guy's are making this bellows thing much more difficult than it needs to be.
_________________
Chip
A Barco is only a AmPro with training wheels
Card carrying member of the AVS chain gang.
|
|
| Back to top |
|
|
Ile
Joined: 09 Mar 2006
Posts: 1491
Location: Jyväskylä, Finland
|
| Posted: Fri Aug 15, 2008 1:00 pm Post subject: |
|
|
Your tubes was easy, because c-element was not clued to bellows like those I have removed. 
When glued, it's needed to remove bellow from screw end first, that is pretty slow from that small opening between aluminium frames. Then bellow need to be pulled through front plate and finally cut bellow from c-element.
|
|
| Back to top |
|
|
Nashou66
Joined: 12 Jan 2007
Posts: 16171
Location: West Seneca NY
|
| Posted: Fri Aug 15, 2008 1:26 pm Post subject: |
|
|
| Mark_A_W wrote: | It's not fungus, it's corrosion - a chemical reaction. You could try adding some glycerin if they just used glycol.
Stainless screws may not be a good idea with an aluminium housing - that sets up a galvanic pair, corroding the aluminium. You may want to coat aluminium screws, rather than introduce another material like stainless.
Pity they didn't make them properly in the first place...like a NEC No screws contact the coolant, just the black housing and the bellows. Sorry, I just had to. |
I actually was thinking of useing plastic or vinyl screws if they will hold up to the Glycol, any ideas on this guys?
Athanasios
_________________
Don't blame your underwear for your crooked ass~ unknown Greek philosopher
"Republicans believe every day is the Fourth of July, but the Democrats believe every day is April 15." --- President Reagan
One Smart Dog!!!
Marquee High Performance Bellows now shipping!!
Marquee Modifications and Performance Enhancement
Marquee C-element and Bellow removal
|
|
| Back to top |
|
|
Nashou66
Joined: 12 Jan 2007
Posts: 16171
Location: West Seneca NY
|
| Posted: Fri Aug 15, 2008 1:29 pm Post subject: |
|
|
| Ile wrote: | Your tubes was easy, because c-element was not clued to bellows like those I have removed.
When glued, it's needed to remove bellow from screw end first, that is pretty slow from that small opening between aluminium frames. Then bellow need to be pulled through front plate and finally cut bellow from c-element. |
mine was glued, I just took the time to carefully unglue it. that was the most difficult part of the procedure.
Athanasios
_________________
Don't blame your underwear for your crooked ass~ unknown Greek philosopher
"Republicans believe every day is the Fourth of July, but the Democrats believe every day is April 15." --- President Reagan
One Smart Dog!!!
Marquee High Performance Bellows now shipping!!
Marquee Modifications and Performance Enhancement
Marquee C-element and Bellow removal
|
|
| Back to top |
|
|
stefuel
Joined: 07 Mar 2006
Posts: 3353
Location: Green Harbor MA USA
|
| Posted: Fri Aug 15, 2008 3:32 pm Post subject: |
|
|
| Nashou66 wrote: | | Mark_A_W wrote: | It's not fungus, it's corrosion - a chemical reaction. You could try adding some glycerin if they just used glycol.
Stainless screws may not be a good idea with an aluminium housing - that sets up a galvanic pair, corroding the aluminium. You may want to coat aluminium screws, rather than introduce another material like stainless.
Pity they didn't make them properly in the first place...like a NEC No screws contact the coolant, just the black housing and the bellows. Sorry, I just had to. |
I actually was thinking of useing plastic or vinyl screws if they will hold up to the Glycol, any ideas on this guys?
Athanasios |
I'm sure plastic screws would work as long as you use ones that are long enough to pass the exposed metal threads in the housing and O-rings under the head of the screw for a seal and reduce the need to crank the screw down.
Mark, No exposed metal in AmPro's housings
_________________
Chip
A Barco is only a AmPro with training wheels
Card carrying member of the AVS chain gang.
|
|
| Back to top |
|
|
CRT_Ben
Joined: 28 Aug 2006
Posts: 1684
Location: Northern Virginia
|
| Posted: Fri Aug 15, 2008 3:40 pm Post subject: |
|
|
| stefuel wrote: | | Mark, No exposed metal in AmPro's housings |
No focus, either 
|
|
| Back to top |
|
|
draganm

Joined: 08 Mar 2006
Posts: 8990
Location: Colorado
|
| Posted: Fri Aug 15, 2008 6:18 pm Post subject: Re: Marquee LC Bellow and C element removal |
|
|
| Nashou66 wrote: | Hi Guys, This procedure is very risky since Bellows wont be sold By VDC anymore, hence the reason i wanted to remove a bellow from a otherwise perfect tube and clear Glycol,also i plan to add a red C-element.
i was so concentrated on removing the C-element i forgot to take a picture of me removing the bellow from the C-element !! Any how i only have two hands and I needed both to separate the bellow from the C-Element. What you do is you get something that has a sharp pint to get a grip on the edge of the C-element and pry it out of the mounting plate hole. Be careful you don't slip and scratch the Element ! I used the tip of a 1/4 inch paddle drill bit( I know not normal tool but it had a nice sharp tip to dig into the edge of the C-element). slowly work your way around the edge till you get it to move, you dont have to get it out as the bellow is holding it in place since it is probably adhered to the C-element.Athanasios
Just noticed there is an advanced procedure for C-element rmoval!! oh well Mine went one step further
with the bellow removal . |
I tried prying to break free the RTV between c-element and bellows and it just did not go at all. As you stated, It would be very easy to slip here with a tool and either puncture the bellows or gouge the lens. One thing that's occured to me now that I look at these pics is you could remove the scheimphlug bolts and upper-lower pivot plates between the front-back LC chamber halves. This would allow you to completely push the c-element and bellows out through the front approx 1/2 inch. Once clear of the Alum. housing you could peel the bellows away from the Lens using only your fingers 
|
|
| Back to top |
|
|
Nashou66
Joined: 12 Jan 2007
Posts: 16171
Location: West Seneca NY
|
|
| Back to top |
|
|
stefuel
Joined: 07 Mar 2006
Posts: 3353
Location: Green Harbor MA USA
|
| Posted: Fri Aug 15, 2008 11:07 pm Post subject: |
|
|
| CRT_Ben wrote: | | stefuel wrote: | | Mark, No exposed metal in AmPro's housings |
No focus, either |
Does this statement come from your own experiance or are you a diagnosed echolalic and are just repeating the fodder that the other troglodytes are spewing?
_________________
Chip
A Barco is only a AmPro with training wheels
Card carrying member of the AVS chain gang.
|
|
| Back to top |
|
|
antorsae
Joined: 16 Jul 2006
Posts: 297
|
| Posted: Sat Aug 16, 2008 1:34 pm Post subject: |
|
|
Great post.
I left an air bubble in mine to help with the pressure.
|
|
| Back to top |
|
|
Nashou66
Joined: 12 Jan 2007
Posts: 16171
Location: West Seneca NY
|
|
| Back to top |
|
|
Arno P
Joined: 01 Jan 2007
Posts: 282
Location: The Netherlands
|
| Posted: Tue Aug 26, 2008 6:32 pm Post subject: Re: Marquee LC Bellow and C element removal |
|
|
| Nashou66 wrote: |
Just noticed there is an advanced procedure for C-element rmoval!! oh well Mine went one step further
with the bellow removal . |
Where is that one?
And next question....are the C-element originally glued or not?
_________________
"Obviously you're not a golfer"
|
|
| Back to top |
|
|
Nashou66
Joined: 12 Jan 2007
Posts: 16171
Location: West Seneca NY
|
|
| Back to top |
|
|
Arno P
Joined: 01 Jan 2007
Posts: 282
Location: The Netherlands
|
| Posted: Tue Aug 26, 2008 9:27 pm Post subject: |
|
|
| Nashou66 wrote: | they are not glued, but stick over time. same as the other side of the bellow it sticks to the crt housing. its easy to rip if you dont go slow, very slow pulling it away from the metal. And use your finger nothing sharp.
Athanasios |
and was there another advanced procedure as well?
_________________
"Obviously you're not a golfer"
|
|
| Back to top |
|
|
rpruen
Joined: 07 Apr 2008
Posts: 67
Location: Southwest UK
TV/Projector: BD701 FTS, BD808s
|
| Posted: Tue Aug 26, 2008 9:32 pm Post subject: |
|
|
| Mark_A_W wrote: | | It's not fungus, it's corrosion - a chemical reaction. You could try adding some glycerin if they just used glycol. |
I agree it isn't fungus, however, I sent a sample of fungusy sony blue tube coolant off to a lab. They say there where bactiria present, as well a mildly acidic residues from them using the coolant as food. All they need to get going is some sort of food, and enough water.
The other glycol from the green and red tubes did not have bateria, maybe due to the dye. The dye is also odd stuff, being florescent in part. I'm not sure now, they feed some to a spectro-something-or-another? The outcome being good luck trying to re-create it, at least without spending quite a lot of cash.
| Mark_A_W wrote: |
Stainless screws may not be a good idea with an aluminium housing - that sets up a galvanic pair, corroding the aluminium. You may want to coat aluminium screws, rather than introduce another material like stainless. |
Maybe what you want here is stuff sold as 'liquid PTFE'. Dip the screws into it before fitting them. It's very non reactive, and sets in the absense of oxygen. That should keep the coolant out of the thread, as well as stopping mosture getting in there. Without some sort of elecrolyte, there is no battery action.
I have not left my tubes long enough since filling to see if the liquid PTFE has worked, but it didn't cause any instant killer reaction.
Richard
|
|
| Back to top |
|
|
|
|


