| Author |
Message |
justtaint
Joined: 21 May 2007
Posts: 191
Location: Chicago
|
| Posted: Tue Jun 17, 2008 1:41 am Post subject: Sony 1272 mounting options |
|
|
I have a family bbq planned for this weekend and part of my grand plan is to finally get my 1272 mounted on the ceiling and (poorly) setup. For the longest time I had assumed I could easily incorporate the factory mount into my setup, but I ran into a snag tonight when I was laying things out. It seems the threading on the inside of the bolt holes on the bottom of the 1272 where the factory mount attaches, well, 2 of the 3 have fallen inside the 1272. I suppose I could spend a couple of hours trying to pull them into the correct orientation and throw bolts into them, but I'm wondering if there isn't an easier and quicker solution.
I have three sections of unistrut attached to my ceiling joists. The unistrut runs perpendicular to the joists and perpendicular to what will be the screen. Should I just attached one section of unistrut to the alternate bolt holes on the front of the projector and one section to the back, or should I try and fish the threading out from the original (factory) holes? (Or am I completely screwing this up?)
I have threaded rod, strut hangers, washers, etc.
Pictured below is what I think is the factory mount and my unistrut attached to the joists.


|
|
| Back to top |
|
 |
AnalogRocks
Forum Moderator

Joined: 08 Mar 2006
Posts: 26706
Location: Toronto, Ontario, Canada
TV/Projector: Sony 1252Q, AMPRO 4000G
|
| Posted: Tue Jun 17, 2008 2:24 am Post subject: |
|
|
If the mounts have fallen inside the set you need to fish them out. They may short something out.
_________________
Tech support for nothing
CRT.
HD done right!
|
|
| Back to top |
|
|
jkruger

Joined: 24 Oct 2007
Posts: 2435
Location: Carlsbad, CA
|
| Posted: Tue Jun 17, 2008 3:20 am Post subject: |
|
|
|
I successfully hung my 1272 from the front two and rear two holes. The three in the middle have better balance but the others will work fine. You will need to get the loose things out of the pj though. I posted pics of the unistrut mount I used a while ago, try searching for them or i'll post them again tomorrow.
|
|
| Back to top |
|
|
ecrabb
Forum Moderator

Joined: 13 Mar 2006
Posts: 15909
Location: Utah
TV/Projector: JVC RS40, Epson 5010
|
| Posted: Tue Jun 17, 2008 3:29 am Post subject: |
|
|
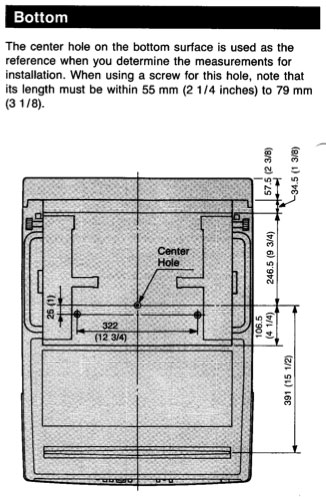
I didn't even recall any other mount points besides the three center-of-mass points, but I did find this page:
http://biobug.org/ht/pjmount/
Looks like he's using points at the front and back instead of the center three. I don't even recalling seeing those. Are you sure you're using the correct bolts, and that they're long enough to engage the factory mount points? To use those center three mount points, you need bolts between 55mm (2.25 in) and 79mm (3.125 in) in length - the actual mount is further inside the chassis than you think.
Not that it necessarily matters, but I don't think that's a Sony mount. It's probably a Chief or some other third-party mount.
Regardless of how you mount it, as the others have mentioned, make absolutely sure nothing is loose inside the projector. Loose metal could cause sudden and catastrophic failure if it finds the wrong place.
SC
| Description: |
|
| Filesize: |
42.61 KB |
| Viewed: |
5065 Time(s) |
|
|
|
| Back to top |
|
|
jkruger
Joined: 24 Oct 2007
Posts: 2435
Location: Carlsbad, CA
|
| Posted: Tue Jun 17, 2008 4:50 am Post subject: |
|
|
|
The bolt lengths can be found on the adjacent pages to the one SC posted. They are metric threads, size M8x1.25 and you need to figure in the thickness of the mount and enough to go thru the mount and into the projector the correct distance. Be sure you get enough threads in the pj but not too much because you may run into things inside. Download the 1272 install manual, it has the correct info.
|
|
| Back to top |
|
|
jkruger
Joined: 24 Oct 2007
Posts: 2435
Location: Carlsbad, CA
|
| Posted: Tue Jun 17, 2008 5:09 am Post subject: Re: Sony 1272 mounting options |
|
|
| justtaint wrote: | | I have three sections of unistrut attached to my ceiling joists. The unistrut runs perpendicular to the joists and perpendicular to what will be the screen. [/img] |
I used two sections of unistrut perpendicular to the screen attached above the joists, (open beam vaulted ceiling) and ran threaded rod down to sections of unistrut attached to the front and rear holes. The front holes take most of the weight so make sure the front of the upper unistruts are well attached. Depending on the projection angle you may need to use some angled washers at the projector bolts to get proper alignment. Mine was mounted at 15 degrees of angle (lower in the rear) to utilize the most of the raster area. That put the projector just above our heads and nearly perfectly parallel to the screen.
|
|
| Back to top |
|
|
justtaint
Joined: 21 May 2007
Posts: 191
Location: Chicago
|
| Posted: Tue Jun 17, 2008 11:41 am Post subject: |
|
|
I'm sure I'm using the correct bolts (thread and length). Of the three mounting holes the center one is still fine, the bolts I have attach to it easily. I turned the projector over and you can see the pieces of inner thread further down in the holes. Is it possible that the holes don't lead to any other part of the projector(so I don't have to worry about them causing a short)? I ask because I tried for almost an hour to get one of those back into position and it doesn't appear there's much wiggle room for it. I'm wondering if its okay to just leave it where it is.
_________________
Thomas
Sony 1272
|
|
| Back to top |
|
|
jkruger
Joined: 24 Oct 2007
Posts: 2435
Location: Carlsbad, CA
|
| Posted: Tue Jun 17, 2008 1:09 pm Post subject: |
|
|
As long as it can never come in contact with any of the electronics or tube surfaces you should be okay. I no longer have a 12xx pj to look at so I can't say for sure.
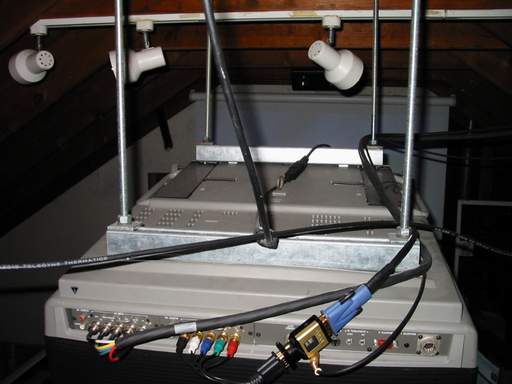
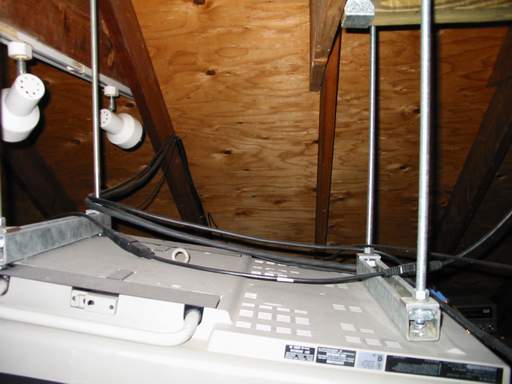
This is how I connected the unistrut to mine:
| Description: |
|
| Filesize: |
25 KB |
| Viewed: |
5011 Time(s) |
|
| Description: |
|
| Filesize: |
25.11 KB |
| Viewed: |
5019 Time(s) |
|
|
|
| Back to top |
|
|
justtaint
Joined: 21 May 2007
Posts: 191
Location: Chicago
|
| Posted: Tue Jun 17, 2008 1:32 pm Post subject: |
|
|
I tried taking a few pictures of the mounting holes and the piece of threading stuck inside, but none of them turned out well. I'll go out to Home Depot this afternoon and try and track down some long M8 bolts to see if I can pull the pieces back into place, if only to avoid a potential short.
_________________
Thomas
Sony 1272
|
|
| Back to top |
|
|
jkruger
Joined: 24 Oct 2007
Posts: 2435
Location: Carlsbad, CA
|
| Posted: Tue Jun 17, 2008 1:34 pm Post subject: |
|
|
|
The bolts are different lengths for front, middle and rear locations.
|
|
| Back to top |
|
|
justtaint
Joined: 21 May 2007
Posts: 191
Location: Chicago
|
| Posted: Tue Jun 17, 2008 1:57 pm Post subject: |
|
|
In order to pull the piece of threading back into position, I just need long bolts, longer the better. They have to fit down into the hole and grab onto the threading. At least I hope that's the way to get them back into position.
_________________
Thomas
Sony 1272
|
|
| Back to top |
|
|
justtaint
Joined: 21 May 2007
Posts: 191
Location: Chicago
|
| Posted: Wed Jun 18, 2008 4:06 am Post subject: |
|
|
I was able to fish the threading back into position, and I used unistrut instead of the mount.
I'll post pics of my mounting technique tomorrow night. I think it looks ok, but there is probably room for improvement. I'm not to happy with my choice of strut hangers. It should be obvious from the pictures that they are the weak point in my contraption.
_________________
Thomas
Sony 1272
|
|
| Back to top |
|
|
|
|


