| Author |
Message |
wallace123456

Joined: 14 Aug 2006
Posts: 2236
Location: Northwest VA area
|
| Posted: Sat May 10, 2008 3:33 am Post subject: Help with ceiling mounting 6pg xtra |
|
|
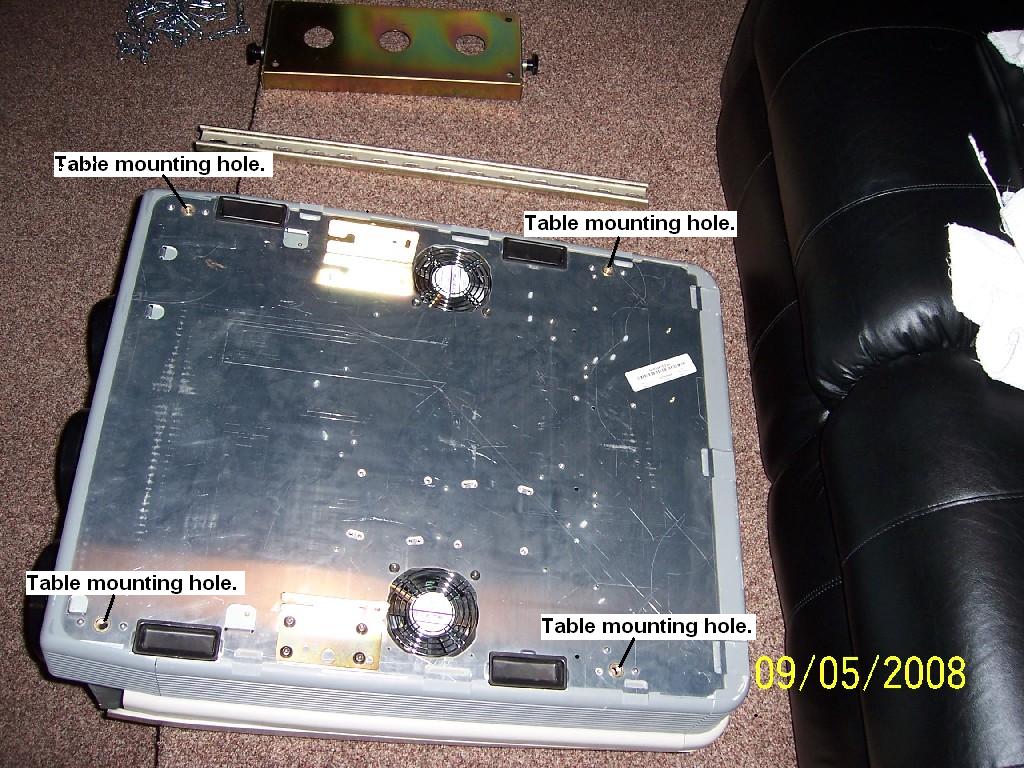
Can I use the table mount screw holes (normally used for leveling stand-offs) for the reverse function and use them for ceiling mounts? I would like to attach uni-strut to the bottom of the pj using the table mount screw holes.
Is there enough base plate (?) support in the case to do this?
Or, must I use the mounting holes as the pj has for a factory ceiling mount plate?
thanks.
wallace
| Description: |
|
| Filesize: |
155.2 KB |
| Viewed: |
11284 Time(s) |
|
_________________
Life Is Good, But BBQ Is Better! BBQ Competition Team
|
|
| Back to top |
|
 |
Zebu Fellenz
Joined: 21 Dec 2006
Posts: 2567
|
| Posted: Sat May 10, 2008 4:16 am Post subject: |
|
|
|
I'll wait for someone else to confirm it but my gut feeling is that the NEC PG cannot be mounted by the leg holes. I remember someone had a projector fall when it was mounted like this (pretty sure it was a PG or XG)
|
|
| Back to top |
|
|
jkruger

Joined: 24 Oct 2007
Posts: 2435
Location: Carlsbad, CA
|
| Posted: Sat May 10, 2008 4:21 am Post subject: |
|
|
|
I think I saw pictures of that. I would hang it from the factory designated holes.
|
|
| Back to top |
|
|
Zebu Fellenz
Joined: 21 Dec 2006
Posts: 2567
|
| Posted: Sat May 10, 2008 4:28 am Post subject: |
|
|
|
If anyone has the picture I'd like to see it.
|
|
| Back to top |
|
|
rabies_70

Joined: 15 Feb 2007
Posts: 1189
Location: Carlsbad, CA
TV/Projector: Sony G70Q
|
| Posted: Sat May 10, 2008 5:04 am Post subject: |
|
|
I would definitely ONLY modify the factory mounting plate, using the original factory mounting holes for it. Adapt that into a uni strut assembly. My 2 cents
_________________
Ray
I am an iconoclast
|
|
| Back to top |
|
|
dropzone7

Joined: 12 Jun 2007
Posts: 1069
Location: Charlotte, NC
|
| Posted: Sat May 10, 2008 5:41 am Post subject: |
|
|
DO NOT mount in those feet holes unless you are absolutely sure that each threaded rod is run up to the same length. Putting one corner in even the slightest bind can put enough tension on the frame to make it break one day. I have seen pictures of it before. If you have attic access then mount that unistrut across two or three rafters, drop the threaded rod through those, through the ceiling and into the factory mount. Let the unistrut and beams carry the load, not the mounting bracket.
_________________
"Coffee is for Closers."
|
|
| Back to top |
|
|
larryk
Joined: 23 Aug 2007
Posts: 106
Location: Edmonton Alberta
|
| Posted: Sat May 10, 2008 7:31 am Post subject: |
|
|
If you mount the unit from the leveler holes you should use metric bolts. I installed a PGxtra that way with the proper sized metric bolts and it is strong and safe. Keep in mind though that a 3/8 rod will thread in but it is not safe in my opinion.
Larry
|
|
| Back to top |
|
|
kschmit2
Joined: 09 Mar 2006
Posts: 1141
Location: Heidelberg, Germany
|
| Posted: Sat May 10, 2008 9:09 am Post subject: |
|
|
|
don't use those "foot" holes. You need _very_ little force to rip the threads out. They are only meant to withstand force pushing against the base, but not any force pulling at the base.
|
|
| Back to top |
|
|
stefuel

Joined: 07 Mar 2006
Posts: 3353
Location: Green Harbor MA USA
|
| Posted: Sat May 10, 2008 1:19 pm Post subject: |
|
|
You have the original mount. Why even consider anything else?
_________________
Chip
A Barco is only a AmPro with training wheels
Card carrying member of the AVS chain gang.
|
|
| Back to top |
|
|
wallace123456
Joined: 14 Aug 2006
Posts: 2236
Location: Northwest VA area
|
| Posted: Sat May 10, 2008 6:57 pm Post subject: |
|
|
| stefuel wrote: | | You have the original mount. Why even consider anything else? |
lol I was wondering if anyone would ask... If I could use the table mounting holes, it would give me a little more flexability.
From the feedback, doesn't sound like a good idea anyway.
Well, off to get this nec baby off the ground. (It only took me 3 hours to get my sony 1272 down.  ) )
wallace
_________________
Life Is Good, But BBQ Is Better! BBQ Competition Team
|
|
| Back to top |
|
|
Xeus

Joined: 07 Mar 2006
Posts: 111
Location: N.E. Wisconsin
|
|
| Back to top |
|
|
wallace123456
Joined: 14 Aug 2006
Posts: 2236
Location: Northwest VA area
|
| Posted: Mon May 12, 2008 4:57 pm Post subject: |
|
|
Thanks for finding the post. It makes for good "look before you leap" tips.
I went ahead and mounted the pj using the factory mount and uni-strut. Only took 3 hours!!!! But I did it by myself using the chain method as Clarence did, and also some of a method that used rachet tie-down straps (Thanks zGman).
That was it for Saturday night. Now, I need to focus and adjustments going.
wallace
_________________
Life Is Good, But BBQ Is Better! BBQ Competition Team
|
|
| Back to top |
|
|
dropzone7
Joined: 12 Jun 2007
Posts: 1069
Location: Charlotte, NC
|
| Posted: Mon May 12, 2008 6:04 pm Post subject: |
|
|
My NEC mount still has a little blood on it from the first time we mounted my XG up there. Good times...
_________________
"Coffee is for Closers."
|
|
| Back to top |
|
|
garysorenson
Joined: 17 Jul 2007
Posts: 63
Location: Milwaukee, Wisconsin
|
| Posted: Tue May 20, 2008 6:32 pm Post subject: |
|
|
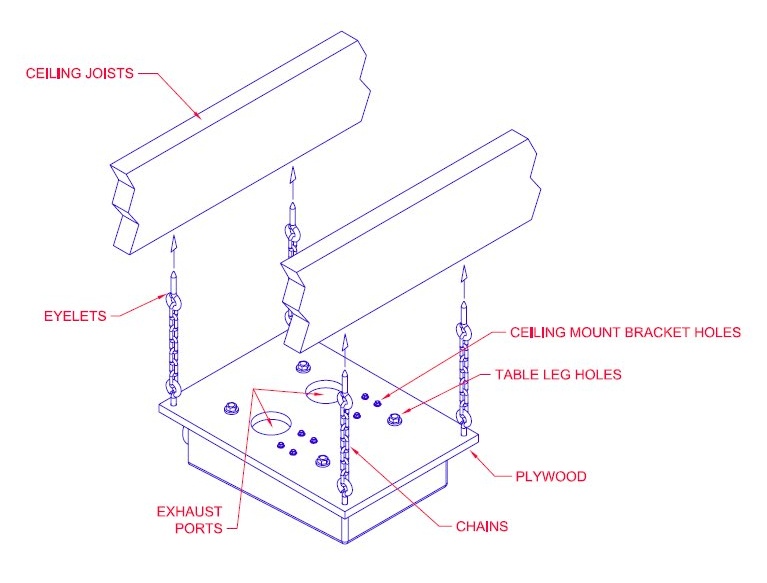
I mounted my PG9 using the table mont holes but I also used the 8 holes that bolt down the cieling mount.
My PJ is mounted flat to 1" thk. marine grade plywood and there are eyelets on each corner. I used a length of heavy chain on each corner. This method allowed me to raise, lower tilt skew the PJ to its ideal alignment to the screen. Im using the 11 degree mount method. I'll work on getting a pic today and post it.
|
|
| Back to top |
|
|
Person99
Joined: 09 Mar 2006
Posts: 4899
Location: Flower Mound, TX
|
| Posted: Tue May 20, 2008 6:46 pm Post subject: |
|
|
Ah, that's it. Good old Buttspice (he hated it when we called him that), wonder what happened to him...
_________________
Dave
A train station is where the train stops. A bus station is where the bus stops. On my desk, I have a work station....
|
|
| Back to top |
|
|
garysorenson
Joined: 17 Jul 2007
Posts: 63
Location: Milwaukee, Wisconsin
|
| Posted: Tue May 20, 2008 7:49 pm Post subject: |
|
|
Heres what I did
| Description: |
|
| Filesize: |
84.59 KB |
| Viewed: |
10966 Time(s) |
|
|
|
| Back to top |
|
|
kschmit2
Joined: 09 Mar 2006
Posts: 1141
Location: Heidelberg, Germany
|
| Posted: Tue May 20, 2008 8:14 pm Post subject: |
|
|
that's not good cooling wise.
The chips on the C-Drive and F-Drive use the bottom plate of the PJ for additional cooling.
With your mount the heat will no longer be transfered away from those chips, and that can lead to premature failures.
|
|
| Back to top |
|
|
garysorenson
Joined: 17 Jul 2007
Posts: 63
Location: Milwaukee, Wisconsin
|
| Posted: Tue May 20, 2008 11:12 pm Post subject: Its OK |
|
|
|
When you attatch the board to the bottom , there is about 1/2" gap between the PJ and the board. It just works out that way, du to the shape of the bottom plate. The cooling fans work as they should and also draw air between through the gap creating additional cooling.
|
|
| Back to top |
|
|
wallace123456
Joined: 14 Aug 2006
Posts: 2236
Location: Northwest VA area
|
| Posted: Wed May 21, 2008 3:08 am Post subject: |
|
|
| garysorenson wrote: | | Heres what I did |
Very nice!
wallace
_________________
Life Is Good, But BBQ Is Better! BBQ Competition Team
|
|
| Back to top |
|
|
wallace123456
Joined: 14 Aug 2006
Posts: 2236
Location: Northwest VA area
|
| Posted: Wed May 21, 2008 3:06 pm Post subject: |
|
|
| kschmit2 wrote: | that's not good cooling wise.
The chips on the C-Drive and F-Drive use the bottom plate of the PJ for additional cooling.
With your mount the heat will no longer be transfered away from those chips, and that can lead to premature failures. |
Is the mount actually working as a heat-sink?
wallace
_________________
Life Is Good, But BBQ Is Better! BBQ Competition Team
|
|
| Back to top |
|
|
|
|


