| Author |
Message |
Elaine Benes
Joined: 25 Apr 2006
Posts: 1416
|
| Posted: Mon Jan 14, 2008 7:53 pm Post subject: Easy, cheap, simple adjustable ceiling mount for Marquee's. |
|
|
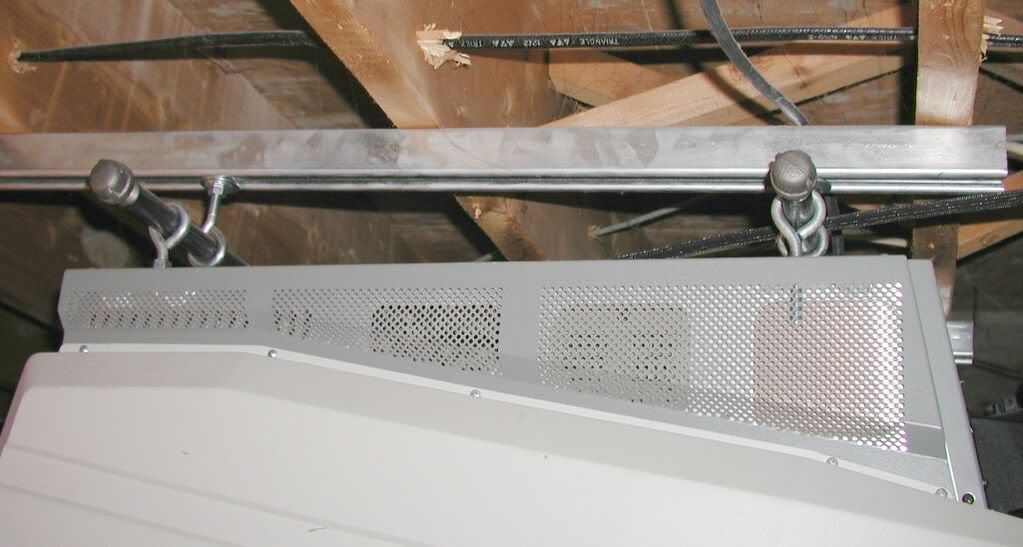
This is a ceiling mount I use for my Marquee, its very easy to make, you can get the parts at any Home Depot, or a contractor supply store.
All you need are 8 eyebolts, sufficient nuts to secure them (ie. two every spot you want to 'set' the eye bolts, and one to back the 'set' position), two lengths of unistrut or barn door channel, and the lag bolts to secure the unistrut to the ceiling joists, and sufficient washers for the whole thing.
When you span three ceiling joists, you are only putting about 30lbs on each lag bolt, way, way, way below their capacity. Make sure you drill holes for the lag bolts as they are weakened by simply driving them into an undrilled joist, and the joist could split.
Attach your unistrut so its basically centered to where your projector needs to be. If your joists run parallel to your screen, then your unistrut will run perpendicular and they need to be centered to the screen center and approximately where you need your projector to be for the screen size.
If your joists run perpendicular to your screen, then the unistrut is placed at the approximate screen center, parallel to the screen, and at the approximate position of your projector. Regardless of which orientation of the unistrut in relation to the screen, make sure they are approximately the same width apart as your projectors feet holes...
When you have your unistrut/barn door channel up, you need two heavy duty washers the same outside size as the inside of your channel. Doubling them up just prevents any deflection. Using washers instead of slider bolts is a better way to go as they will not turn and fall out of the channel. Make sure they are as big as the inside of the channel and fit snugly so they CAN'T be removed from the channel except by sliding them out. I used slide nuts on mine, but if I did it again, I'd use washers like my buddy has, they work better.
Put two nuts onto the eye bolts that will go into the channel on the ceiling, and a washer, put the threaded portion of the eye bolt through the washers that are in the channel, and thread on a nut inside the channel. Tighten the bottom bolts till it is snug enough to be secure, but a tiny bit loose so you can slide it to its position.
Personally, I get all the hangers in their position then tighten everything right down, it makes mounting the pj easier.
Flip your pj over, thread two nuts onto each of four eyebolts then thread them into the foot holes of your projector. NEC's use metric foot holes, so finding the eyebolts with metric thread will be a challenge here in NA, but they are available, I'm sure(edit: apparently the NEC foot holes should not be used for this, sorry to mislead).
Marquee's use standard 3/8" thread, so you can get everything at Home Depot.
When you have the eyebolts in to the desired depth, hoist the projector up, and slide the black pipe through all the holes.
Now you can just shove your projector around to adjust its position fore/aft and left right.
Drop distance can be changed by using longer or shorter eye bolts. I use 4" ones on mine, but my buddy wanted more drop so we used 8" ones on either side. They are commonly available up to 12" length.
Also note, its not necessary to use the same size eye bolts on both sides of the mount. If you need to use 1/2" ones on the ceiling side to get the amount of drop you want, so be it, the black pipe is the actual mounting surface, and since it just sits in the eye bolts, as long as it will fit, it doesn't really matter what size the eye bolts are...
Personally, I find this mount very stable, easy to adjust and cheap/easy to make. My projector is easy to setup when mounted like this and its much, much, much easier to adjust than the variation that uses 4 pieces of unistrut, and threaded rod. Plus, sliding the black pipe through the eye bolts is very quick way to secure it, and quite a bit less finicky than trying to get something hooked or bolted in place.
When I changed from HD-8 RevB lenses to HD144's, I didn't have to remount, just slide it forward a bit, it took all of about five minutes...


Last edited by Elaine Benes on Tue Jan 15, 2008 2:12 am; edited 1 time in total
|
|
| Back to top |
|
 |
mtmelvin
Joined: 18 Mar 2006
Posts: 153
Location: Bay Area, CA
|
| Posted: Tue Jan 15, 2008 12:44 am Post subject: |
|
|
|
I love this idea. It's simple and flexible. Thanks for sharing this!
|
|
| Back to top |
|
|
paw

Joined: 08 Mar 2006
Posts: 1176
Location: Arvada, CO
|
| Posted: Tue Jan 15, 2008 12:45 am Post subject: Re: Easy, cheap, simple adjustable ceiling mount all project |
|
|
| Elaine Benes wrote: | | NEC's use metric foot holes, so finding the eyebolts with metric thread will be a challenge here in NA, but they are available, I'm sure. |
Don't hang NEC PJs by putting bolts in the holes designed for their feet. The sheet metal is not designed to support the weight of the PJ. There's a pic here or on AVS of the damage caused by this method.
_________________
Aubrey
|
|
| Back to top |
|
|
Zebu Fellenz
Joined: 21 Dec 2006
Posts: 2567
|
| Posted: Tue Jan 15, 2008 1:47 am Post subject: |
|
|
Very Nice,
I've always liked the Marquee for flexibility in mounting, as Paw mentioned you can't hang a Nec like that, a G70 would also be a bit of a problem as the threaded holes are in funny locations but for the Marquee it works great.
Erik
|
|
| Back to top |
|
|
Nashou66

Joined: 12 Jan 2007
Posts: 16171
Location: West Seneca NY
|
|
| Back to top |
|
|
Elaine Benes
Joined: 25 Apr 2006
Posts: 1416
|
| Posted: Tue Jan 15, 2008 3:12 am Post subject: |
|
|
Trust me, you have no need to "lock" anything in place.
Unless you hit it with a running shoulder tackle, it stays put simply from the weight of the projector...
My buddy whose 8500LC we just hung, whacks his head quite hard on my 8000 with regularity, and it has never moved at all...
|
|
| Back to top |
|
|
Fujifrontier

Joined: 20 Oct 2007
Posts: 354
Location: San Antonio, Texas
|
| Posted: Tue Jan 15, 2008 4:03 am Post subject: |
|
|
Too bad I can't hang my old Stony that way; that does look like an easy way to mount! 
|
|
| Back to top |
|
|
the_avguy
Joined: 16 Mar 2007
Posts: 91
Location: Edmonton, Alberta
|
| Posted: Wed Aug 06, 2008 5:17 pm Post subject: |
|
|
Does anyone know if this will work for an ECP 4100?
It looks like it should
Are the bolts the same size?
thanks
_________________
working ECP 4100.
marquee still in pieces, just gathering knowledge.
optoma ep729
|
|
| Back to top |
|
|
kal
Forum Administrator
Joined: 06 Mar 2006
Posts: 18114
Location: Ottawa, Canada
TV/Projector: JVC DLA-NZ7
|
|
| Back to top |
|
|
stefuel

Joined: 07 Mar 2006
Posts: 3353
Location: Green Harbor MA USA
|
| Posted: Wed Aug 06, 2008 8:48 pm Post subject: |
|
|
I could never figure why in hell you guy's would spend thousands building your theaters but won't spend a couple of hundred for a factory mount. It just blows my mind. 
Nothing that looks like the shelving in my garage is allowed in the house 
_________________
Chip
A Barco is only a AmPro with training wheels
Card carrying member of the AVS chain gang.
|
|
| Back to top |
|
|
the_avguy
Joined: 16 Mar 2007
Posts: 91
Location: Edmonton, Alberta
|
| Posted: Wed Aug 06, 2008 9:22 pm Post subject: |
|
|
| stefuel wrote: | I could never figure why in hell you guy's would spend thousands building your theaters but won't spend a couple of hundred for a factory mount. It just blows my mind.
Nothing that looks like the shelving in my garage is allowed in the house |
yeah I suppose.
But I am doing my theatre on the cheap so I don't have the cash. 
But why waste the money if you don't have to? Won't it all be in a hush box anyways or covered up somehow?
I could buy a schwack of movies to watch for that couple of hundred. 
_________________
working ECP 4100.
marquee still in pieces, just gathering knowledge.
optoma ep729
|
|
| Back to top |
|
|
stefuel
Joined: 07 Mar 2006
Posts: 3353
Location: Green Harbor MA USA
|
| Posted: Wed Aug 06, 2008 10:20 pm Post subject: |
|
|
I'm sorry but anything but a factory mount just looks cheezie to me.
_________________
Chip
A Barco is only a AmPro with training wheels
Card carrying member of the AVS chain gang.
|
|
| Back to top |
|
|
JustGreg

Joined: 07 Mar 2006
Posts: 3098
Location: Kenosha, WI
|
| Posted: Wed Aug 06, 2008 10:24 pm Post subject: |
|
|
Yeahbutt....factory mounts don't work in all applications. Sometimes a little fabrication is required.
_________________
Greg
"Is it ignorance or apathy? Hey, I don't know and I don't care!" --Jimmy Buffett
|
|
| Back to top |
|
|
stefuel
Joined: 07 Mar 2006
Posts: 3353
Location: Green Harbor MA USA
|
| Posted: Wed Aug 06, 2008 10:58 pm Post subject: |
|
|
| JustGreg wrote: | | Yeahbutt....factory mounts don't work in all applications. Sometimes a little fabrication is required. |
Oh really? Please give me a example. You may have to use the factory pipe extension hardware but I've never seen a circumstance where a factory mount could not be used. You would never see a legit dealer of new CRT's use anything but a approved factory mount or they would refuse the job. They may find a situation where they might have to fabricate a adapter to a beam or cathedral ceiling but what is bolted to the projector will be a factory mount.
_________________
Chip
A Barco is only a AmPro with training wheels
Card carrying member of the AVS chain gang.
|
|
| Back to top |
|
|
kal
Forum Administrator
Joined: 06 Mar 2006
Posts: 18114
Location: Ottawa, Canada
TV/Projector: JVC DLA-NZ7
|
| Posted: Thu Aug 07, 2008 2:10 am Post subject: |
|
|
| stefuel wrote: | I could never figure why in hell you guy's would spend thousands building your theaters but won't spend a couple of hundred for a factory mount. It just blows my mind.
Nothing that looks like the shelving in my garage is allowed in the house |
Because we know better!
You seem to not know about the advantages of unistrut or mounts like this. Which means you don't know about how important it is to fine tune the positioning of your CRT projector (within a tenth of an inch or less) for optimal image quality.
Factory mounts absolutely SUCK. They don't offer any degree of freedom to really fine tune the positioning of the projector in all 6 directions to really get it dialed in.
Factory mounts do not:
- Move front and back (to allow you to optimize raster usage)
- Move side to side (to allow you to center the raster perfectly to again optimize raster usage)
- Move up and down to fine tune positioning
It is absolutely IMPOSSIBLE to get a factory mount to the exact perfect position because they are 100% fixed. No matter how much you measure and re-measure, you're going to have to move the projector at least 2-6 inches if you're looking for absolute perfection. It is impossible to do this with a factory mount. I measured and re-measured a dozen times to get the perfect installation location with my unistrut mount but still ended up about 6 inches away from where I *thought* the projector should be. Unistrut gives you this flexibility. If you used a factory mount I would bet $1000 that your setup is far from ideal and that you're wearing out your tubes faster than someone who took the time to do a proper positioning with unistrut or any sort of flexible mount.
A unistrut mount offers you 6 degrees of freedom to really fine tune positioning. You maximize and center your rasters perfectly and then move the mount ever so slightly left/right/forward/backwards to center it on the screen. You can also go up/down or fine-tune the tilt. If perfection is what you want then something like unistrut or what the original poster mentions is what you want to do. Everything else is a compromise. Using a factory mount means you're not optimized. Simple as that.
It has absolutely nothing to do with being cheap. I have multiple tens of thousands of dollars sunk into my HT. If using a factory mount would have offered ANY advantage I would have gladly spent a few hundred on one. That's nothing compared to how much I've sunk into my HT.
It doesn't have to look bad either. You cover it up. Here's my projector mount using unistrut:

Moral of the story:
Factory mounts are for dealers, installers who just want to do the job fast. Or for ignorant users who don't care about the best possible image quality or simply don't know any better. They slap the thing on the ceiling as best they can and go from there. It's not optimized by a long shot. I've have 2 or 3 projectors up on my ceiling now and every time I set one up from scratch involves going back and forth dozens of times between the physical positioning on the projector and the geometry/size controls on the projector menus. That wouldn't have been possible with a factory mount and would have left the setup compromised.
Kal
_________________

Support our site by using our affiliate links. We thank you!
My basement/HT/bar/brewery build 2.0
Last edited by kal on Thu Aug 07, 2008 4:29 am; edited 2 times in total
|
|
| Back to top |
|
|
the_avguy
Joined: 16 Mar 2007
Posts: 91
Location: Edmonton, Alberta
|
| Posted: Thu Aug 07, 2008 4:08 am Post subject: |
|
|
| the_avguy wrote: | Does anyone know if this will work for an ECP 4100?
It looks like it should
Are the bolts the same size?
thanks |
Okay I think we have confirmed that using this method doesn't make me a cheapskate.
So can anyone confirm or deny the bolt size on the ECP 4100.
_________________
working ECP 4100.
marquee still in pieces, just gathering knowledge.
optoma ep729
|
|
| Back to top |
|
|
stefuel
Joined: 07 Mar 2006
Posts: 3353
Location: Green Harbor MA USA
|
| Posted: Thu Aug 07, 2008 10:00 am Post subject: |
|
|
Kal,
Your "moral of the story" is the most bizzar thing I've ever heard come from you. This is why NEW CRT projectors were never offered to the end user market. If you can read a manual, use a tape-measure and level, you can get it right first time every time. You can still use what you know about raster usage and work that into the calculation for projector to screen depth as most of those additional figures have been posted many times. Thanks for the "ignorant" comment. I guess being able to read and use tools correctly isn't worth a damn when you can just throw up some uni-strut and wiggle it around till it works. 
_________________
Chip
A Barco is only a AmPro with training wheels
Card carrying member of the AVS chain gang.
|
|
| Back to top |
|
|
kal
Forum Administrator
Joined: 06 Mar 2006
Posts: 18114
Location: Ottawa, Canada
TV/Projector: JVC DLA-NZ7
|
| Posted: Thu Aug 07, 2008 12:26 pm Post subject: |
|
|
| stefuel wrote: | Kal,
Your "moral of the story" is the most bizzar thing I've ever heard come from you. This is why NEW CRT projectors were never offered to the end user market. If you can read a manual, use a tape-measure and level, you can get it right first time every time. You can still use what you know about raster usage and work that into the calculation for projector to screen depth as most of those additional figures have been posted many times. Thanks for the "ignorant" comment. I guess being able to read and use tools correctly isn't worth a damn when you can just throw up some uni-strut and wiggle it around till it works. |
Chip, I guarantee that it's absolutely impossible to install a 150 lb device within a 1/4" of perfection the first time using a factory (non-adjustable) ceiling mount.
It's not about throwing it up with unistrut and wiggling it around 'til it works: It's about doing those measurements you mention and then using the flexibility of the unistrut (or other flexible mount) to eek out that last ounce of performance and optimize the position perfectly.
As well, if you're installing based on the MANUAL then you're not doing it right either. Not by a long shot. Your tube usage will be anywhere from bad (Barco) to absolutely abysmal (NEC). The manufacturer manuals and instructions are extremely conservative and err on the side of the thing working for any installer that tries instead of extracting 100% performance out of the unit.
Not sure what you mean about the 'additional figures' that have been posted many times, but every install is slightly different so you need to use the setup that works for you and not someone else's numbers. But that doesn't matter as the best installations are done by people who don't rely on formula's but instead LOOK into the tubes and set up throw by LOOKING at the result instead of calculating using generic (pessimistic) formula's that are meant to work for any setup.
I and others have said it before a million times but I guess I'll say it again: Using calculations and numbers to figure out positioning of the projector is backwards. You want to maximize phosphor usage and then position the projector from there. The formula's will get you in the ball park but to really optimize placement you need to do the following:
| Quote: | While following the manual for throw distance is always a good bet (and recommended for new users), to maximize tube life even further do the following steps:
1. Put the projector on the cart or simply leave it on the floor so that you can move it.
2. Display something that fills the screen entirely (like a grid test pattern).
3. Using only the green (middle) tube, look into the tube and increase the image width on the tube face until it is around 1/8" to 1/4" from the edge of the white phosphor. Under no circumstances should you allow the image to go off of the white phosphor surface!
4. Move the projector back and forth until the image fits your screen.
THAT is the correct throw distance for optimal phosphor usage. It'll usually be 5-8% closer than what the manual tell you because the manual throw instructions are conservative since they make you install blindly without even looking in the tubes at all.
|
Now once you get that throw right, anyone who thinks they can translate that to a ceiling mounting that's within 1/4" is crazy. You need a few inches of adjustment in all directions to get it 'just right'.
See: http://www.curtpalme.com/TubeCondition_PoorInstall.shtm
Kal
_________________
Support our site by using our affiliate links. We thank you!
My basement/HT/bar/brewery build 2.0
|
|
| Back to top |
|
|
aspec2
Joined: 10 Apr 2006
Posts: 549
|
| Posted: Thu Aug 07, 2008 1:05 pm Post subject: |
|
|
| kal wrote: |
Factory mounts do not:
- Move front and back (to allow you to optimize raster usage)
- Move side to side (to allow you to center the raster perfectly to again optimize raster usage)
- Move up and down to fine tune positioning
Kal |
This covers X, Y, Z  but you forgot pitch, yaw, and roll. but you forgot pitch, yaw, and roll.
Tilting side to side
Tilting up and down
TURNING left and right.
This is one reason a 3 point mount is the easiest to dial in.
Walt
|
|
| Back to top |
|
|
kal
Forum Administrator
Joined: 06 Mar 2006
Posts: 18114
Location: Ottawa, Canada
TV/Projector: JVC DLA-NZ7
|
|
| Back to top |
|
|
|
|