| Author |
Message |
Fujifrontier

Joined: 20 Oct 2007
Posts: 354
Location: San Antonio, Texas
|
| Posted: Mon Nov 19, 2007 6:35 pm Post subject: Noob with old tubes!! |
|
|
http://cgi.ebay.com/Sony-VPH-1020Q1-CRT-Projector_W0QQitemZ130173994047QQihZ003QQcategoryZ32862QQssPageNameZWDVWQQrdZ1QQcmdZViewItem
I'm considering this to see if I have it in me to set up and align a CRT projector...
Smallish start, but who's to say I can't have one in another room? 
What concerns me is his comment about the throw distance; i'm sure all it is would be adjusting the focus with the locknuts inside?
If i get this PJ i'll certainly be buying the PJ DVD that I've seen comments about floating around on the forum.
If I do indeed win..... what do/should I tell him about shipping? I saw Curt's thread on how he ships PJs and the neck boards/lenses do concern me. Also, by looking at the PJ stats page, it doesn't seem to have an IR remote, and a wired one isn't pictured. Do all projectors need a remote to do the initial alignment?
|
|
| Back to top |
|
 |
papalek

Joined: 08 Mar 2006
Posts: 1536
Location: Longs SC
|
| Posted: Mon Nov 19, 2007 6:40 pm Post subject: |
|
|
In my opinion it is not worth the freight to have it shipped. If it was close and you could pick it up then it would be a good way to get your feet wet.
_________________
My current list of PJ's AmPro 1 1/2-4600,4200, 1/2-3600,2600.
I do love my AmPro's
|
|
| Back to top |
|
|
Fujifrontier
Joined: 20 Oct 2007
Posts: 354
Location: San Antonio, Texas
|
| Posted: Mon Nov 19, 2007 6:54 pm Post subject: |
|
|
 okay. i think i'll just wait to buy yours. check your pm. okay. i think i'll just wait to buy yours. check your pm.
|
|
| Back to top |
|
|
Fujifrontier
Joined: 20 Oct 2007
Posts: 354
Location: San Antonio, Texas
|
| Posted: Sun Dec 02, 2007 5:46 pm Post subject: |
|
|
I did purchase the projector after all. I noted on the specs page that is has manual convergence, etc.
http://www.arcpictures.info/auctionzed/07ST2142.0025f.JPG
The pic is from a VPH-1042Q
I assume mine has pots on the bottom right are the ones I'll have to play with to get the picture correct?
|
|
| Back to top |
|
|
loribates

Joined: 02 Dec 2007
Posts: 185
Location: KS
|
| Posted: Sun Dec 02, 2007 6:08 pm Post subject: |
|
|
Yep, that's them... ain't no fun in the dark, overhead. Loved my little sony......
_________________
Lori Bates
|
|
| Back to top |
|
|
draganm
Joined: 08 Mar 2006
Posts: 8990
Location: Colorado
|
| Posted: Sun Dec 02, 2007 6:37 pm Post subject: |
|
|
|
so you spent $114. with shipping on a 1021Q? they should make this thread a sticky and call it "ask questions here before buying on e-bay"
|
|
| Back to top |
|
|
JustGreg

Joined: 07 Mar 2006
Posts: 3098
Location: Kenosha, WI
|
| Posted: Sun Dec 02, 2007 8:04 pm Post subject: |
|
|
| draganm wrote: | | so you spent $114. with shipping on a 1021Q? they should make this thread a sticky and call it "ask questions here before buying on e-bay" |
I dunno... for ~$300 he gets to see if as he said he has it in him to setup a CRT pj. Not too shabby if you have the money and want to waggle your toes in the water of a new hobby.
It's certainly alot wiser than having the money to buy a pj from the BEST section of the rankings chart and find out after it isn't for you. Although, I think I personally would have shot for something at least in the MIDDLE of the chart.
http://www.curtpalme.com/Projector_Rankings.shtm
Greg
_________________
Greg
"Is it ignorance or apathy? Hey, I don't know and I don't care!" --Jimmy Buffett
|
|
| Back to top |
|
|
Fujifrontier
Joined: 20 Oct 2007
Posts: 354
Location: San Antonio, Texas
|
| Posted: Sun Dec 02, 2007 8:22 pm Post subject: |
|
|
No, I spend about $114 total on it. Whenever I delve into something new like this I always start off with something on the lower end, now if i found a G90 at goodwill for $100 of course I would take it, but i want something that I wouldn't feel too bad about breaking or messing up.
As far as mounting it on the ceiling, what I think will wind up happening is anchroing it to a cart and using gaffer tape to mark off a clear square on the floor so it sits exactly in the same place every time, until I have the guts to start messing around with ceiling mounts.
As I haven't purchased the CRT setup DVD yet, what should my first steps be after unpacking it? i'm in the process of reading the manuals...
|
|
| Back to top |
|
|
Fujifrontier
Joined: 20 Oct 2007
Posts: 354
Location: San Antonio, Texas
|
| Posted: Sun Dec 09, 2007 12:37 am Post subject: |
|
|
OH ME OH MY
HAHAHAHAHAHAHAHA!!!!!
She came yesterday via FedEx.
The seller packed it quite well. It wasn't a curt-style crating but it was very respectably packed with thick styrofoam on all sides (sorry no pics, i was in such a hurry), and shrink wrapped, with extra bubble wrap placed around the lenses.
I fired it up today against the wall with the deer head (see my other thread) and managed to get a rough crosshair alignment, it's a bit drifty but I got a preliminary picture, clear and bright, albeit defocused. In a dark room this little Sony packs a punch, you might say "lol its only 500 lumens" but I am happy as a clam with this projector!! 
It may have some small issues like needing to be realigned, geometry etc but I'll pop the top tomorrow (leaving for hte company christmas party in a few) and align the focus, and perform the factory alignment. First I'll shop for a screen, now I have a wall to cover.
It looks like it was never used! The tubes are bright and clear, no (visible) burns or wear. Of course when I pulll the lenses we might see a different storey, but right now I'm extremely pleased with my little Sony. 
|
|
| Back to top |
|
|
Zebu Fellenz
Joined: 21 Dec 2006
Posts: 2567
|
| Posted: Sun Dec 09, 2007 1:18 am Post subject: |
|
|
I believe that it is very rare to find any wear on a sony 10** set, I heard this is due to the tubes never being driven hard enough to cause wear.
Be sure that you NEVER try to feed this set a resolution above it's resolveing cabibilites as you will let all the magic smoke out.
Erik
|
|
| Back to top |
|
|
derfla

Joined: 11 Mar 2006
Posts: 547
Location: eastern ohio
|
| Posted: Sun Dec 09, 2007 1:26 am Post subject: |
|
|
| Zebu Fellenz wrote: |
Be sure that you NEVER try to feed this set a resolution above it's resolveing cabibilites as you will let all the magic smoke out.
Erik |
I can confirm this. I tried to feed the one I had a high rez once. that was the end of it . I paid 1200.00 for it and used for 6 years until that unforgiving mistake.
|
|
| Back to top |
|
|
Fujifrontier
Joined: 20 Oct 2007
Posts: 354
Location: San Antonio, Texas
|
| Posted: Sun Dec 09, 2007 3:43 pm Post subject: |
|
|
|
Hmm. I'm only planning on using it with the composite video in with the DVD player being the highest-resolution source I have, so I don't think I'll have any problems there In order to pop the top, it's the screws in the bottom, right? I didn't see any anywhere else.
|
|
| Back to top |
|
|
Tinman

Joined: 09 Mar 2006
Posts: 1326
Location: Carson City Nevada
|
| Posted: Sun Dec 09, 2007 5:16 pm Post subject: |
|
|
Now bolt a cheap set of color corrected NEC lenses on it, like the HD-144's. Damn nice improvement for a video only set.
Marc
_________________
This space for rent.
|
|
| Back to top |
|
|
Fujifrontier
Joined: 20 Oct 2007
Posts: 354
Location: San Antonio, Texas
|
| Posted: Sun Dec 09, 2007 7:01 pm Post subject: |
|
|
I'll have to get a longass screwdriver, won't I. The bottom screws are kind of out of reach, and i'd have to have the PJ upside down because there are some transformers, etc underneath the lenses.
I took the cover off so I could get to the lens focus adjustments to get a rough idea of how much I'd have to correct the geometry, looks like a full alignment is in order. I focused it on the screen so I could see how the center looks with video, watched a brief clip of mcgyver and I can see the scan lines. It's even got instructions on how to do it, how precious.
http://i28.photobucket.com/albums/c234/FujiFrontier/tv/instructions.jpg
Setup for dummies
http://i28.photobucket.com/albums/c234/FujiFrontier/tv/badgeo1.jpg
Using the screen to get a "sweet spot" focused
http://i28.photobucket.com/albums/c234/FujiFrontier/tv/screen2.jpg
The center is focused
http://i28.photobucket.com/albums/c234/FujiFrontier/tv/coveroff.jpg
Naked
http://i28.photobucket.com/albums/c234/FujiFrontier/tv/proj2.jpg
Naked II
http://i28.photobucket.com/albums/c234/FujiFrontier/tv/blue.jpg
Blue tube
http://i28.photobucket.com/albums/c234/FujiFrontier/tv/green.jpg
Green tube
http://i28.photobucket.com/albums/c234/FujiFrontier/tv/red.jpg
Red tube
http://i28.photobucket.com/albums/c234/FujiFrontier/tv/geo2.jpg
A bit off.. Sorry about the blackouts, they'd have a sh*t if they knew I was posting pics of the contents of our living room...
You know, it feels weird to actually see in front of me what I've seen so many times on this forum.
Haha.
Oh - when adjusting the focus with the wingnuts, the travel back and forth felt stiff and gritty. How do I fix that?
|
|
| Back to top |
|
|
Fujifrontier
Joined: 20 Oct 2007
Posts: 354
Location: San Antonio, Texas
|
| Posted: Wed Dec 12, 2007 8:21 pm Post subject: |
|
|
|
Anyone have an idea how to mount this thing? it just has those 2 hook-style mounts under it.,
|
|
| Back to top |
|
|
jkruger

Joined: 24 Oct 2007
Posts: 2435
Location: Carlsbad, CA
|
| Posted: Wed Dec 12, 2007 9:05 pm Post subject: |
|
|
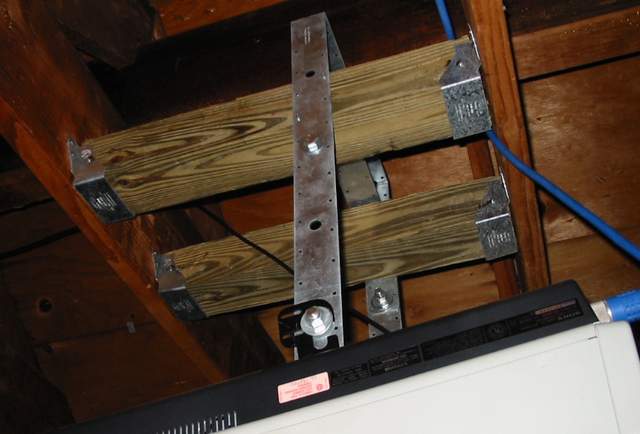
I used one of these to make an inexpensive mount for my first projector, a sony 1000q. It is a strap from home depot, I just bent it to fit the projector and nailed in a couple of 4x4's between the joists in the attic to hang it from. They usually have them hanging in a corner dislay on the lumber aisle. With this and some allthread and some nuts and washers I had it up in a couple hours. Under $15.00
MST37 37.5" 12-Gauge Strap, Model MST37, $4.93/Each
Looks like this:
| Description: |
|
| Filesize: |
29.83 KB |
| Viewed: |
11438 Time(s) |
|
|
|
| Back to top |
|
|
Fujifrontier
Joined: 20 Oct 2007
Posts: 354
Location: San Antonio, Texas
|
| Posted: Fri Dec 14, 2007 1:38 am Post subject: |
|
|
JESUS H CHRIST
I knew alignment was going to be a total ****, but not as much trouble as I had yesterday.
K.
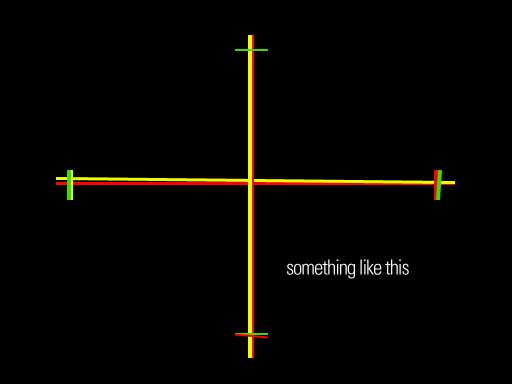
SO in all my faithful forum following i've drilled into my head that maximal rasters are what we need, covering most of the tube face. I peer down the green tube and adjust the V size (H size is maxed out) and that's where I made my fatal mistake. Green wasn't really maxed, but I resized it to be slightly more than about 95% of the tube face (no visible wear lines). So yeah, try and do the red, and the blue. Fine. I have them all the same SIZE............................
but the "squares" are not the same size (linearity) and convergence is sh*t all around. So I cut blue and focused on red and green. After about an hour I had them mostly on top of each other, except for the bottom right hand and middle of hte picture. I mean, twirling those pots left and right wouldn't make the damned lines line up. After about two hours I had most of the grid somewhat nice. Except for some slight registration errors on the top and bottom which are uncorrectable (pots are maxed out), it looked "acceptable." Then I turned blue on.... and did the same thing. After I'd formed a blister on my left thumb from fiddling with pots I had a watchable image. All of you could probably sh*t on it, but I think I did an "okay" job. 45 minutes into it I thought I was going to have to send the poor beastie out to Curt.
What would YOU do in my case, to get this thing aligned. Reset all pots to 50% and go from there? They don't have a mechanical detent in the middle.
I guess another question is, because GREEN is the reference, how do i know that the green values for the lineraity, skew, etc are within reach of the other 2 tubes to be corrected to?
| Description: |
| approximately what it looked like |
|
| Filesize: |
17.6 KB |
| Viewed: |
11418 Time(s) |
|
|
|
| Back to top |
|
|
Fujifrontier
Joined: 20 Oct 2007
Posts: 354
Location: San Antonio, Texas
|
| Posted: Fri Dec 14, 2007 1:39 am Post subject: |
|
|
BTW i had the grid crosshatch up, but that would have been too much work to post. I figured that if i could get the red and green to align on the simple crosshair, I could work on the corners from there. No dice. I just worked using the crosshatch.
And another BTW... all the troubles started when I tried to follow the instructions pasted to the top of hte projector... It's kind of hard to do it with the lid on, since I found it easier to cut the blue and concentrate on red/green.
|
|
| Back to top |
|
|
AnalogRocks
Forum Moderator
Joined: 08 Mar 2006
Posts: 26706
Location: Toronto, Ontario, Canada
TV/Projector: Sony 1252Q, AMPRO 4000G
|
| Posted: Fri Dec 14, 2007 2:15 am Post subject: |
|
|
Did you do the lens toe in first?
_________________
Tech support for nothing
CRT.
HD done right!
|
|
| Back to top |
|
|
Fujifrontier
Joined: 20 Oct 2007
Posts: 354
Location: San Antonio, Texas
|
| Posted: Fri Dec 14, 2007 2:40 am Post subject: |
|
|
ahm, ah... *ahem*... um, ahh...
*cringes*
What's that? I focussed the lenses using the nut that's closet to me. What's the second one, farther up for? Is that what you're talking about? I thought it was a secondary focus and adjusted it so the little dots were visible on the horizontal bars.
|
|
| Back to top |
|
|
|
|


