| Author |
Message |
9kids

Joined: 25 Jun 2007
Posts: 138
Location: Manassas, VA
|
| Posted: Sat Nov 10, 2007 2:53 am Post subject: Marquee 8111 setup - Raster centering vs. max raster |
|
|
I have read a lot about how important it is to get the raster perfectly centered and maximized. I think I have done a pretty good job of centering and maximizing, but after doing the geometry I noticed that because of the effect of the Keystone adjustment (smaller width at bottom than at the top), that I could move the raster down some more and then increase the raster size even more. So before keystone adjustment I would have all four corners of the raster almost touching the corners of the tube, and after keystone the top corners are still almost touching, but the bottom corners far from the edges of the tube. So if I move the raster down, I can increase the size of the raster quite a bit more.
So my question is, is it more important to have the raster center top to bottom or is it ok to move it down and maximize the phosphor use. I am guessing it is probably better to keep it centered (seems like it might be easier on the electronics). I am guessing that during Guided Mechanical Setup, when you are moving the rasters around on the tube face that it is actually the static convergence that you are using to move them.
Thanks
John (9kids)
|
|
| Back to top |
|
 |
Nashou66

Joined: 12 Jan 2007
Posts: 16171
Location: West Seneca NY
|
|
| Back to top |
|
|
Joust
Joined: 05 May 2006
Posts: 2429
Location: Almonte, Ontario, Canada
TV/Projector: Marquee 8501LC
|
| Posted: Sat Nov 10, 2007 1:28 pm Post subject: |
|
|
nothing is written in stone.
If you can, you can. its a matter of going through the setup and the going through it again.
you can go through it a 100 times and still make minor adjustments, i know someone that does that.
Your first time through will result in a usable image.
It all depends on how anal you are.
|
|
| Back to top |
|
|
draganm
Joined: 08 Mar 2006
Posts: 8990
Location: Colorado
|
| Posted: Sat Nov 10, 2007 2:54 pm Post subject: |
|
|
|
if your really using that much Keystone such that your raster is a big Trapezoid you might want to reconsider your set-up? If your shooting up from the floor at an angle to a 16:9 widescreen then the machine was never really designed to do that. It was made to sit either on a low table or hang from the ceiling. roughly, the bottom the machine whould be within 12" of the bottom of the screen for floor.
|
|
| Back to top |
|
|
Tim in Phoenix

Joined: 21 Oct 2006
Posts: 4409
Location: Phoenix
|
| Posted: Sat Nov 10, 2007 7:11 pm Post subject: |
|
|
Guys!
The other key alignments include having the scan yokes level to the tube faces and each other; and to match raster heights and widths for the least load on the convergence section.
|
|
| Back to top |
|
|
deronmoped
Joined: 03 Nov 2006
Posts: 1154
Location: San Diego
|
| Posted: Sun Nov 11, 2007 4:05 pm Post subject: |
|
|
Suppose ably you want as little keystone as possible so the image uses a much tube face as possible, giving you the same resolution top to bottom. Also suppose ably you want the image projecting through the center of the lens to give you maximum resolution. It may be a trade off either way you go, the image will be not in the best spot no matter which way you go. Less keystone or centered on the lens, I have not seen anyone test which is better.
Deron.
|
|
| Back to top |
|
|
9kids
Joined: 25 Jun 2007
Posts: 138
Location: Manassas, VA
|
| Posted: Mon Nov 12, 2007 9:49 pm Post subject: |
|
|
| draganm wrote: | | if your really using that much Keystone such that your raster is a big Trapezoid you might want to reconsider your set-up? If your shooting up from the floor at an angle to a 16:9 widescreen then the machine was never really designed to do that. It was made to sit either on a low table or hang from the ceiling. roughly, the bottom the machine whould be within 12" of the bottom of the screen for floor. |
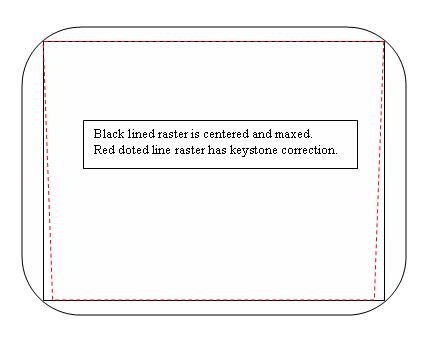
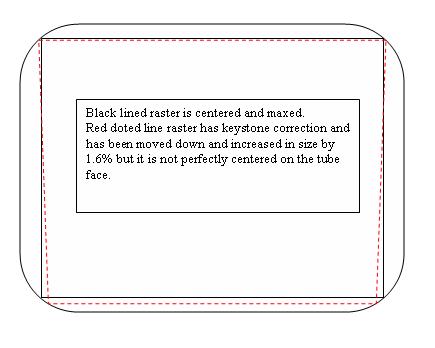
I have the projector above the bottom of the screen right now. So I have the back of the projector propped up. Since the Marquee has 10 degrees built in, I am probable only running about 7 degrees. Which means very little keystone.
But just a little keystone can change how much you can increase the raster size if you move the raster down some. See the drawings below. By decentering the raster you can actually increase the size by about 1.6 %. on a 100 inch screen this is 1.6 inchs, a significant difference.
Everything I have read stress centering the raster on the tube face, so I am not sure making the raster a little larger is worth not knowing how it might effect the picture.
Thanks
| Description: |
|
| Filesize: |
15.79 KB |
| Viewed: |
6371 Time(s) |
|
| Description: |
|
| Filesize: |
22.42 KB |
| Viewed: |
6371 Time(s) |
|
|
|
| Back to top |
|
|
garyfritz

Joined: 08 Apr 2006
Posts: 12088
Location: Fort Collins, CO
|
| Posted: Mon Nov 12, 2007 10:49 pm Post subject: |
|
|
|
Are you actually running a 4:3 raster? I generally center my raster with a 4:3 (because it's easier to see it's centered with a full-size raster), then I squeeze it down to a 16:9 raster for actual setup. And with 16:9 you can run it a bit larger because you don't run into the corners.
|
|
| Back to top |
|
|
igroucho
Joined: 10 May 2006
Posts: 39
Location: Stockholm, SWEDEN
|
| Posted: Tue Nov 13, 2007 1:26 pm Post subject: |
|
|
On a Marquee with linearity controls you really should center the center of the #-hatch on the tubeface, not the edges of the raster to the edges of the tubeface. Done properly the raster will always stay centered even after adjusting linearity.
The main reason to having the center of the raster at the very center of the tubeface and not move it because it's possible due to keystone-geometrics is that the picture will always be at its sharpest at the center, due to properties of the optics and spot sharpness/shape, at which point the eye focusses and the action for the overwhelming part takes place.
|
|
| Back to top |
|
|
cmjohnson
Joined: 03 Apr 2006
Posts: 5180
Location: Buried under G90s
|
| Posted: Tue Nov 13, 2007 2:21 pm Post subject: |
|
|
Check the PJ's point of aim as well. Use the slots down the side panels as a reference. They should point directly at the vertical
center of the screen. And your setup angle should be under 10 degrees, with (I think) an absolute max of 15 degrees as
that's all that the Scheimpflug and geometry are intended for.
Do your setup at 4:3 and then shrink vertically to 16:9 for viewing. (Unless you're viewing 4:3 content.) And as Gary noted, you can
get more width out of a 16:9 setup because the picture doesn't get into the corners of the lenses.
igroucho makes a good point. You CAN use the linearity adjustments (if equipped) to adjust crosshatch centering, but this may
negatively affect linearity.
But there is another way.
If you've got your mechanical, magnetic, and electronic centering as well set up as you possibly can make it, and the crosshatch still
isn't properly centered, you may need to adjust the master centering of the crosshatch via an option in the supersecret factory
service menus. I would avoid this unless you're SURE that you have to do that adjustment.
One final check I make is to ramp focus from one end to the other. The crosshatches should NOT move in relation to each other or
the screen. Focus should change, NOT position. If it does, it's not set up correctly.
CJ
|
|
| Back to top |
|
|
garyfritz
Joined: 08 Apr 2006
Posts: 12088
Location: Fort Collins, CO
|
| Posted: Tue Nov 13, 2007 6:03 pm Post subject: |
|
|
|
Chris, that "ramp the focus" test only checks proper magnetic alignment, correct?
|
|
| Back to top |
|
|
Gino

Joined: 22 Apr 2006
Posts: 1363
Location: Trinity Beach, AUSTRALIA
|
| Posted: Wed Nov 14, 2007 2:02 am Post subject: |
|
|
| igroucho wrote: | On a Marquee with linearity controls you really should center the center of the #-hatch on the tubeface, not the edges of the raster to the edges of the tubeface. Done properly the raster will always stay centered even after adjusting linearity.
The main reason to having the center of the raster at the very center of the tubeface and not move it because it's possible due to keystone-geometrics is that the picture will always be at its sharpest at the center, due to properties of the optics and spot sharpness/shape, at which point the eye focusses and the action for the overwhelming part takes place. |
Actually, I disagree with this. I think you should make equal the edges of the raster to the edges of the tube face. Using C Linearity will move your centre lines within the crosshatch. Putting edges at equal distance, then using all geometry/convergence controls at your disposal, you should be able to create a grid such that the edges of the crosshatch are still where you left them, with the centre at the centre of tube face. Note this is only possible with correct mechanical positioning of your projector.
_________________
( B ) ( G ) ( R ) Blendzilla Down Under ( R ) ( G ) ( B ) - Tubes of Fury
|
|
| Back to top |
|
|
igroucho
Joined: 10 May 2006
Posts: 39
Location: Stockholm, SWEDEN
|
| Posted: Wed Nov 14, 2007 12:17 pm Post subject: |
|
|
| Gino wrote: | | Actually, I disagree with this. I think you should make equal the edges of the raster to the edges of the tube face. Using C Linearity will move your centre lines within the crosshatch. Putting edges at equal distance, then using all geometry/convergence controls at your disposal, you should be able to create a grid such that the edges of the crosshatch are still where you left them, with the centre at the centre of tube face. Note this is only possible with correct mechanical positioning of your projector. |
Don't blame you. I jumped into the topic on misconceptions of what really was discussed here. The situation I referred to was the setting up of magnetics and that wasn't the topic of this thread. Sorry.
|
|
| Back to top |
|
|
cmjohnson
Joined: 03 Apr 2006
Posts: 5180
Location: Buried under G90s
|
| Posted: Fri Nov 16, 2007 12:24 am Post subject: |
|
|
| garyfritz wrote: | | Chris, that "ramp the focus" test only checks proper magnetic alignment, correct? |
Yes...proper magnetic alignment of the focus yoke, to be precise. Which is directly connected to overall positioning of
the raster on the CRT face.
An ideal alignment, which I've never seen, but I've seen close, will not show ANY movement in any raster with ramping
of focus, contrast, or brightness from one extreme to the other. Master focus will also be at 50. Flare, astig, and
triangularity should also be perfectly adjusted, with no changes to dot shape with any electrical adjustment. Even focus
should not change the SHAPE of the dot, just how blurry or sharp it is. And the optimal settings for electronic astig
should not change if any other electronic adjustments are made. High or low contrast settings, or high or low focus
settings, the optimal astig values should remain the same.
This can make the difference between spending two hours aligning the PJ and spending ALL DAY on it, but if it does
take all day, you should be rewarded with a truly optimized picture that behaves strictly "by the book".
CJ
|
|
| Back to top |
|
|
|
|


