| Author |
Message |
Curt Palme
CRT Tech
Joined: 08 Mar 2006
Posts: 24396
Location: Langley, BC
TV/Projector: All of them!
|
| Posted: Wed Dec 31, 2014 11:30 pm Post subject: |
|
|
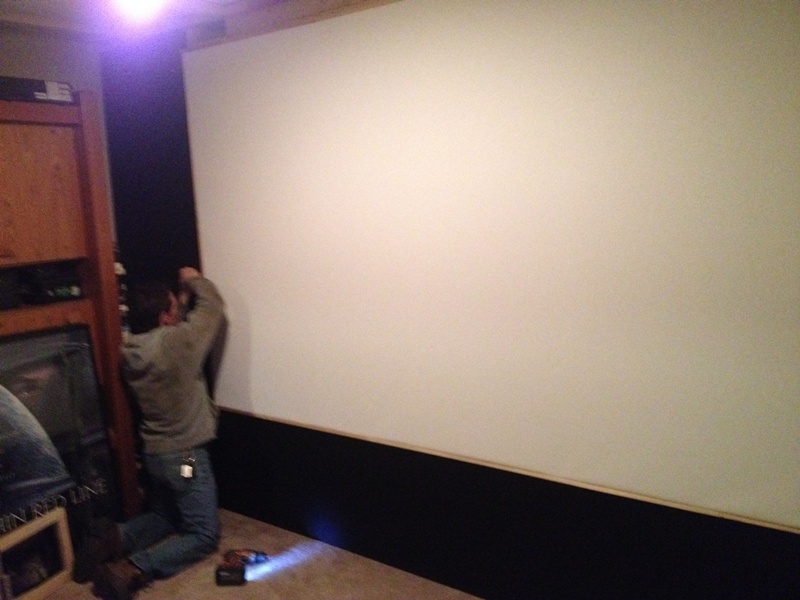
No, that's all the insulation. Yes, it looks like 1950's speaker grille cloth. 
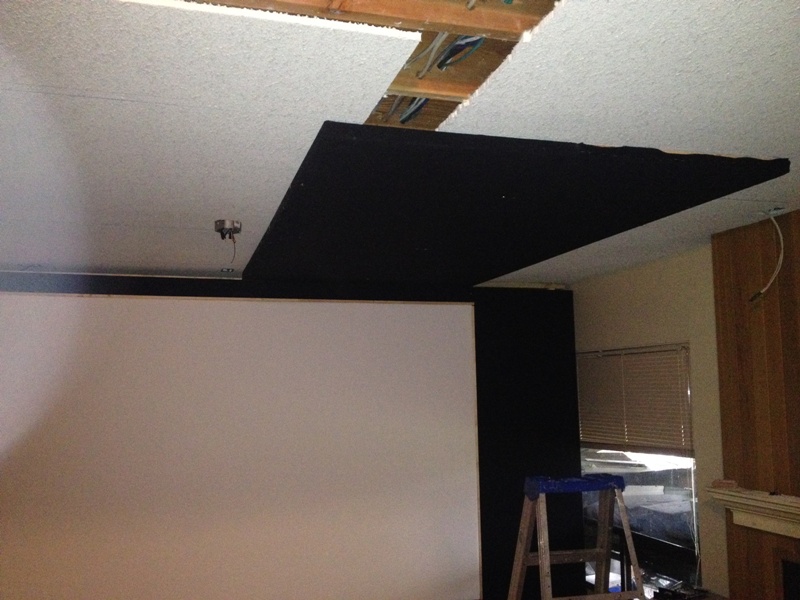
Most of the ceiling panels should be done today. Of course the room is slightly out of square, so despite the screen wall being level, and equidistant out from the main wall, the main wall is out about an inch, so a bit of shimming will need to be done.
|
|
| Back to top |
|
 |
Curt Palme
CRT Tech
Joined: 08 Mar 2006
Posts: 24396
Location: Langley, BC
TV/Projector: All of them!
|
| Posted: Sun Jan 04, 2015 5:57 pm Post subject: |
|
|
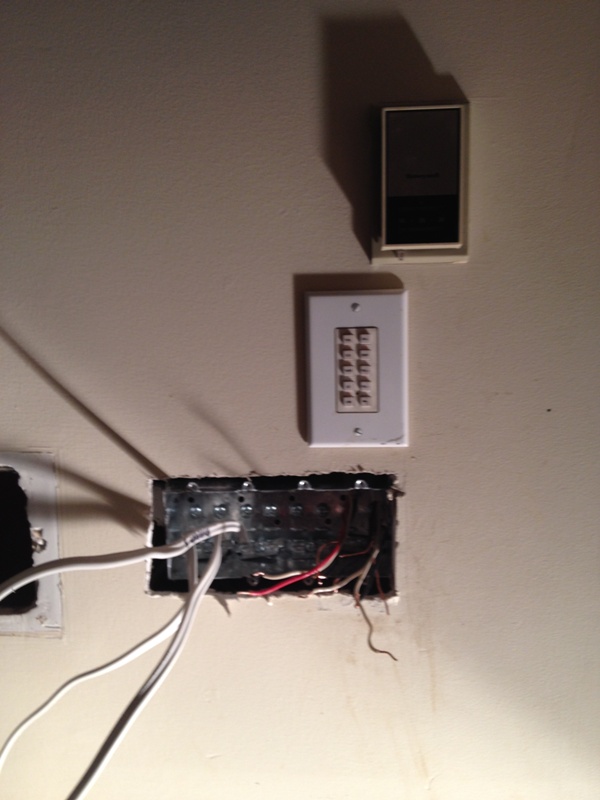
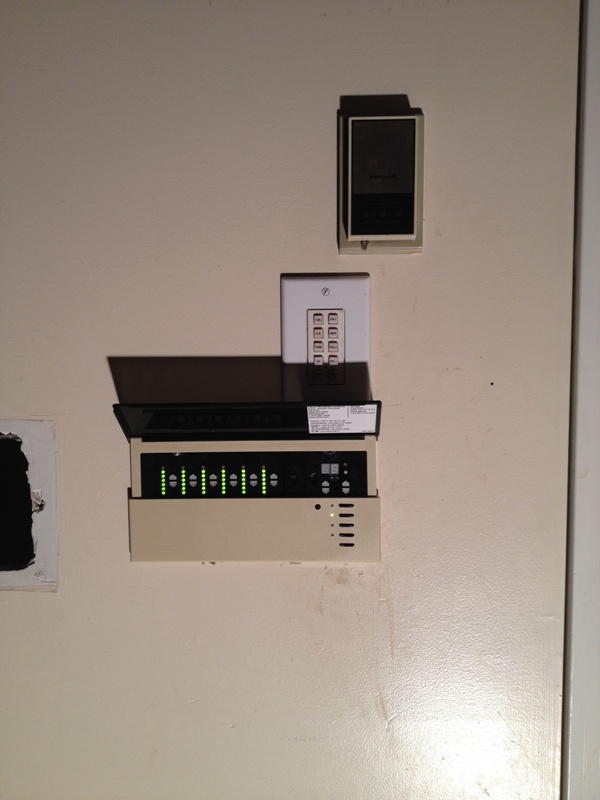
Kinda proud of myself on this one. A CRT customer that had an Ampro 2000 and worked for Lutron gave me this.. oh... 11. years ago! I finally installed it, taking out a single gang box and putting the Lutron in. Before you guys get all crazy about the thermostat, it will be moved down beside the audio keypad. The entire wall will be covered in 1 X 2 frames covered with black cloth as the ceiling is, and we'll put a cutout into the cloth covered panels to access the Lutron and the audio keypad.
Not a bad retrofit for a hack installer that HATES electrical wiring. Now onto adding 2 15 amp circuits for my amps!
The gaping hole to the left is for the 1983 vintage Nutone intercom that's wired throughout the house. It will get covered up by the black panels.
| Description: |
|
| Filesize: |
109.55 KB |
| Viewed: |
16871 Time(s) |
|
| Description: |
|
| Filesize: |
110.09 KB |
| Viewed: |
16871 Time(s) |
|
|
|
| Back to top |
|
|
Curt Palme
CRT Tech
Joined: 08 Mar 2006
Posts: 24396
Location: Langley, BC
TV/Projector: All of them!
|
| Posted: Sat Jan 10, 2015 9:41 pm Post subject: |
|
|
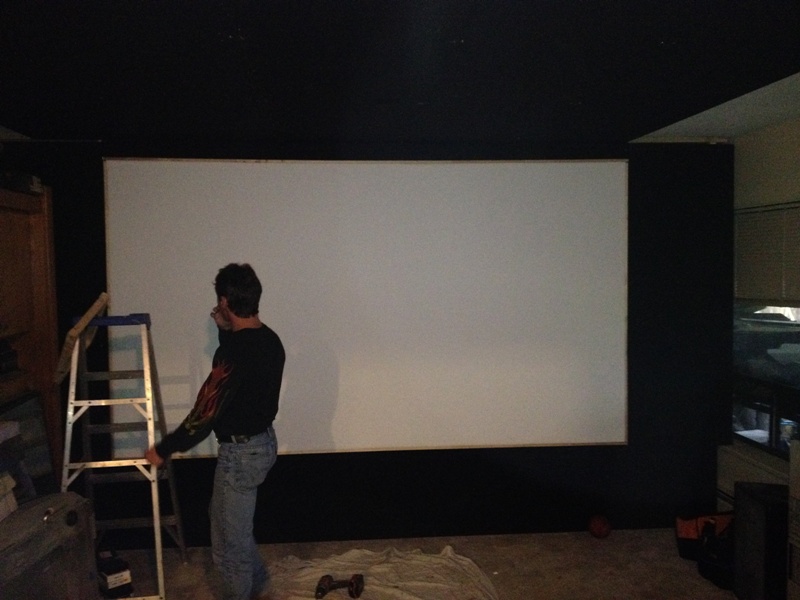
Well, the panels around the screen look great. need to get some black paint for the wood around the screen.
| Description: |
|
| Filesize: |
144.27 KB |
| Viewed: |
16758 Time(s) |
|
| Description: |
|
| Filesize: |
130.51 KB |
| Viewed: |
16758 Time(s) |
|
| Description: |
|
| Filesize: |
137.45 KB |
| Viewed: |
16758 Time(s) |
|
| Description: |
|
| Filesize: |
143.82 KB |
| Viewed: |
16758 Time(s) |

|
|
|
| Back to top |
|
|
overclkr

Joined: 08 Mar 2006
Posts: 4227
|
| Posted: Sat Jan 10, 2015 11:37 pm Post subject: |
|
|
|
Looking good big dog!!!!!!!!
|
|
| Back to top |
|
|
Curt Palme
CRT Tech
Joined: 08 Mar 2006
Posts: 24396
Location: Langley, BC
TV/Projector: All of them!
|
| Posted: Sat Jan 24, 2015 9:47 pm Post subject: |
|
|
Front row of ceiling panels will be in today, maybe a part of the second row as well. Tomorrow I pull all power amps and blow out the dust, replace the filter cap on my one subwoofer channel so I can run on four 15" EAWs, and I make the patch cords for the rear and front surrounds.
Getting ready for Superbowl, even though I don't watch football.
Go HAWKS!
| Description: |
|
| Filesize: |
154.25 KB |
| Viewed: |
16572 Time(s) |
|
|
|
| Back to top |
|
|
Curt Palme
CRT Tech
Joined: 08 Mar 2006
Posts: 24396
Location: Langley, BC
TV/Projector: All of them!
|
| Posted: Sat Jan 24, 2015 11:26 pm Post subject: |
|
|
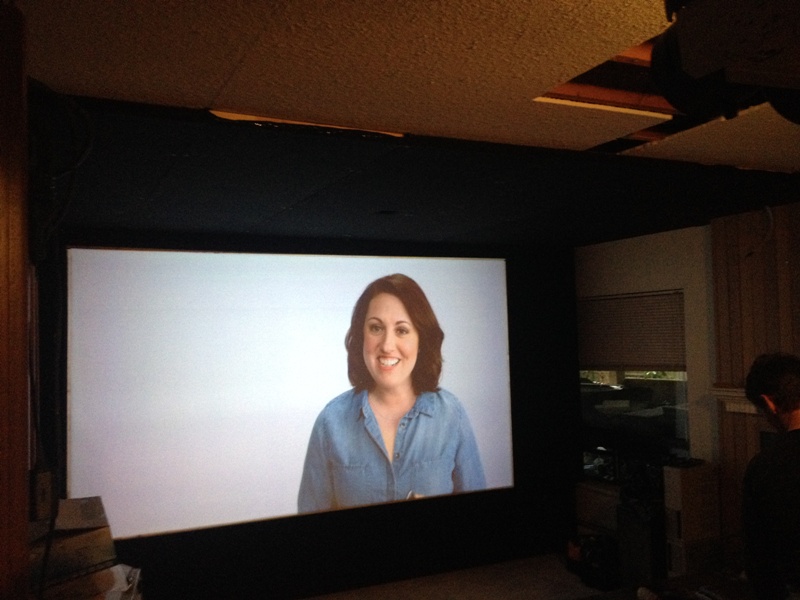
Slow going on these panels, but it's an amazing difference!
| Description: |
|
| Filesize: |
123.87 KB |
| Viewed: |
16545 Time(s) |
|
| Description: |
|
| Filesize: |
131.29 KB |
| Viewed: |
16545 Time(s) |
|
|
|
| Back to top |
|
|
Nashou66

Joined: 12 Jan 2007
Posts: 16171
Location: West Seneca NY
|
|
| Back to top |
|
|
km987654

Joined: 25 Jul 2007
Posts: 2874
Location: Australia
TV/Projector: Barco BG809s
|
| Posted: Sun Jan 25, 2015 3:16 am Post subject: |
|
|
Wow. Its amazing how a projector screen can improve a room. 
|
|
| Back to top |
|
|
gasser
Joined: 31 May 2012
Posts: 40
|
| Posted: Sun Jan 25, 2015 3:12 pm Post subject: |
|
|
Getting ready for Superbowl, even though I don't watch football.
Curt, will your doublestack be sharp enough to show deflated Patriot balls?
|
|
| Back to top |
|
|
ElTopo

Joined: 07 Nov 2006
Posts: 1640
|
| Posted: Sun Jan 25, 2015 6:01 pm Post subject: |
|
|
I painted my home theater in black color.
The difference is amazing !
_________________
Barco Cine 9 the one and only
|
|
| Back to top |
|
|
Curt Palme
CRT Tech
Joined: 08 Mar 2006
Posts: 24396
Location: Langley, BC
TV/Projector: All of them!
|
| Posted: Sun Jan 25, 2015 6:06 pm Post subject: |
|
|
|
Sad thing is, I'll be on a plane during Superbowl! Might be able to catch the end of the game though..
|
|
| Back to top |
|
|
ElTopo
Joined: 07 Nov 2006
Posts: 1640
|
| Posted: Sun Jan 25, 2015 7:25 pm Post subject: |
|
|
Curt,
how many foot lambert are you gettin off your screen ?
_________________
Barco Cine 9 the one and only
|
|
| Back to top |
|
|
Curt Palme
CRT Tech
Joined: 08 Mar 2006
Posts: 24396
Location: Langley, BC
TV/Projector: All of them!
|
| Posted: Sun Jan 25, 2015 7:42 pm Post subject: |
|
|
|
No idea, I don't have the tools to measure it, nor do I really care. It's got piles of punch, and my brightness and contrast are well under typical values. I've put a surprising amount of time on the stack so far. The drifting is annoying, it's nowhere near as good as Cliff's setup yet, ditto for the sound, but I'm hoping to be on track for a meet either this year or next year. Will alll depend if I land some sound jobs to get a bunch of work done around here.
|
|
| Back to top |
|
|
Curt Palme
CRT Tech
Joined: 08 Mar 2006
Posts: 24396
Location: Langley, BC
TV/Projector: All of them!
|
| Posted: Mon Jan 26, 2015 2:04 am Post subject: |
|
|
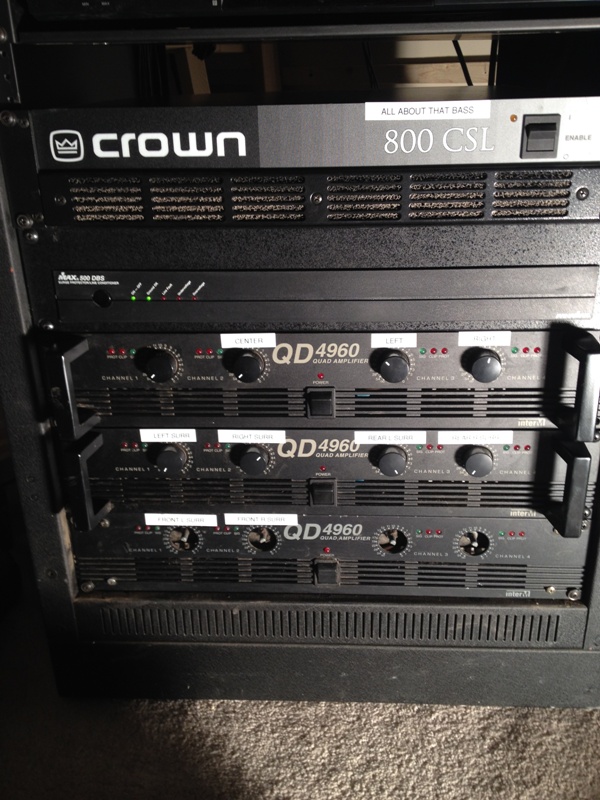
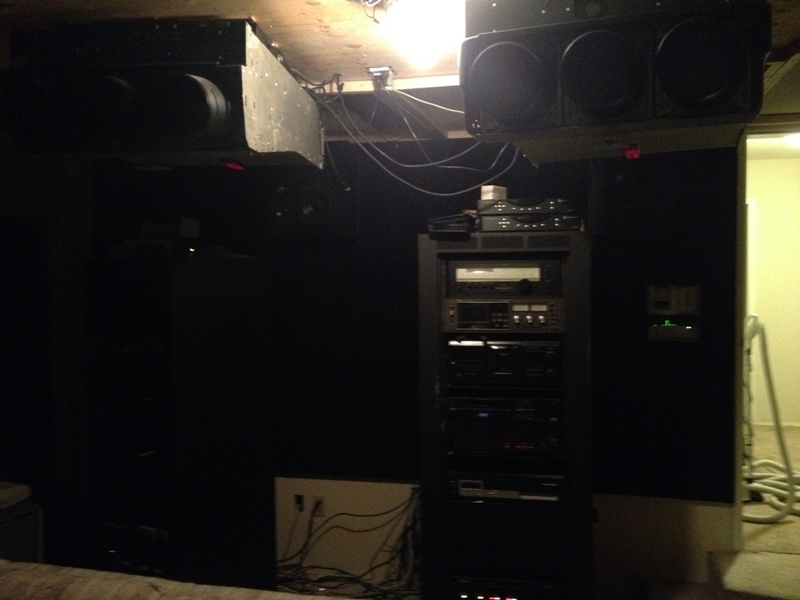
I rewired my rack today and made up new patch cords for the surround speakers.
12 channels of 170 watts into 8 ohms for LCR and surround, and 2 X 400 watts RMS for the EAW subs.
I'm not using 3 channels of the amps, they are spares. The bottom amp was a freebie, and was missing the knobs when I got it. Not really a big deal, but I do have the distributor checking to see if they can get them.
| Description: |
|
| Filesize: |
191.92 KB |
| Viewed: |
16367 Time(s) |
|
|
|
| Back to top |
|
|
Curt Palme
CRT Tech
Joined: 08 Mar 2006
Posts: 24396
Location: Langley, BC
TV/Projector: All of them!
|
| Posted: Wed Jan 28, 2015 2:10 am Post subject: |
|
|
Back wall panels are now up!
| Description: |
|
| Filesize: |
114.39 KB |
| Viewed: |
16277 Time(s) |
|
|
|
| Back to top |
|
|
AnalogRocks
Forum Moderator

Joined: 08 Mar 2006
Posts: 26706
Location: Toronto, Ontario, Canada
TV/Projector: Sony 1252Q, AMPRO 4000G
|
| Posted: Wed Jan 28, 2015 2:21 am Post subject: |
|
|
Hey that **almost** looks like a professional install. 
_________________
Tech support for nothing
CRT.
HD done right!
|
|
| Back to top |
|
|
Curt Palme
CRT Tech
Joined: 08 Mar 2006
Posts: 24396
Location: Langley, BC
TV/Projector: All of them!
|
| Posted: Wed Jan 28, 2015 2:33 am Post subject: |
|
|
Don't knock my wiring! Eventually we want the racks to be level with the top step, and a love seat between the racks.
Then one step down, and a row of seats, and finally a row on the floor. Probably won't happen this year, it's a lot of work, but never say never...
The wiring will all be cleaned up with split loom tubing and proper strain reliefs. Right now it's a %^&*$*R$ mess!
|
|
| Back to top |
|
|
CasetheCorvetteman

Joined: 09 Nov 2008
Posts: 6326
Location: Australia
|
| Posted: Thu Jan 29, 2015 12:40 am Post subject: |
|
|
| AnalogRocks wrote: | | Hey that **almost** looks like a professional install. |
You know Jeremy, there is a good reason these guys throw their cables everywhere and no labels... That way if it breaks down no one else has a hope in hell of figuring out what has been done, they need to get the original guy back 
_________________
Barco Cine 9, ,Sony VPL570ES 4K SXRD, 135" OZ Theatre Majestic 16:9 screen, Denon X6700in preamp mode, 2x 7ch Tonewinner amps, 2x Tonewinner 15" subs, 2x 10" subs, 7.2.6...
RUNCO DTV991 LC ( NEC XG 852 LC ) 100" 4:3 screen, H/K AVR 7.1...
|
|
| Back to top |
|
|
fearn48
Joined: 07 May 2008
Posts: 26
Location: Reading, England
|
| Posted: Fri Jan 30, 2015 10:46 pm Post subject: |
|
|
Hi curt,
Your room is really beginning to look great. I'm interested in how you fixed the black panels to the wall and ceiling. When I did a couple of Sound absorbers in my living room some years ago, I attached the 2x2 frame to the wall, then filled it with Ecophon that I got from work. I then covered it all in cloth which is held in place with staples. If you look closely you can see the staples, but they are very close to the wall so you don't notice them. As you made your panels then hung them, can you see the screws that you used to fix the in place?
I wanted to put one on the ceiling, but could not work out how to keep the ecophon from falling out and making the cloth sag. How have you stopped yours from making the cloth sag?
Thanks
Peter
_________________
If only you could see what I've seen with your eyes!
|
|
| Back to top |
|
|
Curt Palme
CRT Tech
Joined: 08 Mar 2006
Posts: 24396
Location: Langley, BC
TV/Projector: All of them!
|
| Posted: Fri Jan 30, 2015 10:56 pm Post subject: |
|
|
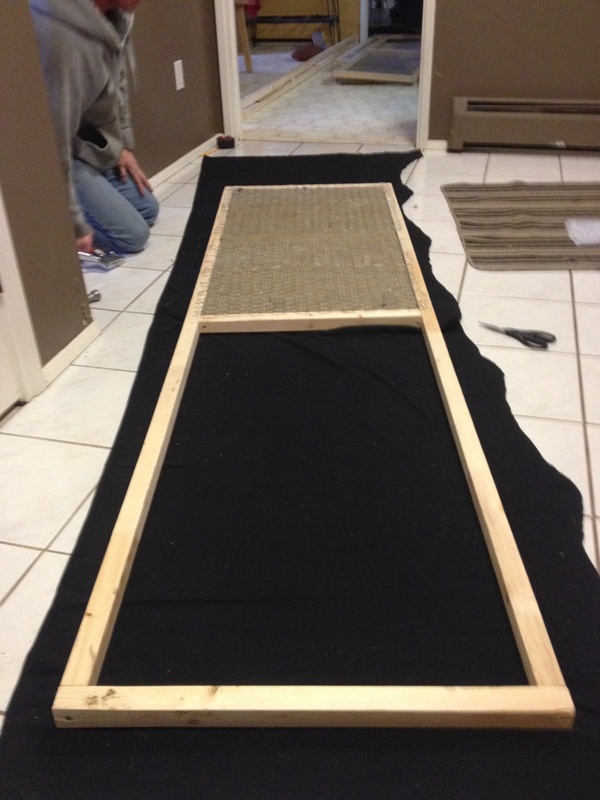
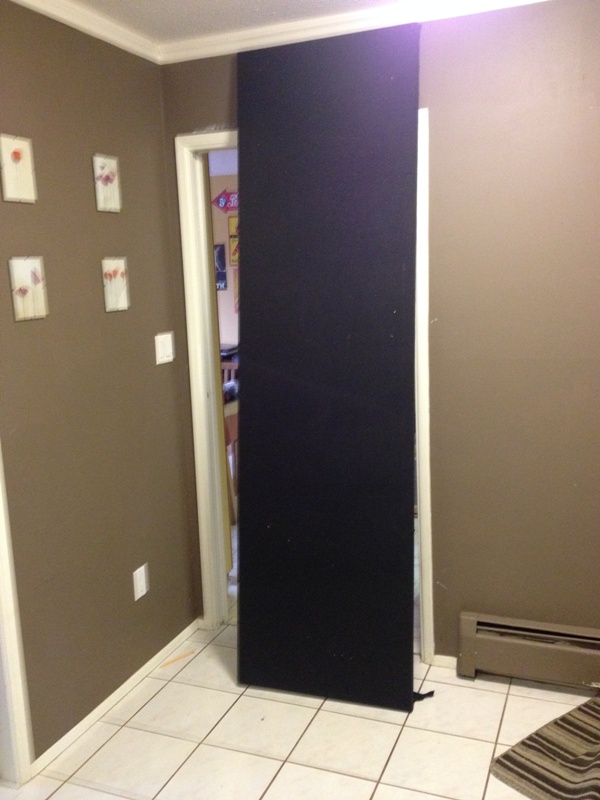
We used black washers and 6 screws per panel. Was going to paint the screw heads black, but they are so unobtrusive, there was no need to. the washers are raised, like on old Sony reel to reel decks, so the screw heads recess right into them.
The frame is built of 1 X 2s, nail gunned together, with a couple of extra 1/2 X 1' across the short sides at the 1/3 and 2/3 marks. Instead of fibreglass pink, we used sheets of insulation that are still fibreglass, but more like bats of insulation, not the fluffy stuff. We notched out the insulation sheets so they rested on the 1/2 X 1s, and there's no sagging whatsoever. We then stretched the microfibre cloth over them, used about 200 staples to support the thin cloth, and used a soldering iron to touch the cloth where we had to put the screws through. With the 4 way stretch of the material, it more or less opened a hole just larger than the screw head, so the screws wouldn't catch the material.
The second row of material will be finished today, I'll throw up a pix tonight.
After this is done, I'll have to slow down on working on it, as the funds are running out until I get another install job. All I've done this month is quotes, and expect some project awards in February.
|
|
| Back to top |
|
|
|
|


