|
As this forum is rarely used anymore, we've locked it. Feel free to browse and read. Questions? Please reach out to us directly. Cheers! |

|
 |
|
|
| Author |
Message |
kal
Forum Administrator
Joined: 06 Mar 2006
Posts: 18114
Location: Ottawa, Canada
TV/Projector: JVC DLA-NZ7
|
|
| Back to top |
|
 |
zaphod

Joined: 16 Jun 2006
Posts: 2002
Location: Cloverdale
|
| Posted: Fri Jun 15, 2012 3:05 pm Post subject: |
|
|
i like the black wood against the white (ecru/bone/cream) tile. a lot nicer on the back as well - i bet that tile heats up REAL nice.
however i am unsure about ladling radioactive waste over oneself.
_________________
walk gently. leave a good impression.
|
|
| Back to top |
|
|
kal
Forum Administrator
Joined: 06 Mar 2006
Posts: 18114
Location: Ottawa, Canada
TV/Projector: JVC DLA-NZ7
|
| Posted: Fri Jun 15, 2012 3:18 pm Post subject: |
|
|
| zaphod wrote: | | however i am unsure about ladling radioactive waste over oneself. |
Ha! Yes, some of the lighting is a bit over the top.
You use the ladle to pour water on the rocks to create steam, not to pour it on yourself. Though I suppose you could!
I'd be afraid of someone tripping on the bowl when you have it recessed. Like these ones:


Seems like a popular thing to do however. More pictures here: http://www.saunavision.fi/galleria/
There's some really nice designs. Pretty expensive I'm sure... just looking at some that seem to have hundreds of pinlights in the ceiling. Yikes. Like this one:

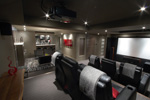
I'd love to have a view like this! (Not easy to do in a basement... ):

Kal
_________________

Support our site by using our affiliate links. We thank you!
My basement/HT/bar/brewery build 2.0
|
|
| Back to top |
|
|
stridsvognen
Guest
|
| Posted: Fri Jun 15, 2012 6:31 pm Post subject: |
|
|
Kal can i suggest that you use your old CRT as a rear projection to create the view.. 
|
|
| Back to top |
|
|
Ile
Joined: 09 Mar 2006
Posts: 1491
Location: Jyväskylä, Finland
|
| Posted: Mon Jun 18, 2012 10:45 am Post subject: |
|
|
I made "fake window" for sauna with lakeside view printed on steel plate. In late 90's I got scenery heaters outer shell from heater factory for test purposes, I was planning pneumatic manipulator for their bending line as a school project.
Then I framed plate and sauna window with lake scenery was ready. 
We have just seven fibre in sauna as a main lighting, the Big Dipper optical fibre series was hit in late 90's when our sauna have been remodeled. Frameless glass door and round ship window to shower room is from same era I guess.
At cottage we have pretty similar scenery from saunas two windows that your picture, so no need for fake windows there. Lake is only few step from sauna building.
|
|
| Back to top |
|
|
kal
Forum Administrator
Joined: 06 Mar 2006
Posts: 18114
Location: Ottawa, Canada
TV/Projector: JVC DLA-NZ7
|
|
| Back to top |
|
|
Ile
Joined: 09 Mar 2006
Posts: 1491
Location: Jyväskylä, Finland
|
| Posted: Tue Jun 19, 2012 10:07 pm Post subject: |
|
|
| kal wrote: | Sounds interesting Ile. Do you have any pictures of your saunas?
Having a lake only a few steps away is great. I remember having saunas in the summer at night and running out jumping off the end of the dock at my grandparents cottage. I've never tried it in the winter or in rolling in snow like some do...
Kal |
Here's now few pictures of my sauna.
I checked few US building instructions and found out some of those sucks, there wasn't any air gaps behind panelings and etc.
This have pretty good picture of wall structure.
http://www.saunamatic.com/docs/construction_notes.htm
Few things to add.
Floors water barrier should continue few inch to wall and wall foil should be taped tightly to floors barrier with same aluminium tape that is used for foils. Vertical "studs" over foil and horizontal paneling will give best air flow in air gap behind paneling and ceiling should be paneled first so there could be leaved also air gap between wall and ceiling panelings.
http://www.saunasite.com/textpics/ilma.jpg
These air gaps ensure that panels will dry properly.
Here's google translated finnish instructions with pictures.
http://translate.google.fi/translate?sl=fi&tl=en&js=n&prev=_t&hl=fi&ie=UTF-8&layout=2&eotf=1&u=http%3A%2F%2Fwww.saunavision.fi%2Fasennus%2Frakentaminen%2F&act=url
|
|
| Back to top |
|
|
kal
Forum Administrator
Joined: 06 Mar 2006
Posts: 18114
Location: Ottawa, Canada
TV/Projector: JVC DLA-NZ7
|
| Posted: Tue Jun 19, 2012 11:12 pm Post subject: |
|
|
Nice sauna Ile!
That gap behind the tongue & groove cedar and the wall behind is new to me.
There's nothing in the installation instructions I was sent that mention that.
I see the logic behind it however: T&G wood isn't waterproof.
You're going to possibly get some moisture behind there up against the silver foil vapour barrier that will take a long time to dry if there's no air gap.
I've sent a note off to the company that sold me the kit asking why they don't mention this air gap requirement.
Some simple 1x3 cedar strapping on the walls and ceiling is all that would be needed. (Vertical on the walls as you mentioned to allow for good airflow).
We're going to tile the floor and go up a few inches on the wall.
I purchased a 5x7' sauna kit from this Canadian site: http://www.saunafin.com/material_kits-why.htm
I've uploaded the assembly instructions here: http://www.curtpalme.com/kal/traditional_sauna_install.pdf
I love the opening comment:
| Quote: | SPECIAL NOTE FOR CONTRACTORS:
We realize you already possess the skill and know-how to build the sauna and you may choose not to read
these instructions. At the very least, make sure you carefully review the material list before you begin
cutting. |
The lead carpenter on my basement got a kick out of that...
They've done a few saunas now from various manufacturers and other times they got nothing but some quick sketches on paper (by hand).
At least now there's an actual installation manual, even though whoever drew the orthogonal view diagrams needs
some drafting lessons. Looks like some of the failed attempts from back in first year engineering.

Kal
_________________
Support our site by using our affiliate links. We thank you!
My basement/HT/bar/brewery build 2.0
|
|
| Back to top |
|
|
Ile
Joined: 09 Mar 2006
Posts: 1491
Location: Jyväskylä, Finland
|
| Posted: Wed Jun 20, 2012 8:07 am Post subject: |
|
|
| kal wrote: | That gap behind the tongue & groove cedar and the wall behind is new to me.
There's nothing in the installation instructions I was sent that mention that.
I see the logic behind it however: T&G wood isn't waterproof.
You're going to possibly get some moisture behind there up against the silver foil vapour barrier that will take a long time to dry if there's no air gap.
I've sent a note off to the company that sold me the kit asking why they don't mention this air gap requirement.
Some simple 1x3 cedar strapping on the walls and ceiling is all that would be needed. (Vertical on the walls as you mentioned to allow for good airflow).
|
Air gap and tightly taped foil makes sense, when you have poured 5 gallons water to heater and start to think where that steam have gone. Same thing when you sometimes wash walls with hose. Steam that have condensed to foil or washing water drops will flow to floor (drain) in that air gap.
Treated panels without air gap would be worst, steam will find it's way to wood but can't dry to either side.
Sauna against houses outer walls and wall between shover room are also bit problematic. Shower room/sauna wall have vapour barrier in both sides (foil at sauna and that goo under tiles at shover) so there are no other way to dry than up. So wall against shover room should have way to dry upward direction.
Outer walls against shower or sauna shouldn't have plastic vapour barrier behind sheet rocks (not sure if that is used there) because when moisture finds it way to insulation/sheet rock that can't dry to either direction. So plastic vapour barrier shouldn't be installed to shower and sauna area and sauna foil should be overlapped to plastic at outside.
| kal wrote: | I purchased a 5x7' sauna kit from this Canadian site: http://www.saunafin.com/material_kits-why.htm
I've uploaded the assembly instructions here: http://www.curtpalme.com/kal/traditional_sauna_install.pdf
I love the opening comment:
| Quote: | SPECIAL NOTE FOR CONTRACTORS:
We realize you already possess the skill and know-how to build the sauna and you may choose not to read
these instructions. At the very least, make sure you carefully review the material list before you begin
cutting. |
The lead carpenter on my basement got a kick out of that...
They've done a few saunas now from various manufacturers and other times they got nothing but some quick sketches on paper (by hand).
At least now there's an actual installation manual, even though whoever drew the orthogonal view diagrams needs
some drafting lessons. Looks like some of the failed attempts from back in first year engineering.
Kal |
That note rocks.
|
|
| Back to top |
|
|
jask

Joined: 17 Mar 2006
Posts: 10187
Location: kamloops BC
|
| Posted: Thu Jun 21, 2012 4:18 am Post subject: |
|
|
| kal wrote: |
At least now there's an actual installation manual, even though whoever drew the orthogonal view diagrams needs
some drafting lessons. Looks like some of the failed attempts from back in first year engineering.
Kal |
Looks like a bad M C Escher drawing

|
|
| Back to top |
|
|
garyfritz

Joined: 08 Apr 2006
Posts: 12088
Location: Fort Collins, CO
|
| Posted: Thu Jun 21, 2012 5:24 am Post subject: |
|
|
| kal wrote: | | Having a lake only a few steps away is great. I remember having saunas in the summer at night and running out jumping off the end of the dock at my grandparents cottage. I've never tried it in the winter or in rolling in snow like some do... |
I've never done a hardcore sauna, but I've done plenty of snow-rolling after jumping out of a hot tub. I suspect the frigid lake is actually a lot worse. The snow is very cold, but it's only "skin-deep." It makes your skin really cold but the snow is an insulator so it doesn't transfer heat very well. Jump back in the tub and your skin tingles like crazy. But near-freezing water would transfer heat out of your body a LOT faster than snow would. I suspect it's a lot bigger shock to your system.
|
|
| Back to top |
|
|
jask
Joined: 17 Mar 2006
Posts: 10187
Location: kamloops BC
|
| Posted: Thu Jun 21, 2012 7:33 am Post subject: |
|
|
| kal wrote: |
- For walls & ceilings use standard fibreglass insulation, the cheapest available.
- There is little benefit to using more than 6 of insulation (R13) even in ceiling joists, so dont.
- It doesnt matter where the insulation is in the joist cavity (top or bottom).
- Try not to compress it too much.
- Sometimes its easier to use paper backed insulation on ceilings so that you can staple it up.
Reasons:
1. Fiberglass has a slight edge in the low frequencies (where it is needed the most).
2. Don't ever compress the insulation. Compression increases density, lowering low frequency absorption and increasing conduction.
3. There is no data that supports that any other insulation (including the acoustic labelled, and recycled cotton) works better, no matter what Owens Corning or Roxul will tell you.
4. Dont use foam. Foam (open or closed cell) is superior for thermal, but distinctly worse for acoustic.
The NRC in Canada put this all to rest in their big study IR 693. NRC Canada proved standard fibreglass it to be slightly better at low frequencies than mineral fiber, cellulose, polyester and cotton. They showed that low density is better than high density, open cell is better than closed cell. Cellulose, mineral and fiberglass are all close, but fiberglass was the marginal winner in the low frequencies. The good news is that fiberglass is not only the best choice, but the cheapest. OC Pink QuietZone and Roxul Safe and Sound have zero benefit for sound isolating.
Backed by:
NRC Canada study IR693: http://www.nrc-cnrc.gc.ca/obj/irc/doc/pubs/ir/ir832/ir832.pdf
Dennis Erskine CFI, CFII, MEI
Architectural Acoustics
Subject Matter Expert
Certified Home Theater Designer
CEDIA Board of Directors
Ted White Founder http://www.soundproofingcompany.com/ - makers of Green Glue.
Terry Montlick
Terry Montlick Laboratories
Home Theater Acoustics
Critical Listening Rooms
Design, Evaluation, Alpha Certification
... and thousands of others.
Kal |
The NRC study did not address ceiling cavities- it was focused on acoustic wall performance - but it clearly showed that cavities that were partially filled performed worse. ( page 83 point 2 )
| Quote: |
1. Fiberglass has a slight edge in the low frequencies (where it is needed the most). |
Have a look at page 75 of the study and tell me if this is correct? fiberglass batt performed much lower than all the other materials. When the materials were tested for airflow transmission.
My take was that resiliant channel with wood studs was the clear winner , but if you look at page 75 you can see that sound transmission loss is related to airflow resistance of the material and higher density materials like rigid fiberglass and mineral wool performed better than fiberglass batt.
| Quote: | | OC Pink QuietZone and Roxul Safe and Sound have zero benefit for sound isolating. |
That is not what the study says, and it is misleading bullflop. in fact they are all very comperable - within 1 STC(db) ( see page 76 ) and that would not be considered significant ( pg 7, methodology )
I have built walls and rooms with both and will use Roxul any chance I can- it is easier to place correctly, is less irritating to install and in my subjective opinion in a decoupled (resilient channel ) wall offers better acoustic insulation for home theater and the type of noise the NRC study did not intend to address.
The study:
https://docs.google.com/viewer?a=v&q=cache:iz41W6FP990J:www.nrc-cnrc.gc.ca/obj/irc/doc/pubs/ir/ir693/ir693.pdf+IR-693&hl=en&gl=ca&pid=bl&srcid=ADGEEShyBCTTtgado6P7wNpvVH6Dmx4tzpaEQUnB71aZX3TKBNzQxbiyZHKN6hPN1a4W0uPQvLFWYYSNwfqIObisvZUOVLAvyr9qd2C16wqt3j_f5rM2NHbXGml7uRBPyDyWLi_jzkLK&sig=AHIEtbTN3Gks78FsLwDlRnHCoNdLIGauZA
|
|
| Back to top |
|
|
kal
Forum Administrator
Joined: 06 Mar 2006
Posts: 18114
Location: Ottawa, Canada
TV/Projector: JVC DLA-NZ7
|
| Posted: Thu Jun 21, 2012 2:10 pm Post subject: |
|
|
Hi Jask,
Thanks for the feedback.
Regarding these points:
| Quote: |
- For walls & ceilings use standard fibreglass insulation, the cheapest available.
- There is little benefit to using more than 6 of insulation (R13) even in ceiling joists, so dont.
- It doesnt matter where the insulation is in the joist cavity (top or bottom).
- Try not to compress it too much.
- Sometimes its easier to use paper backed insulation on ceilings so that you can staple it up. |
They are summaries of what Dennis Erskine, Ted White, and Terry Montlick have written over and over again on AVS. They weren't written by me after reading the NRC study. I haven't read the study in detail myself. Instead I look to what the experts say that work in the field. They refer to the NRC study quite a few times as ammo to back some of their statements.
I wrote:
| Quote: | | OC Pink QuietZone and Roxul Safe and Sound have zero benefit for sound isolating. |
What I meant was that these higher priced products have no ADDED benefit over the cheapest fiberglass insulation. Not that they do not help at all. Sorry for the confusion.
You wrote:
| Quote: | | I have built walls and rooms with both and will use Roxul any chance I can- it is easier to place correctly, is less irritating to install |
That's interesting. My contractor and the trades doing the work said that they used to use OC Quiet Zone (pink fiberglass stuff) and then moved to Roxul for it's more ridgid qualities (easier installation) and then the guys started to complain/hate the little bits that would fall into their eyes while installing it, so they went back to using fiberglass.
Maybe if you're installing in walls it's not an issue.
Kal
_________________
Support our site by using our affiliate links. We thank you!
My basement/HT/bar/brewery build 2.0
|
|
| Back to top |
|
|
jask
Joined: 17 Mar 2006
Posts: 10187
Location: kamloops BC
|
| Posted: Thu Jun 21, 2012 4:18 pm Post subject: |
|
|
Hey Kal no worries, I have seen the NRC report referenced a bunch of times as saying things it did not and then spread like wildfire and become "fact" when repeated. CMHC has done studies that show a full ceiling joist cavity is a better insulator and that ( like walls ) the best results are found with the use of resilient channel and double drywall for attached ceilings and was only bettered by a fully separate and insulated ceiling.
Roxul does shed more than modern pink, the old stuff was still pretty awful to work overhead with, everyone should be wearing eye protection and a nuisance mask with any of these products... my biggest complaint with glass is that it is very easy to install them incorrectly- edges pinched and compressed with air channels that are hidden from the installer, this is much harder to do with Roxul. If you have ever seen thermal scans of homes with glass insulation this is really obvious ... lots of installers do not do a full push in- pull out install.
Judging from your build pics you will not have to worry  you are doing a first class job.. although that vent fan with the Tuck tape looked a little dodgy you are doing a first class job.. although that vent fan with the Tuck tape looked a little dodgy
|
|
| Back to top |
|
|
kal
Forum Administrator
Joined: 06 Mar 2006
Posts: 18114
Location: Ottawa, Canada
TV/Projector: JVC DLA-NZ7
|
| Posted: Thu Jun 21, 2012 4:44 pm Post subject: |
|
|
| jask wrote: | | Judging from your build pics you will not have to worry you are doing a first class job.. although that vent fan with the Tuck tape looked a little dodgy |
 I noticed that myself. They were a couple of feet short on the 4" flexduct after the new fan was replaced and they were going to get a short piece as a go-between. Looks like rigid duct was used instead. I'll have to ask... I've put it on my list. Flexduct has a plastic inner liner which I would assume is better for moving (possibly) humid air out of the bathroom. It'll never rust. Thanks for the heads up! I appreciate comments like this. I noticed that myself. They were a couple of feet short on the 4" flexduct after the new fan was replaced and they were going to get a short piece as a go-between. Looks like rigid duct was used instead. I'll have to ask... I've put it on my list. Flexduct has a plastic inner liner which I would assume is better for moving (possibly) humid air out of the bathroom. It'll never rust. Thanks for the heads up! I appreciate comments like this.
EDIT: Searching around on the 'net seems that people are recommending standard 4" galvanized duct for bathroom fans. Insulated if possible. Sounds like it would be fine. I plan on putting a timer on the fan switch to make sure it runs for a while after showers/saunas to get ride of moisture and also allow the duct time to dry. Thinking about it some more I ran 2 gallons of water as steam through my brewery duct exactly like this over 30 times in the last ~2 years. There's no rust at all.
---------------
So plumbing rough-in is now all done too.
Tomorrow we get sprayfoamed. We're using Heatlok Soya by Demiliec (also sold under the Polarfoam name... different distributor).
All of the existing standard fiberglass insulation has already been removed. We're doing R12 on the outside foundation walls (2" thick) and R20+ in the headers/rim joists (4" thick).
Fiberglass insulation will be used in the ceilings and inner walls as that's the best solution for sound.
The sprayfoam we're using is supposedly very "green" stuff which I like. To quote one site that talked about it:
| Quote: | | Heatlok-Soya takes the prize for hitting the most eco-buttons in its story. It is a polyurethane foam system made out of recycled plastic (a barrel of Heatlok-soya contains 1000 plastic bottles) and soya oil. it is zero ozone depletion and is even coloured green. The manufacturer, Demilec, "is the first Canadian manufacturer of Spray Polyurethane Foam to meet the requirements of the Montreal Protocol. Aside from having risen to the challenge before the deadline, DEMILEC has developed the expertise to embrace the ecological turn (the sustainable development approach) by introducing recycled plastics, renewable natural oils, and water, all while maintaining the high quality and performance of its foam systems." Their brochure, however, is on very glossy and heavy paper. |
So why sprayfoam? It's considerably better at retaining heat and provides a better air and moisture barrier in the places it's needed (like the headers/rim joists where condensation can form). We also absolutely require it in some places as, due ot the design, we have plumbing (both supply and drain) running inside the 2x4" framing on exterior walls. Code around here says you need at least R12 between this and the outside wall to avoid freezing (it is Canada after all), and you don't have enough depth to do that with the standard pink stuff. It would have to be too thick. We were also required to remove the vapour barrier and existing pink fiberglass stuff to do wiring, so it had to come out anyway. It'll get re-used in the ceilings.
So why not sprayfoam? The only reason is that it's more expensive.
The R-rating of sprayfoam is confusing. When researching this product seemed to be either R6 or R7.4 per inch. Then I read this:
| Quote: | | Sprayfoam and R value: According to Rich Krechowicz of Callrich Eco Services, who is a Heatlok installer, only the Demiliec soya insulation product is a type 2″ sprayfoam with a long term R value of 6. As he explained to me, there are two types of sprayfoam, type 1 and type 2. When measuring R value for sprayfoams, it is measured in three stages : initial (just after its sprayed), aged, (after 180 days) and long-term (after six months). In the US, sprayfoam manufacturers are allowed to use the aged R value term when advertising a sprayfoam, in Canada, they must use the long-term number, so if youre doing your research and wondering why the same product has two different R values, it might be that youre looking at American and Canadian sites. All other sprayfoams fall into the type 1 category with a long-term R value of 5. |
Drywall isn't far behind... I'll take some pictures over the weekend of our new green walls.
Kal
_________________
Support our site by using our affiliate links. We thank you!
My basement/HT/bar/brewery build 2.0
|
|
| Back to top |
|
|
WTS
Joined: 08 Mar 2006
Posts: 1276
Location: Calgary
|
| Posted: Fri Jun 22, 2012 1:27 pm Post subject: |
|
|
Damn, after all this I sure hope you plan on living there for along long time. Who ever buys this house when it comes time to sell will be getting more than they bargained for without knowing all the fine detials that wnet into your finishing. Great job on all the researching too.
_________________
Thanks
Walter
|
|
| Back to top |
|
|
kal
Forum Administrator
Joined: 06 Mar 2006
Posts: 18114
Location: Ottawa, Canada
TV/Projector: JVC DLA-NZ7
|
| Posted: Fri Jun 22, 2012 6:59 pm Post subject: |
|
|
We have no intent on selling, but never say never I suppose.
We're definitely never going to recoup what we put into it, but it's not something we worry about too much. We're building it for us, not for possible resale value. To me that doesn't any sense. Why build for what someone else may want? The only time that (IMHO) it makes sense is when you know you're going to be moving soon.
Kal
_________________
Support our site by using our affiliate links. We thank you!
My basement/HT/bar/brewery build 2.0
|
|
| Back to top |
|
|
kal
Forum Administrator
Joined: 06 Mar 2006
Posts: 18114
Location: Ottawa, Canada
TV/Projector: JVC DLA-NZ7
|
| Posted: Sat Jun 23, 2012 8:17 pm Post subject: |
|
|
Sprayfoam has now been completed. The entire outside wall was sprayed to about 2" thick:
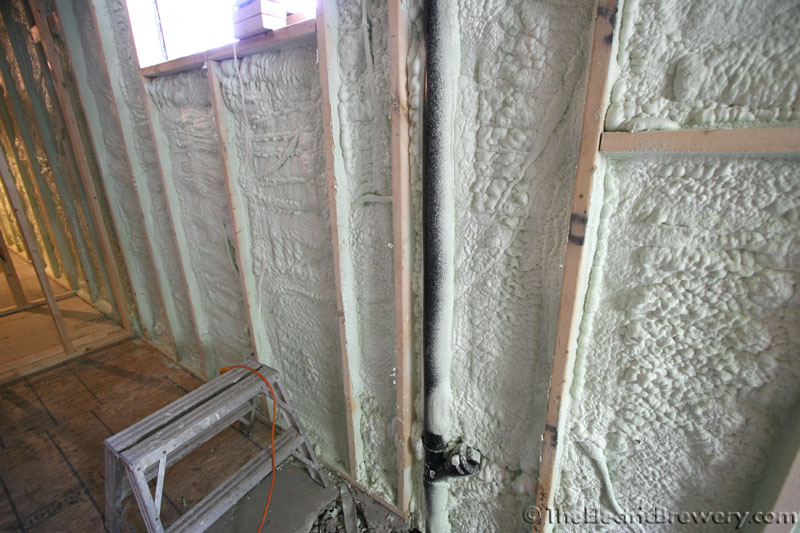
About 4" thick in the rim joists (the area above the foundation, in-between the joists):

We had some condensation in the rim joists (headers) over the winter so I'm glad to get this completely sealed up now so
that it won't happen again. This is fairly common when the rim joists are only covered with standard fiberglass insulation
and vapour barrier. The vapour barrier is never tight, allowing warm air to flow up against the cold rim joists, causing
condensation. Sprayfoam completely seals everything from air and water penetration (no vapour barrier needed).
We did the unfinished/storage area as well:

This area will be drywalled as well, but just rough (no mudding/taping/sanding). Sprayfoam needs to be covered with
something to meet fire rating. Gysum drywall is fine in most places. In unfinished areas with exposed rim joists it'll be
covered with Roxul mineral fiber insulation as it's a fire retardant.
The one thing about sprayfoam: Make sure to double check that you don't forget any wiring before spraying!
Sprayfoam generates a lot of heat as it cures so I still need to go through and test all the smaller wires (security system,
phone, cable, and some CAT5/6 I installed) to make sure it all works. While it's rare, there have been cases where the
heat melts the wiring. Any issues have to be fixed before drywall goes up.
I had also previously installed Carlon single gang low voltage brackets and pulled speaker wires to the 2 rear and 2 side channel speakers:
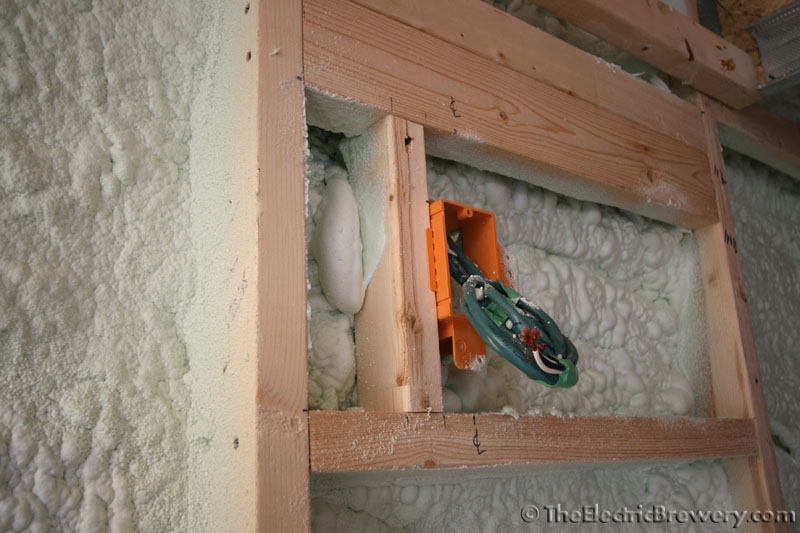
Two sets of 12 ga in-wall rated speaker wires from Home Depot were used. Two sets are pulled as the speakers I use
allow for bi-wiring. This is where the tweeter and woofer in the speaker are separated. The two runs are joined at the
amplifier end so it's not 'bi-amped' but only 'bi-wired'. It's supposed to provide for better sound quality but this is
definitely something that falls into the laws of diminishing returns department. It's reasonably cheap to do in the grand
scheme of things. If nothing else it gives you a backup wire, just in case.
The box for the linear fireplace had also been completed:

The fireplace sits on the left side. The wall above/below the box will be finished in some sort of wood. Not 100% sure
exactly what yet.
A view standing roughly where the barstools will go, looking through the window between the bar and the brewery:

You can see that the bulkhead on the back wall were the hood vent will eventually hang by threaded rod. The hood was
installed temperarily to get the height and positioning right and then put away. The hood exhaust fan has been installed
and wrapped in plastic. The make-up air and exhaust ducts have not been installed yet but the external vents have
already been installed.
To get access to install the hood to the threaded (and if ever the fan and other ductwork needs to be replaced) two
14x14" flushmount drywall access doors from Acudor.ca will be installed in the dropped bulkhead that look like this:

The door flange is a perforted as a taping bead with pre-punched holes. Drywall compound is applied over the beading at
the same time the drywall joints are finished. When the application is completed, only the door panel remains exposed.
You can then paint it to match the wall. End result is a nearly invisible door that can be opened with a flathead screwdriver.
I installed a Dynamat-like product from B-quiet.com to deaden the HVAC ducts by adding mass:

You start with about 25% coverage, randomly placed, and increase until knocking on the ducts gives a satisfying solid
sounding 'clunk' (like knocking on wood) instead of the hollow metallic 'ping' sound you normally get.
Bathroom plumbing rough-in was completed, including urinal:

For a few years now, plumbing code in many areas (including Ontario) calls for an accessible clean-out cap for urinals. It's
usually a 4" diameter silver cap somewhere near the urinal. Here's an example:

A bit odd that a clean-out is required for a urinal given that it's impossible to flush anything down it, but that's code. Lucky
for us, we have room to install one in the crawlspace under the stairs behind the urinal, so no need for a strange looking
silver cleanout plate in the middle of the wall. I'd like to say that we thought of this ahead of time, but it was purely luck.
A few more interior framing things to get done and then drywall. Drywall is expected to take 6 days from start to end.
Actual work days is about half that as time is required between mudding and sanding to allow for the compound to dry.
Then it's on to the interesting things you actually see, like finishes (tile, carpet, woodwork, etc).
Kal
_________________
Support our site by using our affiliate links. We thank you!
My basement/HT/bar/brewery build 2.0
Last edited by kal on Mon Jun 25, 2012 5:29 pm; edited 1 time in total
|
|
| Back to top |
|
|
Tinman

Joined: 09 Mar 2006
Posts: 1326
Location: Carson City Nevada
|
| Posted: Sun Jun 24, 2012 3:42 pm Post subject: |
|
|
Hi Kal,
I hope you'll be ready for some unwanted guests once this is all done.
Man, I really wish I had a house with a basement....
Marc
_________________
This space for rent.
|
|
| Back to top |
|
|
garyfritz
Joined: 08 Apr 2006
Posts: 12088
Location: Fort Collins, CO
|
| Posted: Mon Jun 25, 2012 5:15 pm Post subject: |
|
|
| kal wrote: | | Sprayfoam has now been completed. The entire outside wall was sprayed to R12 value (about 2" thick): |
Why only R12? My house has R19 in the walls, and it was built 22 years ago. (Would have been more if I could have convinced my wife to build 6" walls instead of 4", but she thought it was a waste of money. So I've been paying extra utility bills for 22 years...)
I would think these days you'd want more in the walls, especially up in the Great White North.
|
|
| Back to top |
|
|
|
|
|
|
|
You cannot post new topics in this forum
You cannot reply to topics in this forum
You cannot edit your posts in this forum
You cannot delete your posts in this forum
You cannot vote in polls in this forum
You cannot attach files in this forum
You can download files in this forum
|
Forum powered by phpBB © phpBB Group
|
|


