| Author |
Message |
jeffslife

Joined: 17 Apr 2010
Posts: 4190
Location: ohio usa
|
| Posted: Fri Sep 24, 2010 6:58 pm Post subject: IS MY THROW DISTANCE OFF ? |
|
|
Well it begins, I hung my pj at 117 5/8 inches center of green lens to the screen, per the table in the sony manual.
I had a engineer friend of mine double check the math.
I am trying to get an eight foot wide 16:9 screen.
when I change the rgb size to get the width I max out at 7 foot 3 inches
and I am seeing unused phosphor on the right side
I have to reduce the width to 6 foot 6 inches to get out of the unused phosphor area.
It is the throw right? I mean I know i'm a newby but I cant imagine anything else.
_________________
We are ALL job creators !
|
|
| Back to top |
|
 |
dvh99
Joined: 25 Dec 2009
Posts: 2158
Location: nederland
|
| Posted: Fri Sep 24, 2010 7:04 pm Post subject: |
|
|
these inches and feets are confusing use metric values  . .
|
|
| Back to top |
|
|
dvh99
Joined: 25 Dec 2009
Posts: 2158
Location: nederland
|
| Posted: Fri Sep 24, 2010 7:06 pm Post subject: |
|
|
but to answer your question, maximize raster and shift the pj so the active image fits the screen and is pointed absolutely straight to the screen.
forget the throw distance calculators.
_________________
1 answer always poses multiple questions.
marquee 9500ultra HD10L moome hdmi1.3 v3+ some mods.
|
|
| Back to top |
|
|
jeffslife
Joined: 17 Apr 2010
Posts: 4190
Location: ohio usa
|
| Posted: Fri Sep 24, 2010 7:27 pm Post subject: |
|
|
OK, the raster is maxed as best as i can tell, no blanking,
Expain absolutely straight to the screen, please.
_________________
We are ALL job creators !
|
|
| Back to top |
|
|
dvh99
Joined: 25 Dec 2009
Posts: 2158
Location: nederland
|
| Posted: Fri Sep 24, 2010 7:36 pm Post subject: |
|
|
 . .

|
|
| Back to top |
|
|
dvh99
Joined: 25 Dec 2009
Posts: 2158
Location: nederland
|
| Posted: Fri Sep 24, 2010 7:36 pm Post subject: |
|
|
.
|
|
| Back to top |
|
|
jeffslife
Joined: 17 Apr 2010
Posts: 4190
Location: ohio usa
|
| Posted: Fri Sep 24, 2010 7:39 pm Post subject: |
|
|
OK, parallel,square and centered I understand now.
That is all correct within 1/16 of an inch.
_________________
We are ALL job creators !
|
|
| Back to top |
|
|
jeffslife
Joined: 17 Apr 2010
Posts: 4190
Location: ohio usa
|
| Posted: Fri Sep 24, 2010 7:45 pm Post subject: |
|
|
1.5748 mm sorry about that.
_________________
We are ALL job creators !
|
|
| Back to top |
|
|
dvh99
Joined: 25 Dec 2009
Posts: 2158
Location: nederland
|
| Posted: Fri Sep 24, 2010 7:52 pm Post subject: |
|
|
close enough , the reason i say this is because you can get out of scheimpflug when the pj isnt physically setup right.
keep in mind that the active image starts a bit to the right from the left of the raster on the tube face because of the backporch setting.
_________________
1 answer always poses multiple questions.
marquee 9500ultra HD10L moome hdmi1.3 v3+ some mods.
|
|
| Back to top |
|
|
jeffslife
Joined: 17 Apr 2010
Posts: 4190
Location: ohio usa
|
| Posted: Fri Sep 24, 2010 8:08 pm Post subject: |
|
|
Honestly, you might as well be speaking mandarin.
I have no idea what that means but I will try to remember
for future reference.
Should i just move the screen back and change the throw?
_________________
We are ALL job creators !
|
|
| Back to top |
|
|
dvh99
Joined: 25 Dec 2009
Posts: 2158
Location: nederland
|
| Posted: Fri Sep 24, 2010 8:18 pm Post subject: |
|
|
screen size and maximized phosphor usage depicts throw not the other way around.
if you arent bothered by the visual transition from used and unused phosphor use all the phosphor you can but do not go over the edge of the tube and when you max out the rasters and when you begin adjusting pin and key in the geometry section you might just go over the tube face when you have the raster maxed out so double check by looking into the tube after adjusting geometry.
some people shift the raster a bit to the left on the tube face because of the backporch setting to get the active image centered on the tube face.
hope this makes sense.
_________________
1 answer always poses multiple questions.
marquee 9500ultra HD10L moome hdmi1.3 v3+ some mods.
|
|
| Back to top |
|
|
jeffslife
Joined: 17 Apr 2010
Posts: 4190
Location: ohio usa
|
| Posted: Fri Sep 24, 2010 8:27 pm Post subject: |
|
|
Thank you, Yes that helps, most of It makes sense to me
some things i have learned on the forum
I just hope I can apply it to get an actual functioning HT.
I am starting to wonder if I EVER will.
I am running out of time to complete it.
Thank you for your help, you have no idea how much it means to me.
_________________
We are ALL job creators !
|
|
| Back to top |
|
|
Curt Palme
CRT Tech
Joined: 08 Mar 2006
Posts: 24396
Location: Langley, BC
TV/Projector: All of them!
|
| Posted: Fri Sep 24, 2010 8:39 pm Post subject: |
|
|
Seems to be you're a bit close. This is for the G70, right?
The throw is approx 1.35 X the width of the screen for an LC set like your Sony is, which is 129.6" according to my calculations for an 8' wide screen.
If the width is at about 180-200, and the test patterns don't fill the screen, then yes, you're too close. If the test patterns fill the screen but the image doesn't, then you can adjust the H width on the 'RGB size' control on the remote (different from the 'size' control on the row of the convergence row of buttons at the bottom of the remote/keypad.
|
|
| Back to top |
|
|
jeffslife
Joined: 17 Apr 2010
Posts: 4190
Location: ohio usa
|
| Posted: Fri Sep 24, 2010 8:54 pm Post subject: |
|
|
Yes, it is the g70, I hung the old zenith in another room in the basement and hooked it up for
my nieces and nephews to game on, They love it!!!! especially NEED FOR SPEED SHIFT.
I can move the screen back away from the pj , it isnt easy but it is easier than trying to
rehang the pj. I built a system using various components to make the screen completly
adjustable in ten thousandths of an inch increments to make sur it is square and parallel
and flat with no twist, but it takes about 6 hours to get it perfect.
The image does come out smaller than the test pattern but neither one fill the screen.
Thanks for the help, I really appreciate it.
_________________
We are ALL job creators !
|
|
| Back to top |
|
|
kal
Forum Administrator
Joined: 06 Mar 2006
Posts: 18114
Location: Ottawa, Canada
TV/Projector: JVC DLA-NZ7
|
| Posted: Sat Sep 25, 2010 12:21 pm Post subject: |
|
|
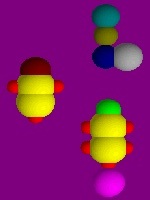
There is only one way to do correct throw distance for any CRT projector and it involves throwing out the manual and actually looking into the tubes:
To maximize tube life even further do the following steps:
- Put the projector on the cart or simply leave it on the floor so that you can move it.
- Display something that fills the screen entirely (like a grid test pattern).
- Using only the green (middle) tube, look into the tube and increase the image width on the tube face until it is around 1/8" to 1/4" from the edge of the white phosphor. Under no circumstances should you allow the image to go off of the white phosphor surface!
Move the projector back and forth until the image fits your screen.
- THAT is the correct throw distance for optimal phosphor usage.
It'll usually be 5-8% closer than what the manual tell you because the manual throw instructions are conservative since they make you install blindly without even looking in the tubes at all.
Link: http://www.curtpalme.com/TubeCondition_PoorInstall.shtm
Kal
_________________

Support our site by using our affiliate links. We thank you!
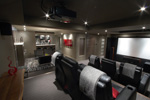
My basement/HT/bar/brewery build 2.0
|
|
| Back to top |
|
|
|
|


