| Author |
Message |
akajester

Joined: 09 Jul 2008
Posts: 934
Location: Wisconsin
|
| Posted: Thu Sep 16, 2010 7:15 pm Post subject: BG808s astig adjustment help |
|
|
I'm getting close to trying to adjust the astig on my bg808s. I can't find a good guide on how to do this. I'm still very inexperienced working inside the projector. I'm setup with a 16x9 screen and the astig pattern is oval of course. but it's not sharp at all. It looks very fuzzy. I'm hoping the astig adjustment will clear that up.
Can anyone instruct me on how to make this adjustment internally?
Thanks!
Dale
|
|
| Back to top |
|
 |
perisoft
Joined: 29 Aug 2007
Posts: 2920
Location: Ithaca, NY
|
| Posted: Thu Sep 16, 2010 7:43 pm Post subject: Re: BG808s astig adjustment help |
|
|
| akajester wrote: | I'm getting close to trying to adjust the astig on my bg808s. I can't find a good guide on how to do this. I'm still very inexperienced working inside the projector. I'm setup with a 16x9 screen and the astig pattern is oval of course. but it's not sharp at all. It looks very fuzzy. I'm hoping the astig adjustment will clear that up.
Can anyone instruct me on how to make this adjustment internally?
|
1) Put your hand in the projector
2) Find the ring things with the twirly knob things
3) Spin the ring things and twirl the knob things
4) Do 3) for two hours
5) f*cking hell it looks the same
6) Shoot yourself in the face
_________________

|
|
| Back to top |
|
|
akajester
Joined: 09 Jul 2008
Posts: 934
Location: Wisconsin
|
| Posted: Thu Sep 16, 2010 7:55 pm Post subject: |
|
|
omg, that's awesome! how about I kick myself in the balls, then sit down and watch a movie and pretend it never happened. 
|
|
| Back to top |
|
|
perisoft
Joined: 29 Aug 2007
Posts: 2920
Location: Ithaca, NY
|
| Posted: Thu Sep 16, 2010 7:59 pm Post subject: |
|
|
| akajester wrote: | | how about I kick myself in the balls, then sit down and watch a movie and pretend it never happened. |
That sounds like a pretty good idea, too. You might want to do two kicks, though - one per nut. 
_________________
|
|
| Back to top |
|
|
wingnut2001
Joined: 25 Aug 2010
Posts: 37
Location: Horse City of the world!
|
| Posted: Thu Sep 16, 2010 8:05 pm Post subject: |
|
|
astig makes or breaks your image 
|
|
| Back to top |
|
|
akajester
Joined: 09 Jul 2008
Posts: 934
Location: Wisconsin
|
| Posted: Thu Sep 16, 2010 8:10 pm Post subject: |
|
|
| wingnut2001 wrote: | | astig makes or breaks your image |
Yeah, that's why I want to learn it. Maybe it's a big industry secret.
|
|
| Back to top |
|
|
Ile
Joined: 09 Mar 2006
Posts: 1491
Location: Jyväskylä, Finland
|
| Posted: Thu Sep 16, 2010 8:18 pm Post subject: |
|
|
First use external test pattern. I guess it's oval because you use internal 4:3 pattern squeezed to 16:9.
Focus yokes position have more to do with sharpness than astig.
Use Barcos procedure it covers pretty much all important steps for tube mechanical settings in two last pages.
http://www.curtpalme.com/docs/BarcoGraphics808s_CRTReplacementProcedure.pdf
I also set dynamic astig to mid position from service menu before adjustment.
|
|
| Back to top |
|
|
akajester
Joined: 09 Jul 2008
Posts: 934
Location: Wisconsin
|
| Posted: Thu Sep 16, 2010 8:35 pm Post subject: |
|
|
Thanks Ile, I'll read up.
Do I have to worry about death moving those poles while the unit is running?
Dale
|
|
| Back to top |
|
|
km987654

Joined: 25 Jul 2007
Posts: 2874
Location: Australia
TV/Projector: Barco BG809s
|
| Posted: Thu Sep 16, 2010 10:19 pm Post subject: |
|
|
| akajester wrote: | Thanks Ile, I'll read up.
Do I have to worry about death moving those poles while the unit is running?
Dale |
Watch out for the HV leads (big Red ones 35kv) and don't touch the back of the neckboards (200v+) if you are carefull its not a problem better than a kick in the nuts 
|
|
| Back to top |
|
|
tse
Joined: 03 May 2006
Posts: 1014
Location: Sweatbucket, Fl.
|
| Posted: Thu Sep 16, 2010 11:43 pm Post subject: |
|
|
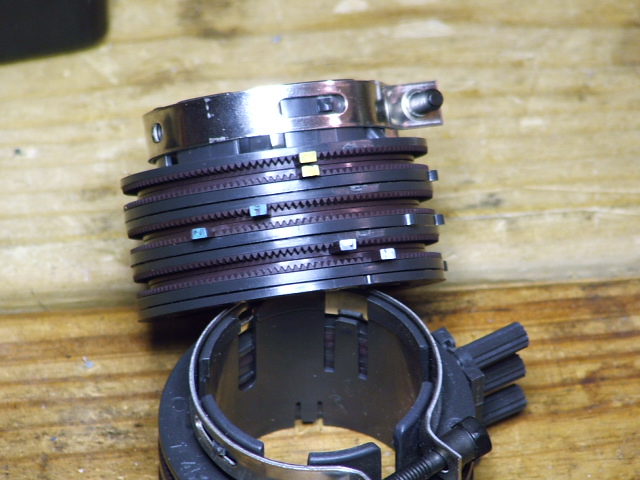
Do yourself a favor and "null" the 2 and 4 pole magnets by overlapping the little tabs (like the yellow ones) before you start. It helps.
Scott
| Description: |
|
| Filesize: |
115.47 KB |
| Viewed: |
4282 Time(s) |
|
_________________
"Were we directed from Washington when to sow and when to reap, we would soon want bread."
Thomas Jefferson
|
|
| Back to top |
|
|
secstate
Joined: 20 Mar 2006
Posts: 720
|
| Posted: Fri Sep 17, 2010 12:35 am Post subject: |
|
|
| tse wrote: | Do yourself a favor and "null" the 2 and 4 pole magnets by overlapping the little tabs (like the yellow ones) before you start. It helps.
Scott |
Great tip! I didn't do this when I first tried to do my tubes. I picked up the same tip from the old Holy Focus thread on AVS. Starting at null really helps to see what differences you are making.
|
|
| Back to top |
|
|
akajester
Joined: 09 Jul 2008
Posts: 934
Location: Wisconsin
|
| Posted: Fri Sep 17, 2010 11:57 am Post subject: |
|
|
Thanks for the info. So if I get this right Tse... If I line up those posts on the magnets that will null the magnets thereby making no adjustment to the astig. Like a reset to zero? Then I can slowly turn them away from each other to see what effect I'm making?
Thanks! More pieces to the puzzle.
Dale
|
|
| Back to top |
|
|
lexx21
Joined: 10 Oct 2008
Posts: 119
|
| Posted: Fri Sep 17, 2010 2:34 pm Post subject: |
|
|
| perisoft wrote: | | akajester wrote: | | how about I kick myself in the balls, then sit down and watch a movie and pretend it never happened. |
That sounds like a pretty good idea, too. You might want to do two kicks, though - one per nut. |
I laughed so hard this morning when I read this.... ROFLMAO!!!!!!
|
|
| Back to top |
|
|
CasetheCorvetteman

Joined: 09 Nov 2008
Posts: 6326
Location: Australia
|
| Posted: Sun Sep 19, 2010 6:07 am Post subject: |
|
|
I did this job on a Sony 1001 QM a couple months ago and didnt see what all the fuss was about, it was so easy, i did all three tubes spot on in about 30 minutes, and so much sharper when i was done....
Then came the NEC, more than 5 hours spent on just the red and the green, the blue was alot better and i considered it close enough. Ofcourse it now looks WAY better, but at the time i wasnt really enjoying myself!!
I hope for your sake the bloody Barco is more like 30 minutes worth or work and not 5 hours plus!!!
|
|
| Back to top |
|
|
|
|


