| Author |
Message |
DGP
Joined: 05 Nov 2008
Posts: 57
Location: Barcelona
|
| Posted: Sun Apr 04, 2010 12:36 pm Post subject: Marquee 9500 convergence |
|
|
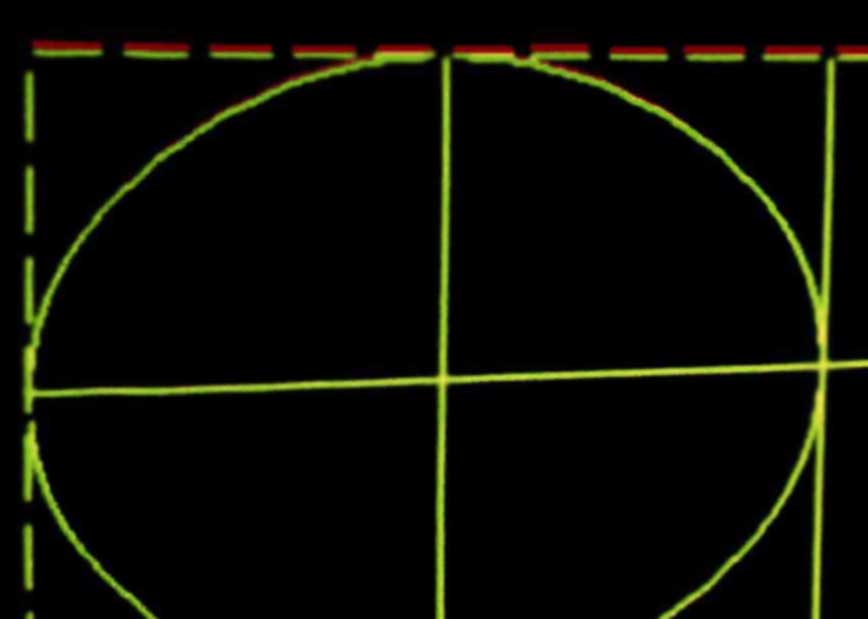
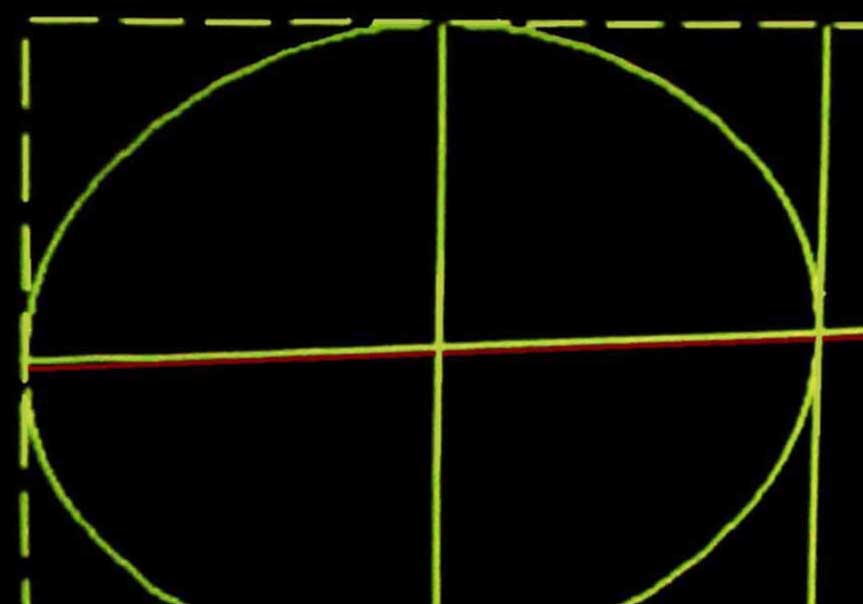
I cant get this right. When I bought the projector, it already came with this problem. I tried everything I know to solve it without success ( Projector initialisation reset, magnetic alignment).
Using a 1080 crosshatch is easy to see that the last horizontal line of the red channel is always misaligned. If I correct this using the convergence adjustments, than the previous horizontal red line will be misalign.
The pictures are not great quality pictures, but show what I see on screen.
What can cause this?
Thanks,
Diego
| Description: |
|
| Filesize: |
38.12 KB |
| Viewed: |
5185 Time(s) |
|
| Description: |
|
| Filesize: |
39.27 KB |
| Viewed: |
5185 Time(s) |
|
|
|
| Back to top |
|
 |
Nashou66

Joined: 12 Jan 2007
Posts: 16171
Location: West Seneca NY
|
|
| Back to top |
|
|
draganm
Joined: 08 Mar 2006
Posts: 8990
Location: Colorado
|
| Posted: Sun Apr 04, 2010 3:09 pm Post subject: |
|
|
All convergence should be zeroed out ( 0 + exit & save), then the Raster heights matched in the Utility's menu to get all 3 grids the same size vertically. Also should be done horizontally with a special tool. Without this Convergence will be crap.
The reason I think it's off on so many machines is that a tube or tubes were replaced at some point and raster sizes were never corrected afterwords.
|
|
| Back to top |
|
|
Nashou66
Joined: 12 Jan 2007
Posts: 16171
Location: West Seneca NY
|
|
| Back to top |
|
|
draganm
Joined: 08 Mar 2006
Posts: 8990
Location: Colorado
|
| Posted: Sun Apr 04, 2010 6:11 pm Post subject: |
|
|
| Nashou66 wrote: | I agree Dragan, Also when tubes are replaced they might not seat the deflection coil up against the tube bell as far as it will go. That could also play a part.
Nashou |
yes certainly, whether or not the old hot-glue is removed, how much glue is around the boot (8 inch tube), etc. all plays a part. I also suspect every tube and coil combo will yield a slightly different size raster as well.
|
|
| Back to top |
|
|
DGP
Joined: 05 Nov 2008
Posts: 57
Location: Barcelona
|
| Posted: Sun Apr 04, 2010 6:22 pm Post subject: |
|
|
Thanks for the replies. I checked the vertical sizes in the service menu, but I never reset all convergences before adjusting the vertical sizes, as Dragan recommended. I will do that and see what happens.
I also consider that the deflection yoke was not at the right position, but at least with this projector, this is not the case.
Diego
|
|
| Back to top |
|
|
mp20748
Joined: 12 Sep 2006
Posts: 5689
Location: Maryland
TV/Projector: 9500LC Ultra / Super 02 and 03 VIM
|
| Posted: Sun Apr 04, 2010 8:56 pm Post subject: |
|
|
Go into your service menu (0901) and press: 3
That will put you in the R/G vertical size menu to adjust the separate size of either Red or Blue to match, or get closer to green.
Sometimes you have to actually move the R/G size in the service menu to correct that convergence problem. Extend it first in one direction - try it - then go in the other direction.
|
|
| Back to top |
|
|
DGP
Joined: 05 Nov 2008
Posts: 57
Location: Barcelona
|
| Posted: Thu Apr 15, 2010 10:25 am Post subject: |
|
|
Finally I solved the problem.
I did a full setup (mechanical and electronics) and the problem is gone.
I think that the issue was related to the convergence, I mean I used too much convergence compensations. I followed the recommendations of Dragan and Mike but I was not able to completely solve the problem. I noticed that displaying a crosshatch I had the center of the crosshatch really not centered on the tubes faces with the all convergence null.
The projector has a set of Sony 1292 frankenyokes installed but I changed the original Sony magnetics by a set of Barco magnetics just because the magnetic strength of the Sony magnetic rings was not enough for the Marquee. When I had the magnetics rings separated and all the coils in my hands I decided to put them in the right order, I mean exactly the same order than the Thomson focus yokes (static closer to the neck / dynamic). Then I reassembled the magnetic rings but following the magnetic polarity of the Thomson yokes. So now I have a set of focus yokes with all the benefits of the Sony 1292 coils and the extra strength in the magnetic field of the Barco coil. The result is that the static and dynamic focus are really close (39/50) and the under focus is not an issue anymore.
It is well known that by using frankenyokes you loose the possibility to adjust the raster position. To solve this I did exactly the same that another forum member already explain here. https://www.curtpalme.com/forum_archived/viewtopic.php@t=2498.html
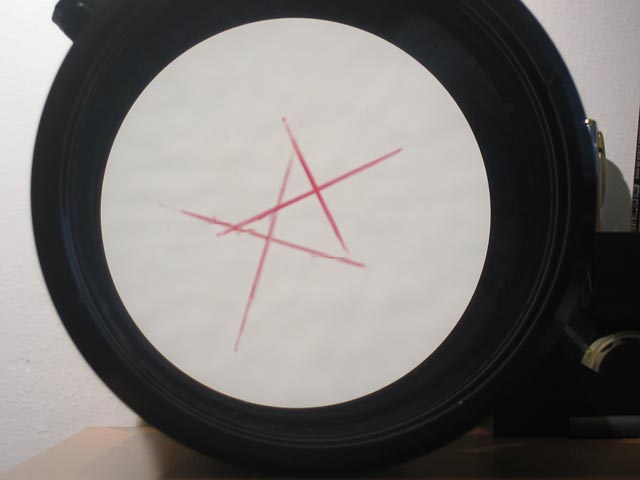
This is a great solution for raster centering. So I re-initialized the projector and started with the geometry, mechanical setup, then astig and focus. Once a had a perfect 16:9 1080p crosshatch on screen, using the 2 pole CPC installed between the convergence and focus yokes, I centered the raster on the tube face. To find the center on the tube faces I used an old lens that I did two marks on it using a soft pen. Booth marks should be perfectly centered. Once installed in the projector, I simply look thru the lens until I see the booth marks align and then move/rotate the special raster centering CPC to align the crosshatch with the booth marks. Really easy job  . .
Please take a look to the attached picture.
Once I had the crosshatch centered in all tubes I readjusted the angle of the Red and Blue tubes to mach the green on screen. Then Red and Blue size, some minor optical adjustments, convergence and that's it.
Mods and upgrades I have in my 9500:
HD Dragan Mods
Frankenyokes (Sony 1292 coils but using Barco KF-3203 magnetics)
2 Pole CPC magnets between the convergence coils and the Focus yoke
MP Mikrons (waiting the Super VIM 02 version)
HFQ900 lenses
Red C-Element
Convergence Ground Strap
Thanks for your help.
Diego
| Description: |
|
| Filesize: |
40.01 KB |
| Viewed: |
4961 Time(s) |
|
|
|
| Back to top |
|
|
Sparky015
Joined: 12 May 2009
Posts: 1185
Location: Cleveland / Akron, OH
|
| Posted: Thu Apr 15, 2010 11:28 am Post subject: |
|
|
wow, you have HFQ900 lenses. I'm jealous! 
_________________
~Paul
|
|
| Back to top |
|
|
1031
Joined: 22 Mar 2006
Posts: 657
Location: Finland
|
|
| Back to top |
|
|
Nashou66
Joined: 12 Jan 2007
Posts: 16171
Location: West Seneca NY
|
|
| Back to top |
|
|
draganm
Joined: 08 Mar 2006
Posts: 8990
Location: Colorado
|
| Posted: Thu Apr 15, 2010 3:59 pm Post subject: |
|
|
|
those test patterns are impressive,getting a CRt to focus that tightly is more of an art-form than a skill
|
|
| Back to top |
|
|
Nashou66
Joined: 12 Jan 2007
Posts: 16171
Location: West Seneca NY
|
|
| Back to top |
|
|
DGP
Joined: 05 Nov 2008
Posts: 57
Location: Barcelona
|
| Posted: Thu Apr 15, 2010 8:38 pm Post subject: |
|
|
| draganm wrote: | | those test patterns are impressive,getting a CRt to focus that tightly is more of an art-form than a skill |
Hi Dragan, this is the center of the screen only, anyway the corners are not at same level but ok too. It took me some days to achieve this level of sharpness. I used and HD camera with a 12 times zoom fully in and a 1920x1080 40" LCD to calibrate the focus and the 6 +2 pole CPC magnets. I have the LCD close to me so no matter how far is the screen, I can work sitting just behind the project and see what I'm doing on the LCD  . This is the best way I found to clearly see what I'm doing. . This is the best way I found to clearly see what I'm doing.
What I think I always did wrong is that I always did the raster centering before adjusting the geometry, specially the C and S linearity. As soon as you touch the C and S linearity, the center of the raster will move. So I decided to change the order of the procedure and it works for me. Once the projector position is ok, I only worked to get a perfect 16:9 crosshatch at 1080 60p on screen and then the astig and focus and just before doing convergence I did the raster centering with the 2 pole CPC nothing else.
Diego
|
|
| Back to top |
|
|
|
|


