| Author |
Message |
Kiev Savoie

Joined: 25 Oct 2007
Posts: 432
|
| Posted: Thu Nov 12, 2009 3:11 am Post subject: First time swapping a tube out. |
|
|
|
After some procrastanation and much wringing of my hands, I'm finally preparing to swap the green tube on my G70 this weekend. If anyone could throw me a link or some helpful tips I would appreciate it. So far, I don't have much of a plan besides being careful and taking notes as I go. I'm a little concerned about putting the magnetics on correctly. Any advice would be great.
|
|
| Back to top |
|
 |
dturco

Joined: 06 Feb 2009
Posts: 3778
Location: Eastern Shore Maryland
TV/Projector: Runco DLP VX-3000i Marquee 9500 parts doner
|
|
| Back to top |
|
|
Kiev Savoie
Joined: 25 Oct 2007
Posts: 432
|
| Posted: Thu Nov 12, 2009 3:38 am Post subject: |
|
|
|
Thanks Dturco. I should have figured Curt would put something in advanced procedures. Wheww, Ok deep breaths...
|
|
| Back to top |
|
|
dturco
Joined: 06 Feb 2009
Posts: 3778
Location: Eastern Shore Maryland
TV/Projector: Runco DLP VX-3000i Marquee 9500 parts doner
|
| Posted: Thu Nov 12, 2009 4:15 am Post subject: |
|
|
From gleaning over the procedure it looks fairly simple.  Well at least there isn't potting material like on a Marquee. So have at it. I found the bellows on the Marquee easy, swapping neckboards no problem, swap a VIM gotcha, solder a resistor.... Wait a minute thats not me. See anyone but me for that. Well at least there isn't potting material like on a Marquee. So have at it. I found the bellows on the Marquee easy, swapping neckboards no problem, swap a VIM gotcha, solder a resistor.... Wait a minute thats not me. See anyone but me for that. 
Seriously it does look straight forward, just go slow and keep looking at the pictures, thats how I did the bellows on my Marquee..
_________________
Firefly rules. Can't stop the signal.
http://www.hulu.com/firefly
|
|
| Back to top |
|
|
Mark_A_W
Joined: 15 Mar 2006
Posts: 3068
Location: Sunny Melbourne Australia
|
| Posted: Thu Nov 12, 2009 5:21 am Post subject: |
|
|
It's so easy it's laughable.
Two things to make it easier:
1. There is a little clip pin thing under the tube at the front...took us a while to find that.
2. DON'T BEND A PIN. Just be careful, that's all.
What tube are you replacing it with? A bare 08?
|
|
| Back to top |
|
|
Kiev Savoie
Joined: 25 Oct 2007
Posts: 432
|
| Posted: Fri Nov 13, 2009 4:39 am Post subject: |
|
|
|
I feel a lot more confident with Curt's tutorial being available. Thanks for the encouragement guys. I'll post some before and after pics after it's all said and done.
|
|
| Back to top |
|
|
Mark_A_W
Joined: 15 Mar 2006
Posts: 3068
Location: Sunny Melbourne Australia
|
| Posted: Fri Nov 13, 2009 5:06 am Post subject: |
|
|
|
There are little white caps to protect the tube pins - have you got some (one) of them?
|
|
| Back to top |
|
|
Kiev Savoie
Joined: 25 Oct 2007
Posts: 432
|
| Posted: Sat Nov 14, 2009 7:48 pm Post subject: |
|
|
|
I may have some with the new tube. i'll find out shortly...
|
|
| Back to top |
|
|
Kiev Savoie
Joined: 25 Oct 2007
Posts: 432
|
| Posted: Sun Nov 15, 2009 3:18 pm Post subject: |
|
|
Ok, I got the tube out, it wasn't too bad. pulling the HV lead was a little akward but it came with a little time and patience. Today I'm putting on the magnetics.
Curt mentions something at the end that has me a bit confused:
32. Open your G70 service manual in section 3 (adjustments) and redo section 1.3.1 to 1.3.11 adjustments for the relevant (new) tube(s). This will takes around four hours to do all these necessary adjustments.
I looked at the manuals section but didn't find any service manuals. Anyone know what this is all about?
|
|
| Back to top |
|
|
Kiev Savoie
Joined: 25 Oct 2007
Posts: 432
|
| Posted: Sun Nov 15, 2009 7:36 pm Post subject: |
|
|
|
OK, it works! The image on the raster is pretty crooked, so I guess that is what the procedure in section 3 of the service manual is. All I see in the manuals section for the G70 is an Owner's manual and an Install manual, no service manual, but i think I can adjust the coils reasonably as long as i'm willing to be patient and shut the unit down before each individual adjustment. Any tips?
|
|
| Back to top |
|
|
Tim in Phoenix

Joined: 21 Oct 2006
Posts: 4409
Location: Phoenix
|
| Posted: Sun Nov 15, 2009 7:48 pm Post subject: |
|
|
| Kiev Savoie wrote: | | OK, it works! The image on the raster is pretty crooked, so I guess that is what the procedure in section 3 of the service manual is. All I see in the manuals section for the G70 is an Owner's manual and an Install manual, no service manual, but i think I can adjust the coils reasonably as long as i'm willing to be patient and shut the unit down before each individual adjustment. Any tips? |
Hello
Magnetics alignment requires that the projector is running fully on. Do not grab any tube glass it is charged to 34000 volts. Do not grab any wires or exposed copper windings, some run at 1200 volts.
.
|
|
| Back to top |
|
|
Kiev Savoie
Joined: 25 Oct 2007
Posts: 432
|
| Posted: Sun Nov 15, 2009 7:53 pm Post subject: |
|
|
|
Thanks Tim, yeah, I've been looking at a few posts and some of curt's other tutorials. I'm going to do more research. I think I need a better understanding of how the magnetics work before I fool with them
|
|
| Back to top |
|
|
Mark_A_W
Joined: 15 Mar 2006
Posts: 3068
Location: Sunny Melbourne Australia
|
| Posted: Sun Nov 15, 2009 8:52 pm Post subject: |
|
|
| Tim in Phoenix wrote: | | Kiev Savoie wrote: | | OK, it works! The image on the raster is pretty crooked, so I guess that is what the procedure in section 3 of the service manual is. All I see in the manuals section for the G70 is an Owner's manual and an Install manual, no service manual, but i think I can adjust the coils reasonably as long as i'm willing to be patient and shut the unit down before each individual adjustment. Any tips? |
Hello
Magnetics alignment requires that the projector is running fully on. Do not grab any tube glass it is charged to 34000 volts. Do not grab any wires or exposed copper windings, some run at 1200 volts.
. |
The inside of the tube is at 32,000v (or thereabouts, not sure about a Sony), the outside of the tube is grounded. But I still wouldn't touch it.
The G70 coils are reasonably well protected, only the deflection coil is exposed I think. Which is the one you want to turn..
Have the coil pre-loosened, turn it with the plastic housing till the raster is level, then tighten the clamp.
|
|
| Back to top |
|
|
Kiev Savoie
Joined: 25 Oct 2007
Posts: 432
|
| Posted: Sun Nov 15, 2009 9:53 pm Post subject: |
|
|
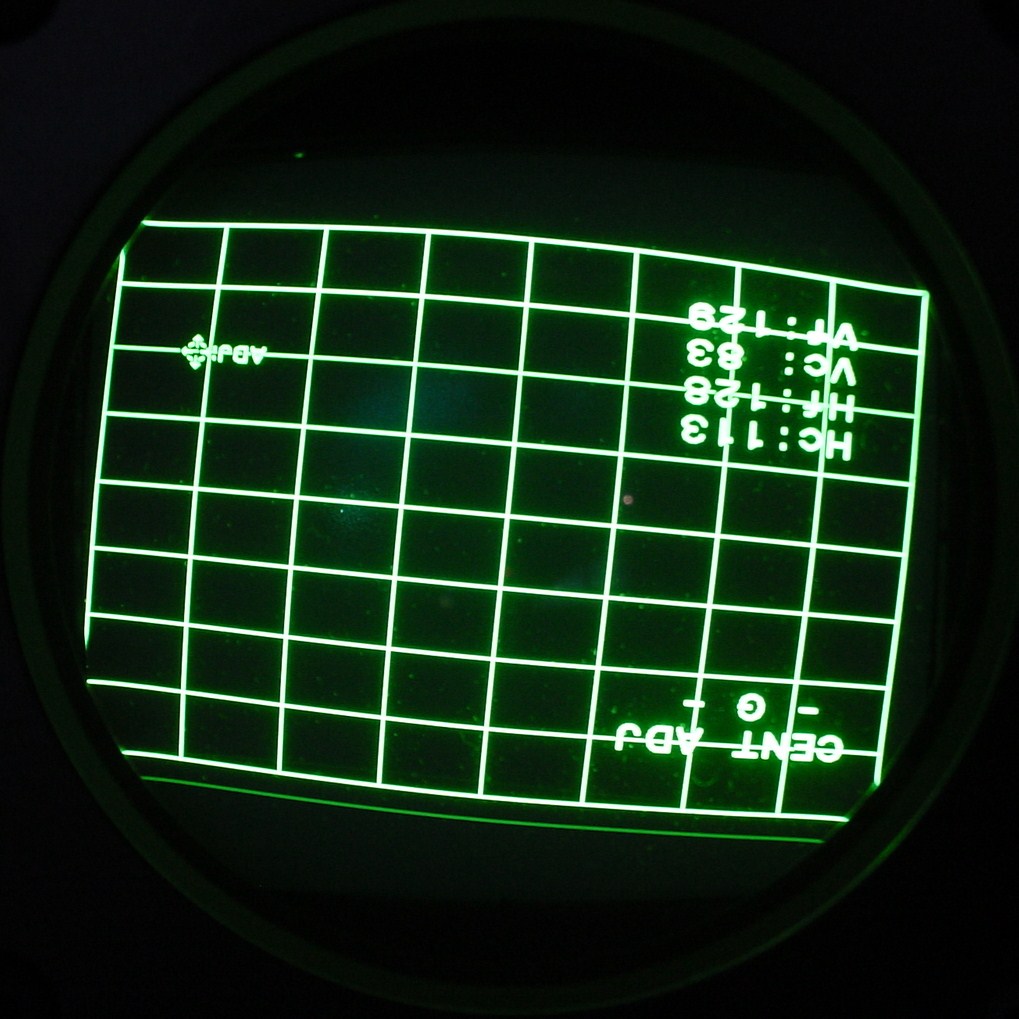
Thanks Mark, That was the notion I was trying to confirm from what i've read so far. I just found a link for the service manual so i'll read through it before I start the adjustment. I think this should be all I need to do. When I pull up the grid pattern it looks like an exact match to the old tube, including focus and astig (except for the tilt).  Here is a Pic: Here is a Pic:
| Description: |
|
| Filesize: |
183.74 KB |
| Viewed: |
17798 Time(s) |
|
|
|
| Back to top |
|
|
perisoft
Joined: 29 Aug 2007
Posts: 2920
Location: Ithaca, NY
|
| Posted: Sun Nov 15, 2009 10:11 pm Post subject: |
|
|
Swapping a tube can be tricky the first time around. That's why I suggest to people that they wait until the second or third time to try it.
_________________

|
|
| Back to top |
|
|
AnalogRocks
Forum Moderator
Joined: 08 Mar 2006
Posts: 26706
Location: Toronto, Ontario, Canada
TV/Projector: Sony 1252Q, AMPRO 4000G
|
| Posted: Sun Nov 15, 2009 10:31 pm Post subject: |
|
|
| perisoft wrote: | | Swapping a tube can be tricky the first time around. That's why I suggest to people that they wait until the second or third time to try it. |
LOL
_________________
Tech support for nothing
CRT.
HD done right!
|
|
| Back to top |
|
|
Mark_A_W
Joined: 15 Mar 2006
Posts: 3068
Location: Sunny Melbourne Australia
|
| Posted: Sun Nov 15, 2009 10:34 pm Post subject: |
|
|
|
Yeah, well, my first tube swap was on a beaten up POS Xtra called Clunker. Just took a tube out, then put it back again.
|
|
| Back to top |
|
|
ecrabb
Forum Moderator

Joined: 13 Mar 2006
Posts: 15909
Location: Utah
TV/Projector: JVC RS40, Epson 5010
|
| Posted: Sun Nov 15, 2009 10:50 pm Post subject: |
|
|
I "popped my tube swap cherry" completely re-tubing a 1252. I wasn't too nervous, I suppose becase it wasn't my main projector, and the machine nor tubes were worth that much money... Probably would have been more nervous if I would have been working on my main machine.
But, now that I've done it a few times, though - I wouldn't even be nervous about tearing into my G70.
SC
|
|
| Back to top |
|
|
Kiev Savoie
Joined: 25 Oct 2007
Posts: 432
|
| Posted: Mon Nov 16, 2009 2:47 pm Post subject: |
|
|
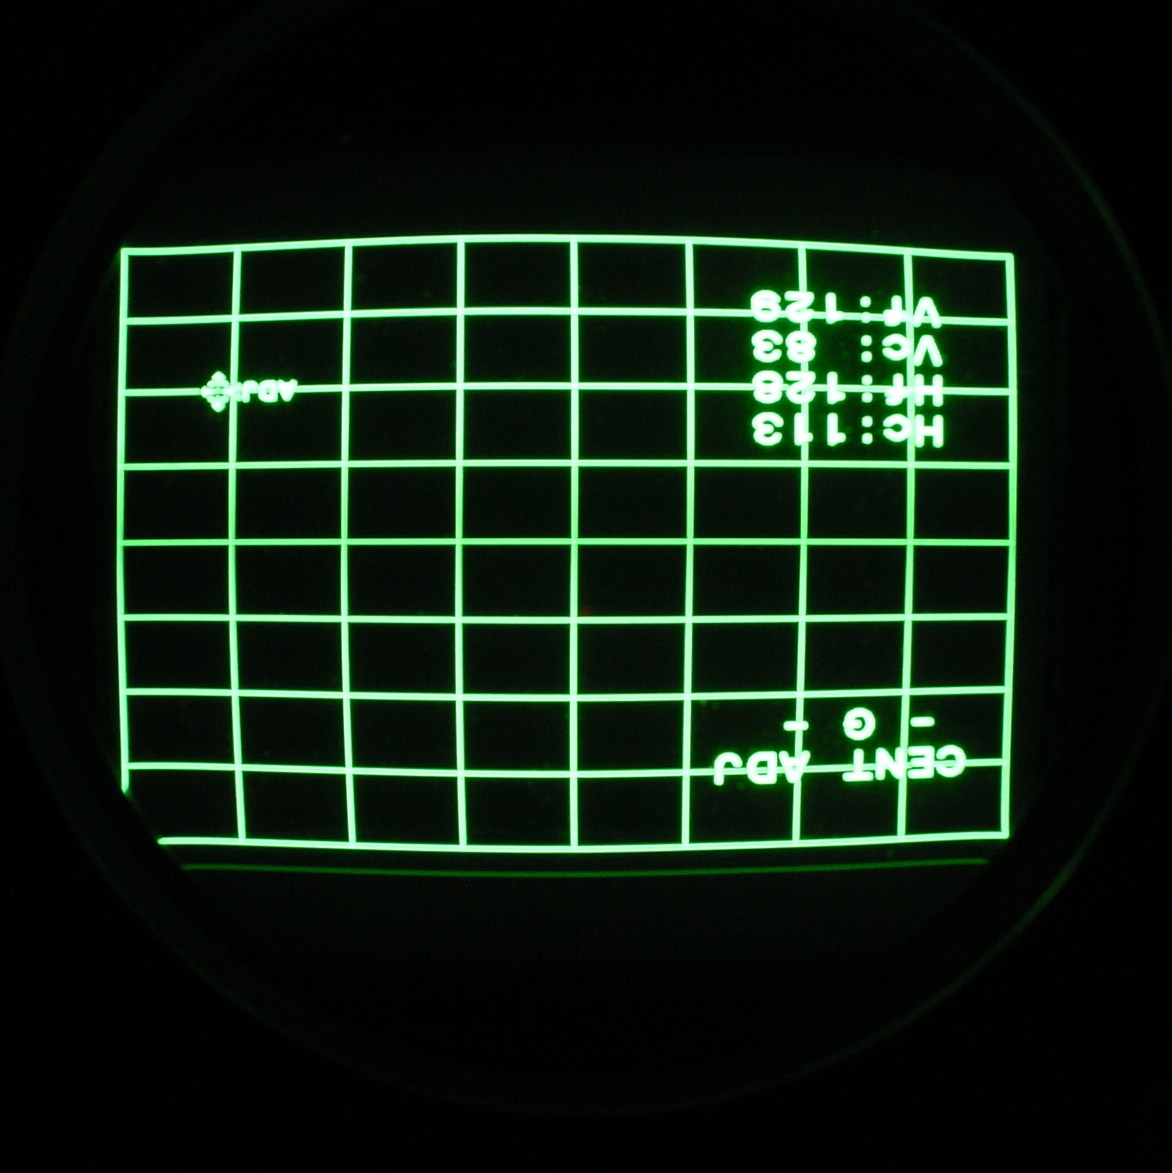
Alas, I spent my whole afternoon yesterday just to make sure turning the deflection coil was the correct thing to do, but it all worked out. The Raster was almost identical to the old one after adjustment. My girlfriend had the pressure on to watch The Simpsons so I did not go through all the procedures outlined in the service manual yet. I just recentered the image and adjusted a few geometry settings and 10 minutes later i had a watchable image... with no tube wear. Here is a pic of the newly leveled raster:
I'll post a few before and after screen shots this afternoon. You may laugh when you see how slight the wear was. I went through a lot of trouble for this, but I guess my projector is as close to perfect as i could ask...
| Description: |
|
| Filesize: |
189.4 KB |
| Viewed: |
15303 Time(s) |
|
|
|
| Back to top |
|
|
Kiev Savoie
Joined: 25 Oct 2007
Posts: 432
|
| Posted: Tue Nov 17, 2009 2:13 am Post subject: |
|
|
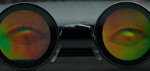
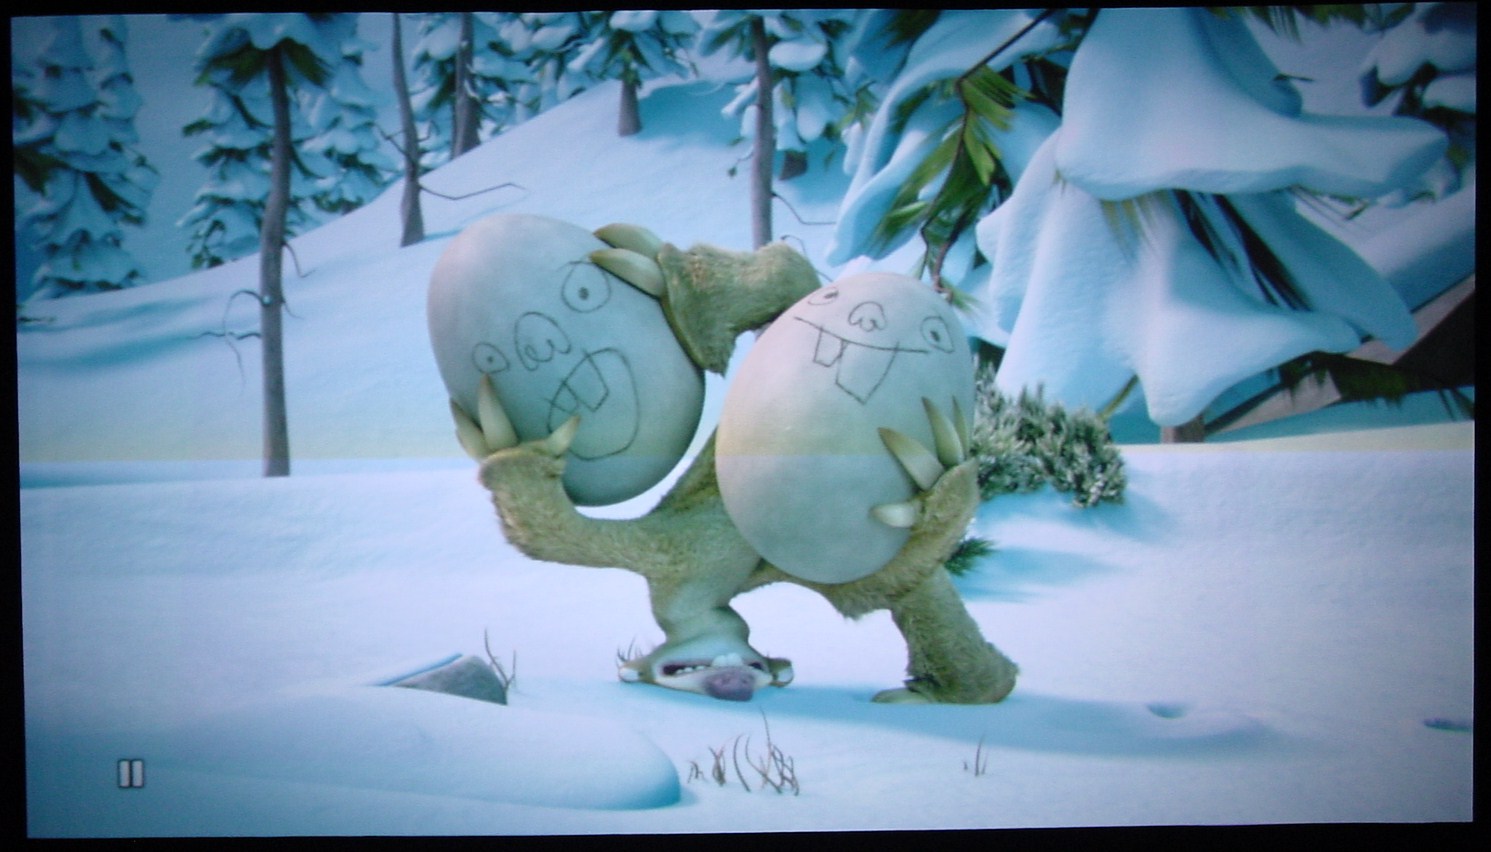
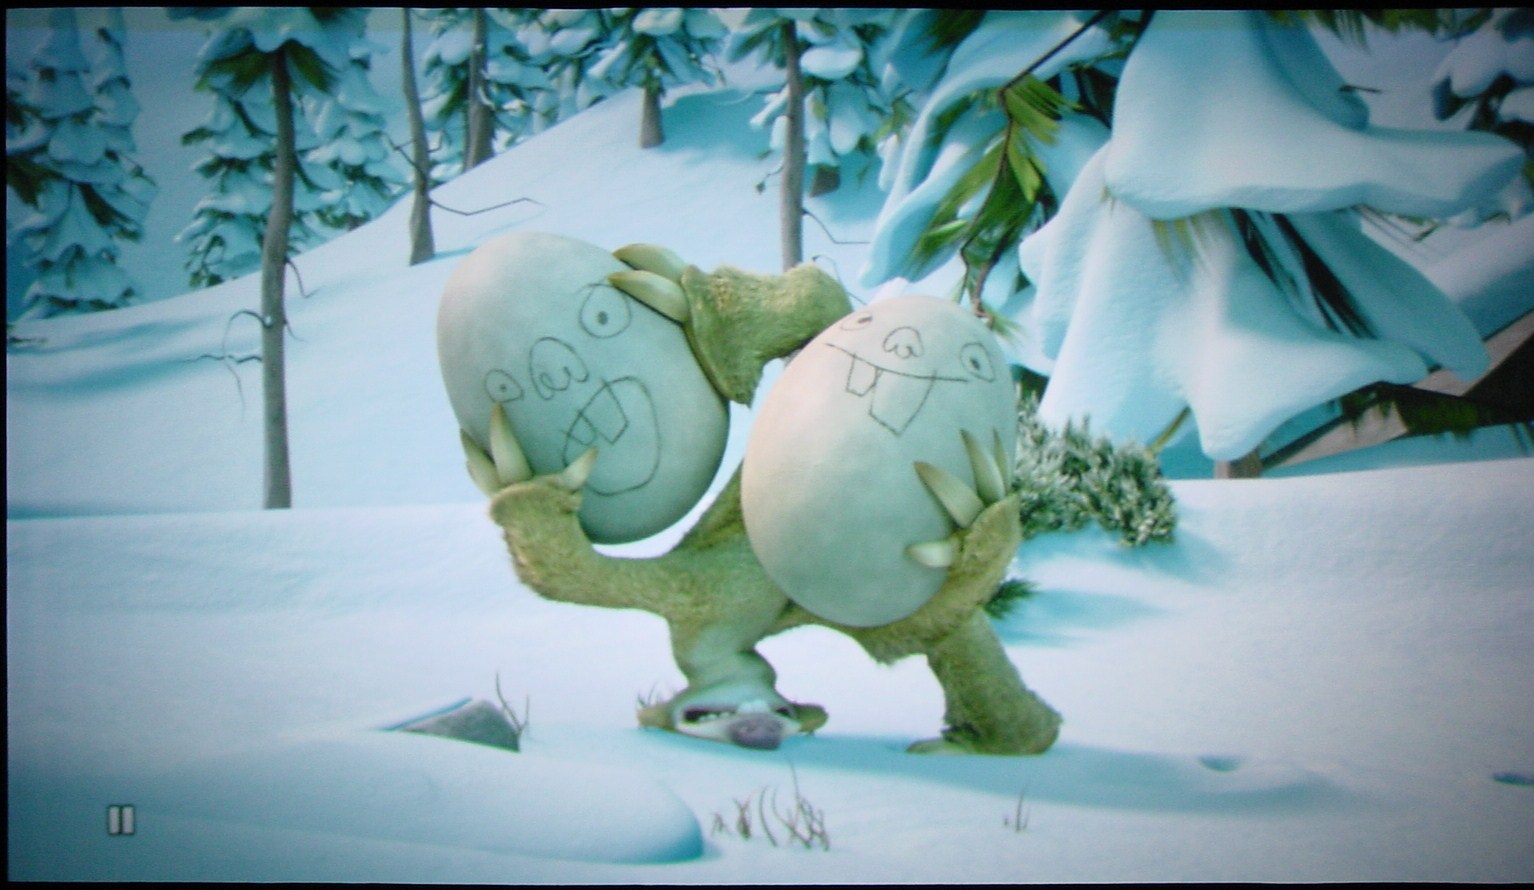
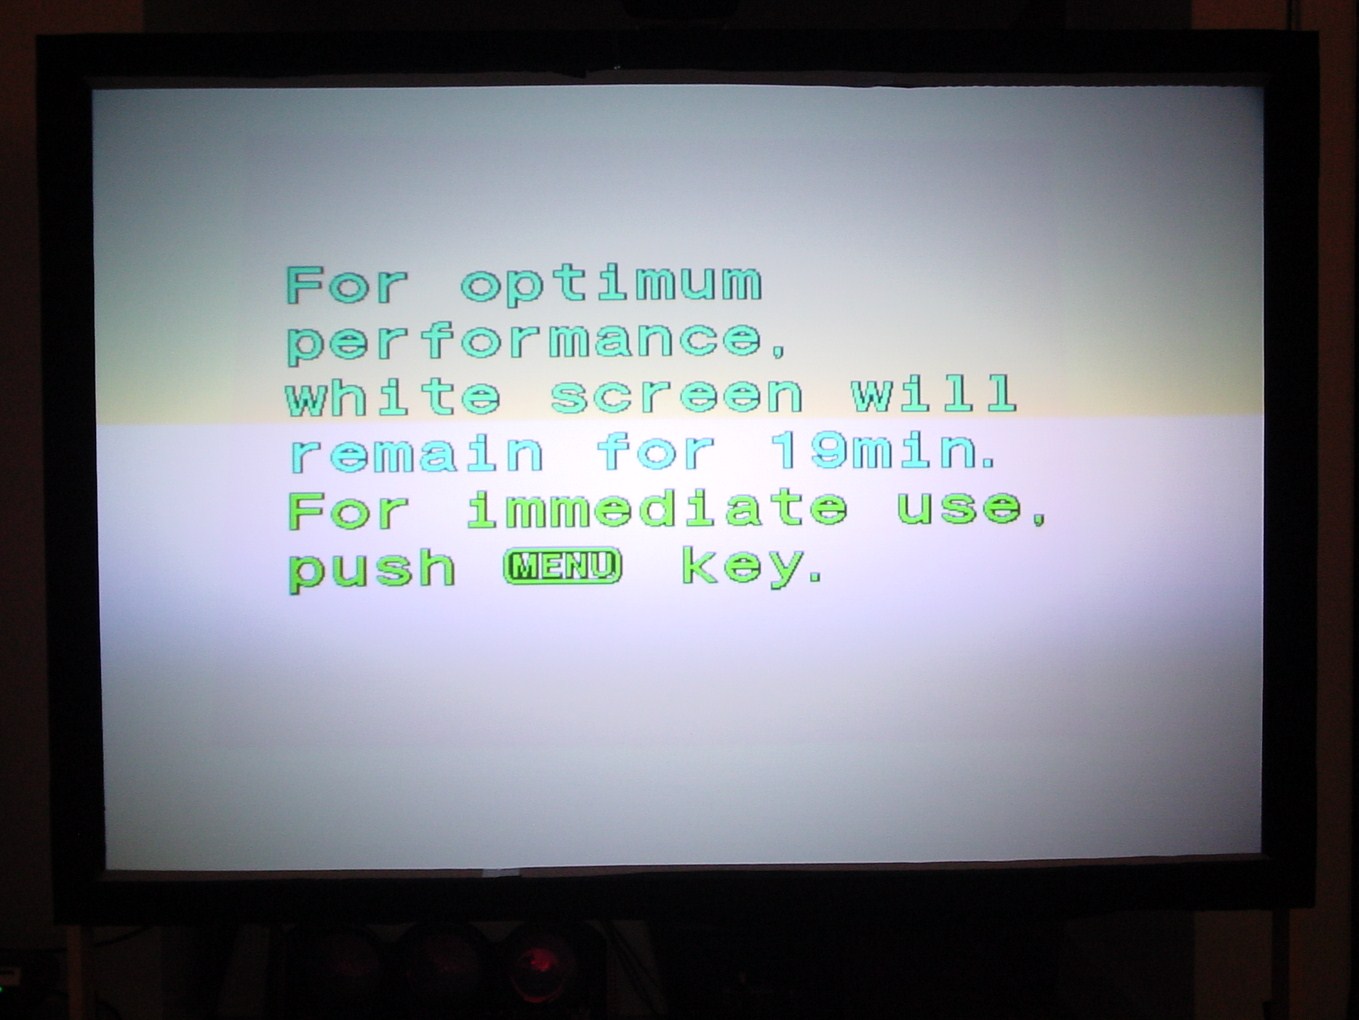
Here are the before and after photos. I'm still figuring out screen photography, so there is a heavy darkening on the top half of some of the pics which is solely camera artifact, not part of the original image.
Pictures are as follows:
1- original tube. can you see the wear? if not check #3 for a clue.
2- new tube. picture isn't dialed in yet, but no wear.
3- full white startup screen with old tube. tilt your screen back and the wear pattern in the shape of a pink keystone is fairly evident.
The camera doesn't show the wear as good as my eyes see it in person, but it's not too far off.
The things i do in the name of a hobby.
| Description: |
|
| Filesize: |
210.18 KB |
| Viewed: |
15315 Time(s) |
|
| Description: |
|
| Filesize: |
225.96 KB |
| Viewed: |
15313 Time(s) |
|
| Description: |
|
| Filesize: |
177.45 KB |
| Viewed: |
15312 Time(s) |
|
|
|
| Back to top |
|
|
|
|


