|
As this forum is rarely used anymore, we've locked it. Feel free to browse and read. Questions? Please reach out to us directly. Cheers! |

|
 |
|
|
| Author |
Message |
MYoung
Joined: 24 Feb 2007
Posts: 369
Location: Madison, WI
|
| Posted: Thu Mar 12, 2009 10:41 pm Post subject: Wear leveling a picture tube using GIMP |
|
|
The Runco IDP-980 that I recently, as you well can imagine, suffered from moronic raster setupitus for the first 4000 hours of its life. The green tube suffers the most. The blue and red tubes are actually in decent shape. I was thinking of wear-leveling the tube phosphors, especially the green tube, and I think the best way to do this will be using a PC and GIMP (GNU Image Manipulation Program).
I'm planning on connecting a PC to the projector, setting the PC to a resolution that will fill the raster well, in the IDP-980's case, perhaps 1024x768. Then I'm going to load GIMP, put it in full screen mode and turn off all menus, toolbars, sliders, etc, create a blank image filling the whole screen with white, draw a box using the "Paths" tool around the end of the level phosphor wear and another box around the beginning of the wear (drawn on a different layer as it will serve as a reference box when blurring the inner box), fill the inner box with black, invert the picture, and blur the inner black box enough so that the blur ends along the box I drew in the other layer. I might have to play around with the size of the inner box to get the inverse wear pattern correct, but I think GIMP can prove to be a great tool for doing wear leveling. My green tube has about 4000 hours on it and while it's watchable with the virgin phosphor area, it would a whole lot better with wear leveling.
It would be even better if I could take a picture of the whole lit raster, invert the image, adjust the contrast and brightness to achieve the inverse wear pattern, and display that. Though getting it to line up properly when fed back to the projector would be a nightmare with all the imperfect geometry of a CRT front projection. Anyone successfully tried wear leveling?
|
|
| Back to top |
|
 |
AnalogRocks
Forum Moderator
Joined: 08 Mar 2006
Posts: 26706
Location: Toronto, Ontario, Canada
TV/Projector: Sony 1252Q, AMPRO 4000G
|
| Posted: Thu Mar 12, 2009 10:47 pm Post subject: |
|
|
Talk to Perisoft he mentioned some thing about this as I recall
_________________
Tech support for nothing
CRT.
HD done right!
|
|
| Back to top |
|
|
Tom.W

Joined: 09 Mar 2006
Posts: 6635
|
|
| Back to top |
|
|
CRT_Ben
Joined: 28 Aug 2006
Posts: 1684
Location: Northern Virginia
|
| Posted: Fri Mar 13, 2009 12:18 am Post subject: |
|
|
|
Peri's method was IMO a lot more precise...carefully set up a digital camera and then take a picture of a green field, invert the luminance and there you have your wear leveling map. Or something like that.
|
|
| Back to top |
|
|
Zebu Fellenz
Joined: 21 Dec 2006
Posts: 2567
|
| Posted: Fri Mar 13, 2009 12:32 am Post subject: |
|
|
I have done wear leveling on both my previous Marquee 8000 and my current G70. I did it very simply and crude with the aid of MS Paint. I just experimented with an inverted wear pattern drawing until I got it close and then put it on the projector. I then setup the projecter again using the geometry controls and blanking to fit the pattern to the wear. I then defocused the tube(s) electronically and let them burn. All of my patterns were run at a high resolution to reduce the chance of wearing scanlines.
I'm not sure if I would recommend trying this. It helped a little on my G70 but now the lighter wear is starting to annoy me (I never saw it before) and on my Marquee the pattern was a bit off leaving a slight bright line in the image. Running at high contrast also can increase the chance for tube failure or failure elsewhere in the set, I never had any major problems but that isn't to say everyone would be that lucky.
Also remember that this may take a *long* time. I ran the pattern on both of my machines for several hundred hours with the contrast maxed out, and neither of my machines had much wear to begin with.
IMO I would start shopping for a better tube.
-Erik 
|
|
| Back to top |
|
|
perisoft
Joined: 29 Aug 2007
Posts: 2920
Location: Ithaca, NY
|
| Posted: Fri Mar 13, 2009 1:09 am Post subject: |
|
|
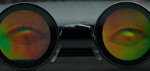
I didn't do leveling, per se - I never tried to actually wear the 'outside' of the tube to match. I just created an inverse luminance map and applied it to the output with avisynth, so it LOOKED like I'd done wear leveling:
That was with a Truly Toasty Tube:
(whose tubes have since been retired...)
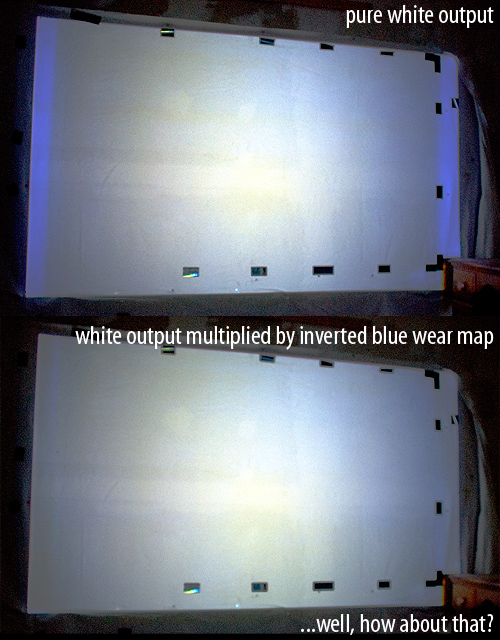
The reason the color stays correct between unworn and worn areas of the tube is the ROSCO65 filter I put on the blue tube. To wit:
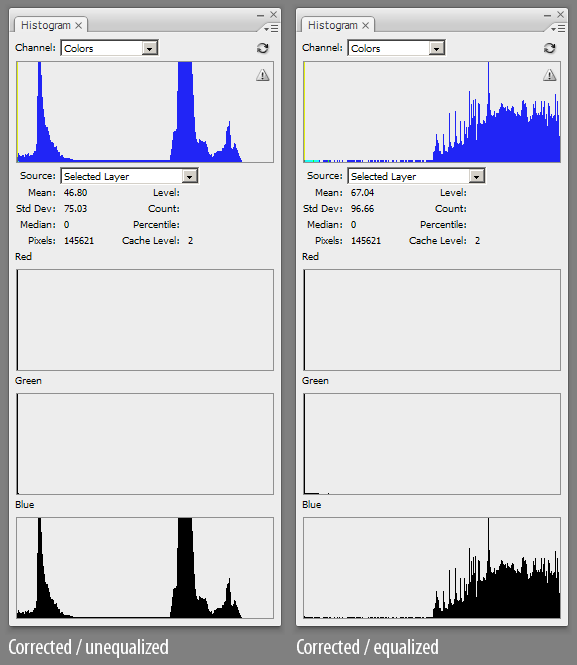
Histogram of the output from the worn blue tube without the ROSCO filter - note the large amount of non-blue in there:

...and with the filter:
So, with those two things combined, you can get correct luminance *and* color out of a heavily worn tube. You still have to drive the poor bastard hard to get any light out of it, but you CAN get good, even color. You could use the same maps to inverse-wear the tubes, though.
The maps were made (for each tube) by:
1) Making a fine grid in photoshop
2) Set up geometry, etc, and project the grid. Take off the lens (Why? If you do a normal screenshot, it will be easier to un-warp - very easy with a good lens - but you'll end up correcting for EVERYTHING: The tube wear, the screen hotspotting, the tiny bit of light coming in from the crack under the door, the wrinkle in the screen..) and set up a *GOOD* camera on a tripod. You have to make absolutely sure that you're not clipping off the top of the input ('white crush' in PJ parlance, but going the other way).
3) Snap!
4) Put up a full white screen.
5) Snap!
Now you've got one image showing the geometry of the screen, as shown all warped-y-like on the tube face, and another with just the 'real' luminance output of the tube.
Your grid now shows the screen surface 'projected back onto the tube face', in a way. If you warp the grid to be square (16:9, 4:3, whatever), you can warp the white image the same way to get a wear map.
I did it this way in photoshop - this works because both the grid image and the full white image were taken with the camera in the exact same position:
1) Open the 'grid' image
2) Open the original grid you projected and out it over the photographed grid image as a reference ('darken' or 'lighten' depending whether it's white-on-black or black-on-white)
3) Start to record a new action (basically a 'macro' that records every last 'move' you make in photoshop)
4) Start warpin'! Make the squishy, pincushioned, trapezoided, generally screwed up image match the original grid. In CS3 you can use the 'warp' tool to do really careful adjustments of individual areas (think 'point convergence'). You're basically just using photoshop's tools to perform a really good convergence. Think about it that way.
5) When you're happy with the result, stop recording the action.
6) Open the 'white' image you photographed. Play back the action. After a bit, it should be nice and square - with all the little nonlinearities evened out, that you'd never have gotten right without the grid as a guide!
7) Open the original 'grid' image and overlay it, as in step 2). Now you can see the borders of the screen, which should be square.
8) Crop to those borders, and resize to the perfect aspect ratio if it's off - remember that every pixel counts here.
9) There's your inverse wear map!
Nothin' to it. I did a kind of haphazard job with the images I posted there because it was just an experiment, but if you do it carefully I think you could come up with a near-perfect inverse wear map - that could even be used to knock back light pattern/text burn, if you're good.
[Note: You'll need a camera that you can focus manually, or that has really good autofocus - the camera will focus fine on the grid pattern but will barf when shown a relatively solid color. Ideally you want a camera whose focus you can set and then grab two pictures in a row without changing ANYTHING. If you haven't got a DSLR that will do that, you could try setting up so you have a slideshow in Windows, or such, that alternates between the grid and white images. Hold the shutter halfway down to focus while the grid is up, and snap. Wait for the white image, without lifting the shutter (to preserve the focus and shutter speed - so you'll want your grid to be black-on-white!) and then grab another shot when the slideshow switches to white.
You'll also want to crank the aperture as closed as you can, or turn the contrast down on the PJ, so you can use a long exposure - a second, if you can. Otherwise you'll grab an image with the raster painted half way, so the top part of the image is brighter than the bottom, with a line in the middle. If you have no way to compensate for this, either, then take 5 or 6 shots, and combine the top and bottom of two that have been 'painted' the same number of times.]
_________________

|
|
| Back to top |
|
|
|
|
|
|
|
You cannot post new topics in this forum
You cannot reply to topics in this forum
You cannot edit your posts in this forum
You cannot delete your posts in this forum
You cannot vote in polls in this forum
You cannot attach files in this forum
You can download files in this forum
|
Forum powered by phpBB © phpBB Group
|
|


