| Author |
Message |
ecrabb
Forum Moderator

Joined: 13 Mar 2006
Posts: 15909
Location: Utah
TV/Projector: JVC RS40, Epson 5010
|
| Posted: Mon Jan 12, 2009 5:08 pm Post subject: |
|
|
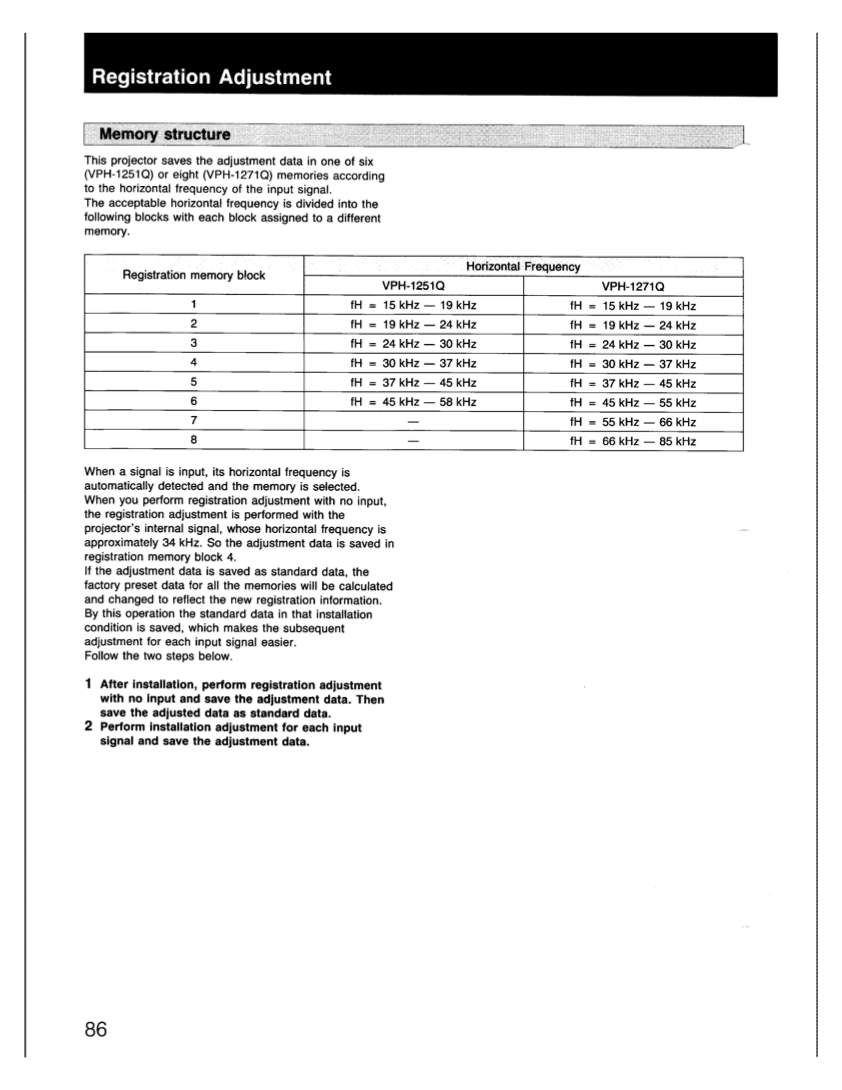
The 1272 assigns and recalls geometry settings based on the input signals horizontal frequency (fH). There are 8 blocks on the 1271 and 1272.
So, for instance, you can set up the geometry controls to display a 1280x720 input correctly on your 96x54. Those settings would be stored in block 5 or 6 (I can't remember which - 720p is right on the edge). Then, you could set up another resolution at 480p for 4x3 material at 72x54, for instance. Those settings would be stored in block 4.
Because of how the memory registration blocks work on the 12xx, what you can't do is have switch between 4x3 and 16x9 at one resolution - say 480p. For that, you'd need to do something at the source... which most HTPC-based software will do just fine without changing resolutions.
I never had to worry about aspect-ratio control because all my sources (DirecTV, PS3 (BD), and HD DVD) all displayed everything at the proper aspect ratio, and all at 1080i - which is what I always ran on my 1271. Your HTPC-based player should do the same.
FYI, the 12xx's are very well suited for 1080i for film-source material. 1080i looks awesome - high horizontal resolution, and no scan lines because the lenses on the 12xx's just aren't sharp enough to reveal it. 1080i on a 12xx is very film-like.
I wouldn't run 720p on the 12xx, unless I really had to look at a PC desktop and read icon names. I had a monitor mirroring the signal for that.
SC
PS - The block assignment table is on page 86 of the 1251/1271 install manual.
|
|
| Back to top |
|
 |
ecrabb
Forum Moderator
Joined: 13 Mar 2006
Posts: 15909
Location: Utah
TV/Projector: JVC RS40, Epson 5010
|
| Posted: Mon Jan 12, 2009 5:16 pm Post subject: |
|
|
Attached.
SC
| Description: |
|
| Filesize: |
87.03 KB |
| Viewed: |
10070 Time(s) |
|
|
|
| Back to top |
|
|
stgdz
Joined: 07 Dec 2008
Posts: 107
|
| Posted: Mon Jan 12, 2009 6:36 pm Post subject: |
|
|
| ecrabb wrote: |
I never had to worry about aspect-ratio control because all my sources (DirecTV, PS3 (BD), and HD DVD) all displayed everything at the proper aspect ratio, and all at 1080i - which is what I always ran on my 1271. Your HTPC-based player should do the same. |
For most film material I am not going to worry about aspect ratio, per your suggestion though I will just set it up to 1080i.
My software PVR(sagetv) displays the material through source and does a constant height for the source material, so I have black bars when watching 4x3 material. Sagetv shifts the placement of the 4x3 material so it is never centered and reduces burn in a bit(I shift it about every 10 mins).
Games is the primarily why I am asking this question. Some of my older games only display in 4x3 and most of the newer games display in 720p I have noticed. According to the projector rankings my 1272 can display a max resolution of 1600x1200 but I run a lot of my games at either 1024x769 or 1280x1024(I think). I would just a get a pull down for the 4x3 gaming.
How does the horizontal frequency transfer into resolution though?
|
|
| Back to top |
|
|
stgdz
Joined: 07 Dec 2008
Posts: 107
|
| Posted: Mon Jan 26, 2009 2:40 pm Post subject: |
|
|
So I received the DVD over the weeked and also got my wilsonart screen. I don't have a frame so I just mounted it to wall, and it isn't flat against the wall so there is a slight wave in it. I will order a aluminum frame from 8020 today though.
With that being said, I added the Toe-in mod with the rubber gaskets and springs http://www.curtpalme.com/Sony125x_SpacerMod1.shtm and while I can get the center reticule lined up fairly well the rest of the reticules, specifically the edge reticles are way off. I don't have a picture of it but from what I remember in the process, I centered the raster, then adjusted the toe in for the red and blue to get the centers. I didn't use the 3/4 length springs I found because it looked like they were way to long, instead I found some 1/2"long springs both medium and stiff springs(at least I think). I used the medium strength springs and it seemed to work. I tried the zone control to get certain areas lined up but I was all ready at some of the max-min areas without it being lined up. There are also spots that are out of focus, I have adhjust the optics to no avail.
Slowly learning how to fix this issues is both fun and frustrating and the waviness of the screen is probably affecting a lot of the issues. Ecrab, I was able to get a 4x3 and 16x9 image to display so I was pretty happy.
Edit-Is there a way to turn on this projector through a wireless remote?
|
|
| Back to top |
|
|
stgdz
Joined: 07 Dec 2008
Posts: 107
|
| Posted: Tue Jan 27, 2009 4:58 pm Post subject: |
|
|
Since this may have turned into a microblog of somesort, I am having trouble with the alignment of the R&B relative to the green. Last night after I believed I had all three rasters lined up, after of course maximizing the raster on the gun face, I looked at the screen cut off the blue and tried to align the right using the toe-in mod and of course I noticed a couple of things.
1)When I go to the crosshair, the red is angled relative to the green. The angle is 1'o clock for the top and 7'o clock for the bottom of the red relative to the 12 and 6 green. I can tweak the toe in mod to get either the top or the bottom of the reticule even with either the top or bottom of the green but not both. So I can get 12 and 12 for the green and red on the top but the bottom will be 12 and 6:32. I fiddled and fiddles with the screws to no avail. When I put up the grid the left side of the screen for red is shifted to the right relative to the green, this is after I have somewhat aligned the reticule as mentioned above.
2)I am going to take the lenses off and to a manual centering of the green and maximize the raster. Do I set the R&B size measurements the same and just line them up using the zone control?
|
|
| Back to top |
|
|
RogueChili

Joined: 31 Mar 2008
Posts: 162
Location: Westfield, MA
|
| Posted: Tue Jan 27, 2009 9:21 pm Post subject: |
|
|
Skimming through the post it is not clear what your target screen size is (Diagonal). I think your target is 96 diagonal. If so, the standard factory spacers will work properly. The standard spacers allow a range of 86 to 139 diagonal screen size.
If your screen size is outside the range of your spacers I would recommend getting the correct spacers for your application. The position of the lens relative to the tube face is complicated and critical for proper alignment and performance. I would stay away from mods that may compromise the integrity of the optical system.
One thing, reset all the parameters to factory defaults (described in manual) before attempting alignment procedures. If you have things set up correctly the RGB cross patterns will be fairly close to the correct positions on the screen. This is my opinion based on observations during installation of three Sony projectors; 1042Q, 1252Q and 1292Q. From my recollection, the cross patterns were less then a 1/2 inch off center axis on a 120 diagonal screen.
So, how did you decide to mount the beast?
|
|
| Back to top |
|
|
ecrabb
Forum Moderator
Joined: 13 Mar 2006
Posts: 15909
Location: Utah
TV/Projector: JVC RS40, Epson 5010
|
| Posted: Tue Jan 27, 2009 10:45 pm Post subject: |
|
|
Sounds like you really need to go back and read the basic setup guide. Lens toe-in allows you to center the raster on the tube face so the tubes and lenses are all pointing at the same spot on the center of the screen - and that's ALL.
The magnetic coils on the tube neck control whether the crosshair is level with the screen.
The electronic SKEW control controls vertical/plumb once horizontal is set mechanically/magnetically.
This is the basic beginning of the setup, assuming your mechanical setup is already done (projector is centered on, and square to the screen, and perfectly level/plumb).
1. Reset all settings to mid-line or 127/128.
2. Look through the lenses and center the crosshair in the center of the tube face (or do it with the lenses off)
3. Do a quick rough focus
4. Adjust lens toe-in to converge the center of the crosshair.
5. Adjust deflection coils if necessary to make horizontal lines level w/screen (this can be dangerous if you're not careful - do some reading)
6. Proceed with normal geometry focus/convergence on green per setup manual
You'll also find that depending on what spacers are in your machine, and the vertical offset of the projector relative to the screen, that your top/bottom focus will be impossible to get right (if top is focused, bottom won't be and vice-versa). In that case, you may want to use some spacers of some kind to shim the top of the lenses out from the bottom. On my friend's machine, some washers between the lens and spacers worked perfectly.
I'll see if can find one of the older 12xx setup threads where the process is articulated in some more detail.
SC
|
|
| Back to top |
|
|
stgdz
Joined: 07 Dec 2008
Posts: 107
|
| Posted: Wed Jan 28, 2009 4:00 pm Post subject: |
|
|
Thanks guys for your help. My current WA screen is 61x121, but I will probably cut it down a bit.
Tonight I am going to back to basics with this thing and remove the springs and replace them with the spacers. There is a lot of buttons and dials on this thing. I like to tinker and tweak, while I am learning of course but the astig stuff threw me for a loop, but I need to get back to square 1 and go from there. I have read the mooneysas guided and some of the avs guides.
I will post a picture of what I currently have the grids setup as my current setup for a reference point later and then post a square one grid. Oh and the projector is off of the bed on a TV stand currently, but I may put it on one of those portable metal tables and then mount it to the ceiling. Still haven't figured that out.
browsing through the thread I found AR's statement about this true "You'll set it up, tweak it. Screw up the setup, re do the setup. Tweak it. Redo it...and on it goes. Each time it will get a little better."
|
|
| Back to top |
|
|
RogueChili
Joined: 31 Mar 2008
Posts: 162
Location: Westfield, MA
|
| Posted: Wed Jan 28, 2009 6:07 pm Post subject: |
|
|
A note on the spacers, the orientation of the spacers is critical and they are marked for identification. Refer to the installation manual (on Curts web page) and read the installation process under Changing the CRT spacers. You may want to I.D. and log exactly what spacers you have for future reference. Also review the section under Changing the lens spacers for front projection and be sure the settings are set to match the CRT spacers.
I will post pics of a simple mounting system that should make things easy for your installation. The parts can be purchased at your local hardware store and with a few simple tools, youll have it. The mounting system allows for minor alignment adjustments and unlimited distance to screen adjustment.
|
|
| Back to top |
|
|
RogueChili
Joined: 31 Mar 2008
Posts: 162
Location: Westfield, MA
|
| Posted: Thu Jan 29, 2009 1:44 am Post subject: |
|
|
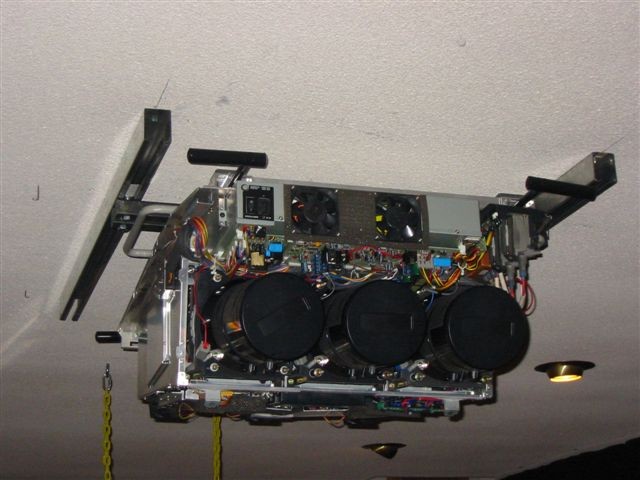
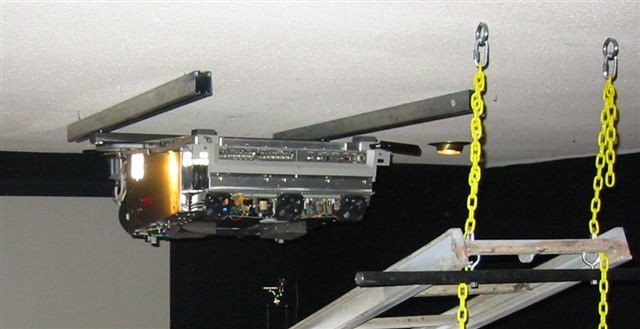
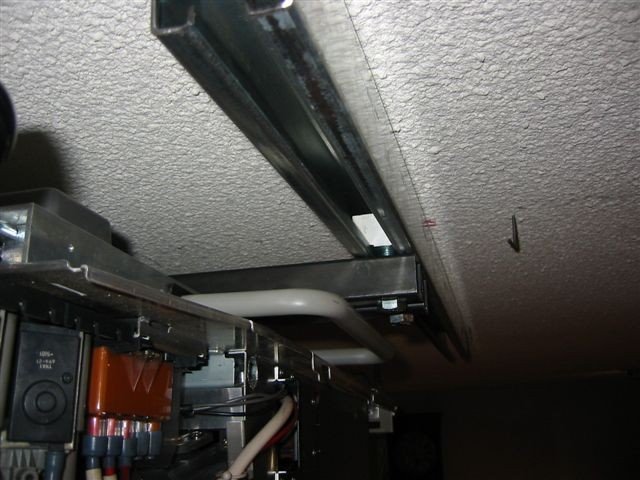
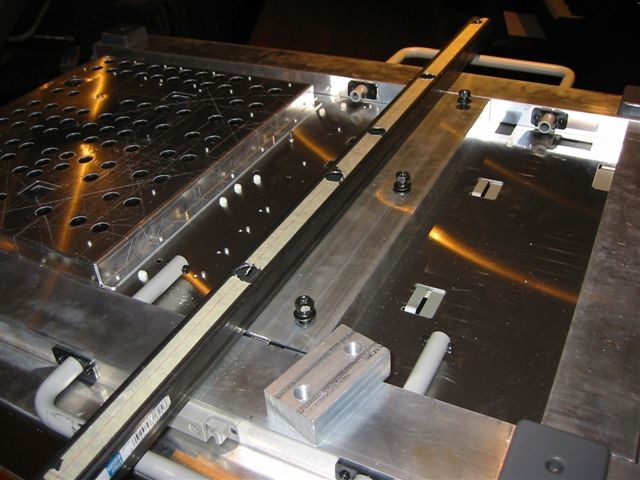
Pics of projector mounting system consisting of two rails, two mounting bars, two slide blocks and mounting hardware. This mounting system keeps the projector parallel and close to the ceiling. The top of the screen (4:3) ends up near the ceiling. This is ideal for my application. The rails are intended to be used to mound a hush box.
As you can see, the rails allow for sliding the projector in the z axis (nearer or further from the screen). The length of the rails determines the amount you can adjust the distance to the screen. The rails are mounted, 34 inches apart, to the studs with 5/16 lag bolts at 16 intervals. The distance of the rails from the screen is such that the projector is positioned 1/3 back from the leading edge of the rails for the calculated working distance. This allows for significant adjustments for any tolerance issues. You can purchase the rails at Tractor Supply.
The mounting bars simply attach to the projector with the Sony recommended metric bolts. The mounting bars are standard 1 1/4 square tubing purchased at Tractor Supply.
The slide blocks simply attach to the mounting bars with ½ inch bolts. The slide blocks are made from scrap aluminum stock. You could use a nut and washer in place of the blocks however the washer should be hardened to prevent bending under load.
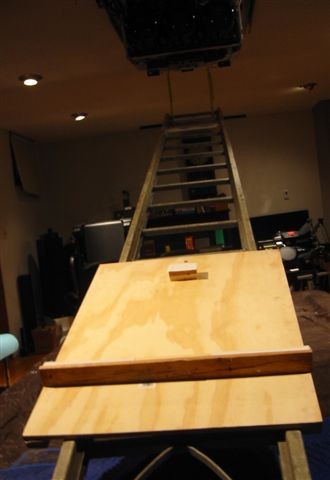
To simplify positioning the projector to the mounting rails a ladder was used. One end suspended from the ceiling and the other end resting on the table with the projector. This gives you a ramp to slide the projector up into place. Its much easer sliding then lifting. When the projector is at the top, and all the weight at the suspended side, you simply lift the other end of the ladder making it parallel with the ceiling. At this point the slide blocks should be in front of the rails. All you have to do is slide the projector forward while inserting the slide blocks into the rails. Done!
| Description: |
|
| Filesize: |
66.98 KB |
| Viewed: |
9912 Time(s) |
|
| Description: |
|
| Filesize: |
45.82 KB |
| Viewed: |
9912 Time(s) |
|
| Description: |
|
| Filesize: |
25.09 KB |
| Viewed: |
9912 Time(s) |
|
| Description: |
|
| Filesize: |
73.71 KB |
| Viewed: |
9912 Time(s) |
|
| Description: |
|
| Filesize: |
73.54 KB |
| Viewed: |
9912 Time(s) |
|
|
|
| Back to top |
|
|
AnalogRocks
Forum Moderator
Joined: 08 Mar 2006
Posts: 26706
Location: Toronto, Ontario, Canada
TV/Projector: Sony 1252Q, AMPRO 4000G
|
| Posted: Thu Jan 29, 2009 5:52 am Post subject: |
|
|
You must be a roofer. That's how they move the shingles up the ladder.
_________________
Tech support for nothing
CRT.
HD done right!
|
|
| Back to top |
|
|
stgdz
Joined: 07 Dec 2008
Posts: 107
|
| Posted: Fri Jan 30, 2009 11:51 pm Post subject: |
|
|
I am driving this projector with a HTPC and messing around with the refresh rates through power strip and catalyst control center.
How easy is it to mess up the projector by driving the wrong refresh rate through it? Also sony specs lists a maximum resolution of 1600x1200, so how can I send a 1920x1080i signal into it?
|
|
| Back to top |
|
|
imprez25
Joined: 01 May 2007
Posts: 70
|
| Posted: Sat Jan 31, 2009 4:08 pm Post subject: |
|
|
|
Roguechili- What projector is that? a 1292, 1270, 1271, or a 1251?
|
|
| Back to top |
|
|
RogueChili
Joined: 31 Mar 2008
Posts: 162
Location: Westfield, MA
|
| Posted: Sat Jan 31, 2009 6:44 pm Post subject: |
|
|
imprez25- That is a 1292.
stzdz- does this imply your projector is working properly now ? I too use a pc to drive the projector. You shouldn't have any problem at 1088i assuming your graphics card is capable. As far as "How easy is it to mess up the projector" let us know!
|
|
| Back to top |
|
|
stgdz
Joined: 07 Dec 2008
Posts: 107
|
| Posted: Sat Jan 31, 2009 10:11 pm Post subject: |
|
|
| RogueChili wrote: | | stzdz- does this imply your projector is working properly now ? I too use a pc to drive the projector. You shouldn't have any problem at 1088i assuming your graphics card is capable. As far as "How easy is it to mess up the projector" let us know! |
It is somewhat working, its not razor sharp. Its probably due to my screen not mounted on the frame yet but I am having trouble with the right side alignment at the center.
http://stgdz.shackspace.com/Shack/house/Hometheater/1272/screenshots/shacknews.JPG
You can see it in the the above photo.
|
|
| Back to top |
|
|
Zebu Fellenz
Joined: 21 Dec 2006
Posts: 2567
|
| Posted: Sat Jan 31, 2009 11:06 pm Post subject: |
|
|
stqdz,
Not trying to derail the thread but I see you are running windows 7. Does CCC or the resolution changer within windows allow you to go past 1600x1200? I had an issue with windows 7 where it would limit the resolution on my G70 to 1200p.
Thanks,
Erik
|
|
| Back to top |
|
|
stgdz
Joined: 07 Dec 2008
Posts: 107
|
| Posted: Sun Feb 01, 2009 12:30 am Post subject: |
|
|
| Zebu Fellenz wrote: | stqdz, Does CCC or the resolution changer within windows allow you to go past 1600x1200? I had an issue with windows 7 where it would limit the resolution on my G70 to 1200p.
Thanks,
Erik |
Nope, see here
https://www.curtpalme.com/forum_archived/viewtopic.php@t=14628.html
I tried powerstrip to go to 1080i and then I lost all my resolution besides 1080i
|
|
| Back to top |
|
|
stgdz
Joined: 07 Dec 2008
Posts: 107
|
| Posted: Mon Feb 09, 2009 12:53 am Post subject: |
|
|
Figured I would post a update,
I have been watching a bunch of stuff and playing videogames on my 1272 for the last week or so. I have gotten it tweaked pretty good for my wavy screen and my frame came this last week so I will be able to get it flat. I will have to shorten the width though as the WA laminate is 61x121
Its pretty cool, and the screen size is set to 61x108 currently and it is fine for me.
I have some screenshots and video of burnout paradise


http://www.youtube.com/watch?v=yD9ACwjRSZ8
|
|
| Back to top |
|
|
|
|


