| Author |
Message |
CrystalGeek
Joined: 28 Jul 2008
Posts: 9
Location: Surrey
|
| Posted: Mon Jul 28, 2008 6:50 pm Post subject: HELP! Replacing a flyback on a 46-inch projection RCA |
|
|
Hi folks and thanks in advance for any help you can give me.
I have an old (1999) RCA 46" projection non-HD television. It's been a great TV for watching most broadcast programs.
Model: P46921
Chassis: PTK195MA
Service No: P46921YX1
It just stopped working. No sound, no picture. All I get is a rhythmic chirping sound out of the back. When I unplug it, the chirping slows down and eventually stops.
So I did some research on "the internetz". The concensus is that it's a bad flyback transformer. So I opened up the back, located the flyback on the main board and sure enough it looks a little crispy around the top.
Now just before I ask a bunch of questions, I'll let you know I'm not a TV technician. I'm a computer geek and I have no problems doing repairs on computers, soldering, etc. I am aware of the high voltage dangers that are mysteriously contained in the flyback.
So I have a couple of questions, and again, I thank you in advance for any advice:
1) From my research, the flyback it requires is the RCA 239111. Can anyone confirm this?
2) I've read some comments on other sites that say to ONLY use the RCA replacement flyback, not the copies, while others say they've had no problems with the copies. The big difference is of course the price - the orginal RCA goes for around $60, while the copy goes for about $12. Any thoughts?
3) If I don't want to buy this flyback online, can anyone recommend a local supplier (greater Vancouver, BC area) that I could get this from?
4) What if I just pull the main chassis board out and bring it to a service shop for repair? Can anyone recommend a local trustworthy shop or technician that would do this and what would be the ballpark price?
I know, I know, lots of questions. 
Thanks again!
|
|
| Back to top |
|
 |
AnalogRocks
Forum Moderator
Joined: 08 Mar 2006
Posts: 26706
Location: Toronto, Ontario, Canada
TV/Projector: Sony 1252Q, AMPRO 4000G
|
| Posted: Tue Jul 29, 2008 3:18 am Post subject: |
|
|
I would recommend Curt Plame for a local vancouverite. Cpntact him at curtplame@curtplame.com
_________________
Tech support for nothing
CRT.
HD done right!
|
|
| Back to top |
|
|
CrystalGeek
Joined: 28 Jul 2008
Posts: 9
Location: Surrey
|
| Posted: Tue Jul 29, 2008 5:21 am Post subject: |
|
|
Thanks Analog, I've sent him an email. Funny, I've been on Curt's mailing list for years (since I bought a Sony 1272 off him), but I just didn't even think about him for servicing a projection TV. Hmmm....me not smart today.
Thanks again.
|
|
| Back to top |
|
|
AnalogRocks
Forum Moderator
Joined: 08 Mar 2006
Posts: 26706
Location: Toronto, Ontario, Canada
TV/Projector: Sony 1252Q, AMPRO 4000G
|
| Posted: Tue Jul 29, 2008 6:11 am Post subject: |
|
|
Just look at it this way...projector good. Broken projector bad. TV good, Broken TV bad. Curt fix muchley TV good. TV fix good.
Use the man part of your brain 
_________________
Tech support for nothing
CRT.
HD done right!
|
|
| Back to top |
|
|
Curt Palme
CRT Tech
Joined: 08 Mar 2006
Posts: 24396
Location: Langley, BC
TV/Projector: All of them!
|
| Posted: Tue Jul 29, 2008 6:16 am Post subject: |
|
|
RPs is one type of set that I've done very little work on, sorry Crystalgeek.
Since it's out of my area of expertise, I'd suggest you buy the parts yourself and install them. That way I won't be risking my reputation and your money if I misdiagnose...
From what you say, it could well be the flyback. Call Main Electronics at (604) 872-0267 and see if they have the flyback. Flybacks do not 'contain' HV, once the set has been off for 5 minutes there's no HV in the set, so no problem desoldering the flyback like any other part.
It's always a good idea to touch any HV lead you disconnect to the metal chassis to discharge anything, but you'll be fine.
If you're stuck installing the flyback, by all means bring the board out and I'll charge next to nothing (a 6 pack of coolers?) to swap out the part, and I can check the H output transistor that usually dies as well as the flyback as well.
Cheers!
|
|
| Back to top |
|
|
AnalogRocks
Forum Moderator
Joined: 08 Mar 2006
Posts: 26706
Location: Toronto, Ontario, Canada
TV/Projector: Sony 1252Q, AMPRO 4000G
|
| Posted: Tue Jul 29, 2008 6:19 am Post subject: |
|
|
 Thought you had some experiance there Curt. Sorry about that CG. Thought you had some experiance there Curt. Sorry about that CG.
Macguyver will probably have the chassis manuals if you need them. I KNOW he has RPTV experiance but he's on the right coast(ish) of the US.
_________________
Tech support for nothing
CRT.
HD done right!
|
|
| Back to top |
|
|
CrystalGeek
Joined: 28 Jul 2008
Posts: 9
Location: Surrey
|
| Posted: Tue Jul 29, 2008 8:40 am Post subject: |
|
|
| Curt Palme wrote: |
Since it's out of my area of expertise, I'd suggest you buy the parts yourself and install them. That way I won't be risking my reputation and your money if I misdiagnose...
From what you say, it could well be the flyback. Call Main Electronics at (604) 872-0267 and see if they have the flyback. Flybacks do not 'contain' HV, once the set has been off for 5 minutes there's no HV in the set, so no problem desoldering the flyback like any other part.
It's always a good idea to touch any HV lead you disconnect to the metal chassis to discharge anything, but you'll be fine.
If you're stuck installing the flyback, by all means bring the board out and I'll charge next to nothing (a 6 pack of coolers?) to swap out the part, and I can check the H output transistor that usually dies as well as the flyback as well.
Cheers! |
Hey thanks Curt! Much appreciated.
I'll try the swap out myself - I'm always up to a challenge as it's the only way to learn! If I can't get it to work, I might show up at your door with some booze and a board. Heheh.
Thanks again!
|
|
| Back to top |
|
|
macgyver655
Joined: 22 Aug 2007
Posts: 8508
|
| Posted: Tue Jul 29, 2008 2:09 pm Post subject: |
|
|
|
The chirping sound means a power supply is getting overloaded by a short somewhere. Usually you would start by disconnecting source lines to find out which line is being overloaded. The flyback is one of many possiblilties. Disconnecting the B+ to the flyback and the chirping goes away should verify, if the chirping was coming from the power supply. If the chirping is coming from the flyback itself, it could be the fly or an output of the fly. Thats why this profession is so much fun. You never know where the problem will be. You have to find it. You could shoot from the hip and change the fly and output xsistor and hope for the best. I can check a few places for the parts if you cant find one. I would like to see a pic of that burn on the fly.
|
|
| Back to top |
|
|
CrystalGeek
Joined: 28 Jul 2008
Posts: 9
Location: Surrey
|
| Posted: Tue Jul 29, 2008 5:44 pm Post subject: |
|
|
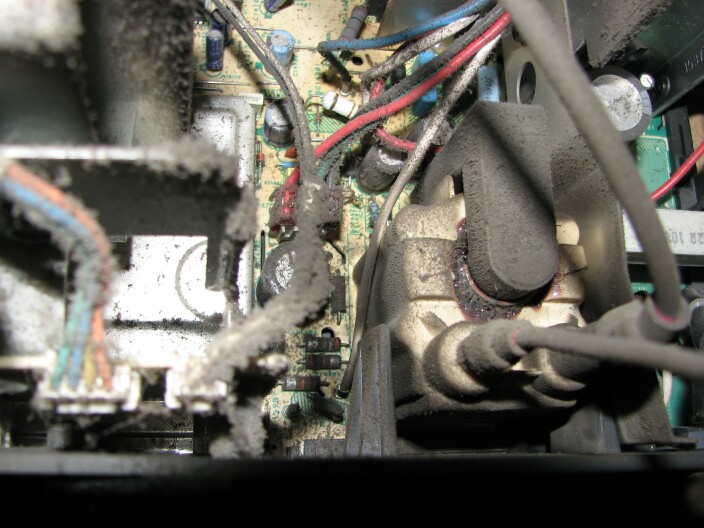
| macgyver655 wrote: | | I would like to see a pic of that burn on the fly. |
Thanks for the tips MacGyver. Here's some pics. I know, I know, it looks like the TV's made of cardboard.
| Description: |
|
| Filesize: |
102.14 KB |
| Viewed: |
123 Time(s) |
|
| Description: |
|
| Filesize: |
125.19 KB |
| Viewed: |
123 Time(s) |
|
|
|
| Back to top |
|
|
Curt Palme
CRT Tech
Joined: 08 Mar 2006
Posts: 24396
Location: Langley, BC
TV/Projector: All of them!
|
| Posted: Tue Jul 29, 2008 5:55 pm Post subject: |
|
|
Step 1: Air compressor used liberally.
Step 2: Check HOT for shorts (transistor mounted on that large heatsink behind and to the right of the flyback.
|
|
| Back to top |
|
|
rpruen
Joined: 07 Apr 2008
Posts: 67
Location: Southwest UK
TV/Projector: BD701 FTS, BD808s
|
| Posted: Tue Jul 29, 2008 6:40 pm Post subject: |
|
|
Yes, get the dust out of there.
Also be carefull with the HV, that tube will hold charge much longer than a projector tube. Maybe for a few min if the flyback is fitted with a discharge resistor, or several hours if not!
That isn't likely to be a problem now, but once you start testing, take care to discharge HV before getting too close.
HV can be discharged as follows... Connect a cable to the ground on the TV, such as the frame, or ground wire from the tube (easy if it is the braid type). The other end of the wire goes to a thin screwdriver, obviously make sure the wire is in contact with the metal part. You then feed the end of the driver under the edge of the HT cap on the tube (keep fingers clear), untill it toches the contact. The screwdriver is grounded, so any voltage will jump to it, not travel through you. If the tube has any charge then you will hear a snap, but once the screwdriver touches the contact, you know *for sure* that it is safe.
I didn't do this once, I was in a hurry, and still have the burn on my finger.
Richard
|
|
| Back to top |
|
|
CrystalGeek
Joined: 28 Jul 2008
Posts: 9
Location: Surrey
|
| Posted: Sat Aug 02, 2008 4:51 am Post subject: |
|
|
Thanks for the tips everyone! Here's an update:
-I've removed the main board from the TV.
-I cleaned out all the dust bunnies.
-I removed the burnt-out flyback using some Super Wick. That Super Wick stuff sucks. I don't know if I got a bad spool or something, but it didn't work very well. I was able to get it to work like a charm by dipping the tip it in some paste flux before using it. Then it worked! Dip 1/4 inch tip in flux - heat - absorb solder - cut used tip off - start again.
-I've got the new flyback mounted - perfect fit in regards to the pin locations (all 10 of them).
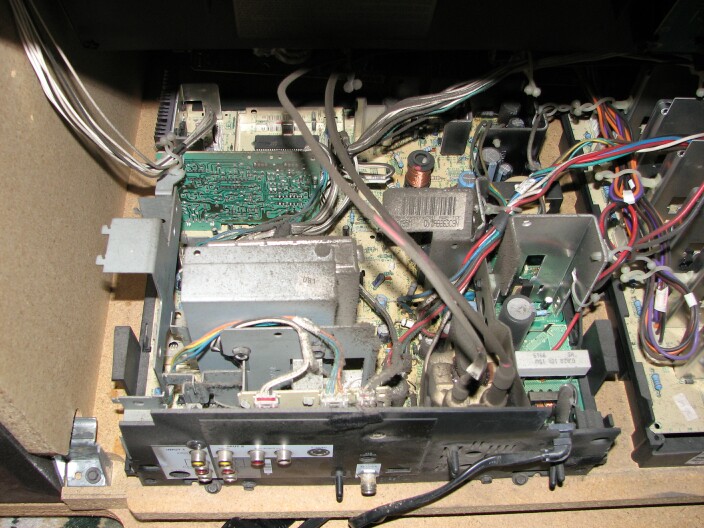
OK, so now I would like to test the Horizontal Output Transistor, as I've heard that on these chassis, they rarely short out, even if the flyback burns out.
Is there any way to test the HOT without removing it from the circuit? It's in a weird spot strapped down to a heatsink (in picture #2 above, it's located on the heatsink below the dusty UPC sticker in the middle of the photo). I'd rather not remove it if I don't have to. I have a digital multimeter and sausage fingers.
What if I just don't test it and try plugging everything in? What's the worst that could happen if the HOT was hypothetically shorted out? Could it burn out my new flyback? Thank you kindly!
|
|
| Back to top |
|
|
CrystalGeek
Joined: 28 Jul 2008
Posts: 9
Location: Surrey
|
| Posted: Sat Aug 02, 2008 7:48 am Post subject: |
|
|
Well, I got bored and pulled out the HOT. When I was testing it in circuit, it looked shorted. When I tested it out of the circuit board, it was definitely shorted.
However, the original HOT I pulled (C5148) is different than the replacement I was given (BU2525AF). I'll call the supplier tomorrow and doublecheck before installing it. Fun times.
|
|
| Back to top |
|
|
rpruen
Joined: 07 Apr 2008
Posts: 67
Location: Southwest UK
TV/Projector: BD701 FTS, BD808s
|
| Posted: Sun Aug 03, 2008 6:10 pm Post subject: |
|
|
| CrystalGeek wrote: | Well, I got bored and pulled out the HOT. When I was testing it in circuit, it looked shorted. When I tested it out of the circuit board, it was definitely shorted.
However, the original HOT I pulled (C5148) is different than the replacement I was given (BU2525AF). I'll call the supplier tomorrow and doublecheck before installing it. Fun times. |
Looking at the datasheets the new transistor is slightly better than the old one. It has a higher HFE, and peak current rating, but slightly lower power 45W vs 50W. It looks like it should be a drop in replacement.
You may have to tweak some settings, but that could happen with an identical replacement as well.
Did you measure the flyback to see what had failed? Though you will likley need an IRT that goes up to at least 1kv for the secondary.
Hope it works ok first time.
Richard
|
|
| Back to top |
|
|
Curt Palme
CRT Tech
Joined: 08 Mar 2006
Posts: 24396
Location: Langley, BC
TV/Projector: All of them!
|
| Posted: Sun Aug 03, 2008 6:43 pm Post subject: |
|
|
|
THe only way to test a flyback is with a ring inductor tester. I hvae one of those here if you want to come by. A HOT almost always shorts out from the collector to the emitter or base. If you have no dead short, chances are it's OK. You can measure that in circuit.
|
|
| Back to top |
|
|
rpruen
Joined: 07 Apr 2008
Posts: 67
Location: Southwest UK
TV/Projector: BD701 FTS, BD808s
|
| Posted: Mon Aug 04, 2008 5:52 am Post subject: |
|
|
| Curt Palme wrote: | | THe only way to test a flyback is with a ring inductor tester. I hvae one of those here if you want to come by. A HOT almost always shorts out from the collector to the emitter or base. If you have no dead short, chances are it's OK. You can measure that in circuit. |
It's nice to have test gear made for that sort of stuff. I have had some luck in the past with insulation resistance testers. Though the propper gear would be better.
Richard
|
|
| Back to top |
|
|
CrystalGeek
Joined: 28 Jul 2008
Posts: 9
Location: Surrey
|
| Posted: Mon Aug 11, 2008 6:43 am Post subject: |
|
|
All righty then! So here's my update for my RCA p46921 46" projection tv, circa 1999.
I replaced the Flyback AND the HOT. Both were definitely cooked. No fancy tools required.
I had a hard time locating the original C5148 HOT, as every shop seemed to only have replacements, with "close" specs. No thanks. I wanted the original. Finally found it at Able Electronics in Burnaby.
Anyhoo, I installed the new HOT and the TV started up no problem. Let it run for a couple of hours, and everything was cool....
HOWEVER, the convergence and focus were a little off. I went through RCA's built-in menus to adjust the green placement, blue and red convergence (very simple crosshair in the middle). Really weak and simple adjustment options. Nothing available for focus adjustment. The focus is still off.
I popped off the front speaker panel, in hopes of finding some secret adjustment buttons (as per some other website's advice). No luck.
Am I going to have to adjust the focus by using the little sliding screws on the actual tubes themselves? Cuz that's going to be a pain in the butt. Why can't this all be available through a menu, like my nice Sony 1272...arrgh.
|
|
| Back to top |
|
|
macgyver655
Joined: 22 Aug 2007
Posts: 8508
|
| Posted: Mon Aug 11, 2008 1:28 pm Post subject: |
|
|
|
There should be a screen and focus block in there somewhere. They are sometimes very small and attached in places not easily seen.
|
|
| Back to top |
|
|
CrystalGeek
Joined: 28 Jul 2008
Posts: 9
Location: Surrey
|
| Posted: Mon Aug 11, 2008 7:35 pm Post subject: |
|
|
Thanks Macgyver! Your reply convinced me to search further. I found the focus block! I had to pop off the front speaker cover where the power/volume/channel controls are. Behind there, was a ventilation panel held in by some screws. When I took that off, I could see the bottom of the tubes, and tucked up in the corner was a little panel with 6 adjustment screws and some writing!
Looked something like this, where the "X" is a screw:
SCREEN
X X X
R G B
X X X
FOCUS
The bottow row of screws were covered over in electrician's tape. I didn't want to touch those - originally.
However, the top three screws seemed to only control the brightness of each colour, and didn't really have much to do with focus that I could see. Mind you, when turning up the brightness on each colour, it would get brighter - and blurrier.
So I took off the tape at the bottom row - those screws are what really let me adjust the focus.
I threw up the V76 service menu in order to display a green grid, and made all three focus adjustments there.
After adjusting the focus using the V76 grid, I had to go back to a broadcast picture to make some proper colour brightness adjustments with the top three rows of screws.
I then re-adjusted the convergence through the on-screen menus.
What a difference! The picture is fantastic!
THANKS EVERYONE! :O)
|
|
| Back to top |
|
|
macgyver655
Joined: 22 Aug 2007
Posts: 8508
|
| Posted: Mon Aug 11, 2008 8:22 pm Post subject: |
|
|
Great. Glad its working out for you.
You may want to go back and recheck those screen controls. Especially since you turned them. They will greatly affect your gray scale.
The best way I have found to adjust the screen controls is to turn the tv to a video input that doesn't have anything hooked to it. The screen should be black unless it has a blue screen feature. If it does, turn it off. Now set your brightness to 50%. Its best if you can stick your head in there and look right into the lens. Now one color at a time, with the screen control, rotate it until you can make the raster appear then disappear so you can get a feel for it. Then adjust it until the raster just disappears. Do this for all 3 colors. When your done and looking at the tv from normal position, as you increase the brightness, it should go from black to lighter shades of gray, with no tinting of a particular color. If all looks good then lower the brightness until the screen just goes black. And your done. Enjoy your tv.
|
|
| Back to top |
|
|
|
|


