
|
 |
|
|
| View previous topic :: View next topic |
| Author |
Message |
Nashou66
Joined: 12 Jan 2007
Posts: 16171
Location: West Seneca NY

|
|
| Back to top |
|
 |
PaulB
Joined: 26 Oct 2007
Posts: 359
Location: Bonnie (but rainy) Scotland
|
 Link Posted: Thu Sep 18, 2008 2:15 pm Post subject: Link Posted: Thu Sep 18, 2008 2:15 pm Post subject: |
 |
|

_________________
Paul
|
|
| Back to top |
|
|
Nashou66
Joined: 12 Jan 2007
Posts: 16171
Location: West Seneca NY
|
| Link Posted: Thu Sep 18, 2008 11:50 pm Post subject: VDM and CVA Caps list. |
|
|
Ok now we get to the caps for the VDM, I'll list the part numbers of the caps I used
then you can punch them into what ever vendor you want to use. I'll add the CVA
caps as well and signify if they are used on both boards.
12--10uf 350 VDC Panasonic EEUED2V100 for CVA
18--22uf 100VDC Panasonic EEUFC2A220 for CVA
7--470uf 50 VDC Panasonic EEUFM1H471 for VDM
4--100uf 100VDC Panasonic EEUFC2A101 for VDM
1--10uf 50 VDC Panasonic EEUFC1H100 for VDM
1--2.2uf 50VDC CORNELL DUBILIER SEK2R2M050ST or if you can find
the Panasonic EEUFC1H2R2 for VDM I couldnt from newark but digikey
might have them.
Also for the CVA you will need 12 of the 1/2 ohm resitors from the VDM post
and 50 of these 1.2ohm 1/2 watt resistors from mouser part # 660-MF1/2LL1R2J .
Ok I did all the easy caps first( I like to start off easy and i get more motivated
and creative as i go along).  these are C6(2.2uf) , C3110Uf) ,C15(470uf) these are C6(2.2uf) , C3110Uf) ,C15(470uf)
and C41(100uf).
C31 and C6 only 85c caps 

Remember to properly bend the leads to the holes pitch.

I bend the leads underneath to hold them whilst I solder.

Look at the size difference on these ! for C15

And these 100uf's !! the upped voltage is one reason

C41 in place

Ok, now thats the easy caps, the next caps are the three bunched together
two 470uf and one 100uf in between . the Originals were small but the new ones are huge in
comparison as you saw from the above pics. I took me a couple attempts to find the best
positioning for all three along with some creativity in lead bending.
Here you can see how they were all nice and straight after they were out

I had to bend the leads like this to get them shifted off center of the silk screen location.
Lead bent for off center positioning

you can see how they are off center here
Off center top view C7o8 and C709

and a pic from other angle of C909

Arial view of how three huge caps fit !

Comparison of old and new

Now there are some of those op amps on here that we changed on the FCM and CLM.
You can change them if you want but I left them for now I may change them later.
TLO84 can be swaped out for a TLE2084 or TLE2074

There are also some film caps on this board, I have seen a board some where but
I cant remember where I had seen it that had Wima film caps in their place.
You could change them out too as wima's are an excelent film cap from what i have read
add I have an Ultra HDM here that has wima's through out. well thats it for the VDM.
Completed board !!!!

I still have to wait for the 1.2 ohm resistors for the CVA and thats next, I
cant wait to finish these and see how well the changes stabilize this board.
A friend was watching me work and snapped this shot 
Me looking for resistor lead to desolder

Athanasios
_________________
Don't blame your underwear for your crooked ass~ unknown Greek philosopher
"Republicans believe every day is the Fourth of July, but the Democrats believe every day is April 15." --- President Reagan
One Smart Dog!!!
Marquee High Performance Bellows now shipping!!
Marquee Modifications and Performance Enhancement
Marquee C-element and Bellow removal
Last edited by Nashou66 on Sat Jan 01, 2011 3:58 am; edited 1 time in total
|
|
| Back to top |
|
|
PaulB
Joined: 26 Oct 2007
Posts: 359
Location: Bonnie (but rainy) Scotland
|
| Link Posted: Fri Sep 19, 2008 4:08 pm Post subject: |
|
|
The Master at work.
Hehe, the face that launched a thousand threads! Nice to put a face to the name Athanasios! I'll maybe post my fizz-ogg, you can use it to scare kids or keep birds out of your garden.
Did you get the 1.2ohms - them suckers are big!!!

Fitting them all on to the CVA is gonna be fun.........., not! Pretty sure its only 24 of the 1.2ohms that need to be fitted though - even thats bad enough.
I'm thinking 45degree angle pointing up away from the transistors - i.e. keeping the body of the resistor away from the heat from the transistor and out of the way of the heatsink that clips over the transistors?
_________________
Paul
Last edited by PaulB on Sat Sep 20, 2008 7:53 am; edited 8 times in total
|
|
| Back to top |
|
|
Nashou66
Joined: 12 Jan 2007
Posts: 16171
Location: West Seneca NY
|
| Link Posted: Fri Sep 19, 2008 5:14 pm Post subject: |
|
|
| PaulB wrote: | The Master at work.
Hehe, the face that launched a thousand threads! Nice to put a face to the name Athanasios! I'll maybe post my fizz-ogg, you can use it to scare kids or keep birds out of your garden.
Did you get the 1.2ohms - them suckers are big!!!
Fitting them all on to the CVA is gonna be fun.........., not! |
I wouldn't say master i'd say obsessed Hobbiest  Mooaaaaa!!!!! Mooaaaaa!!!!!
No I havn't yet recieved the Resistors, the .47ohm ones are twice as large too but went in easy
now I know why Mike Parker called them Mickey Mouse, they were small and of larger value too !
I just put in those .47R's on the CVA While I await the 1R2's The panasonics 10uf 350 VDC caps
came and are the same as the 10uf 250VDS on there, the 22uf 100 VDC for the other caps are
much bigger.
Athanasios
_________________
Don't blame your underwear for your crooked ass~ unknown Greek philosopher
"Republicans believe every day is the Fourth of July, but the Democrats believe every day is April 15." --- President Reagan
One Smart Dog!!!
Marquee High Performance Bellows now shipping!!
Marquee Modifications and Performance Enhancement
Marquee C-element and Bellow removal
|
|
| Back to top |
|
|
Nashou66
Joined: 12 Jan 2007
Posts: 16171
Location: West Seneca NY
|
| Link Posted: Sun Sep 21, 2008 4:00 am Post subject: CVA resistor Upgrade From Mike Parker Maintenance thread. |
|
|
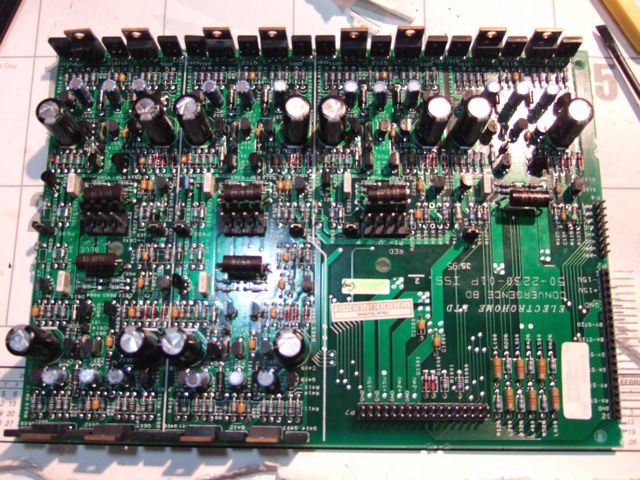
Ok now on to the resistor mod part of the CVA from the Mike Parker Maintenance Thread (MPMT).
This is to stabilize the convergence of the marquee as older set tend to drift a bit. This board is
next to the VDM we removed earlier and come out the same way. No need to
mark this board since we marked the VDM, unless your anal  . .
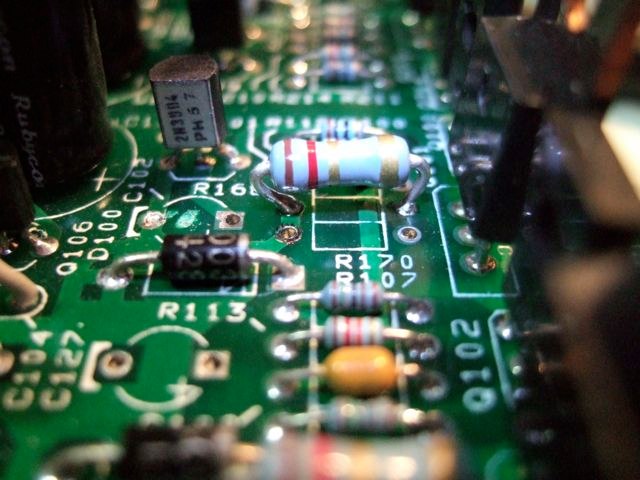
Pic of CVA
There are 12 of the 1 ohm fusible's that need to be swapped out with the 1/2 ohmer's.
R117,118,217,218,317,318,417,148,517,518,617 and 618.
Pic of R117 in and R218 Removed
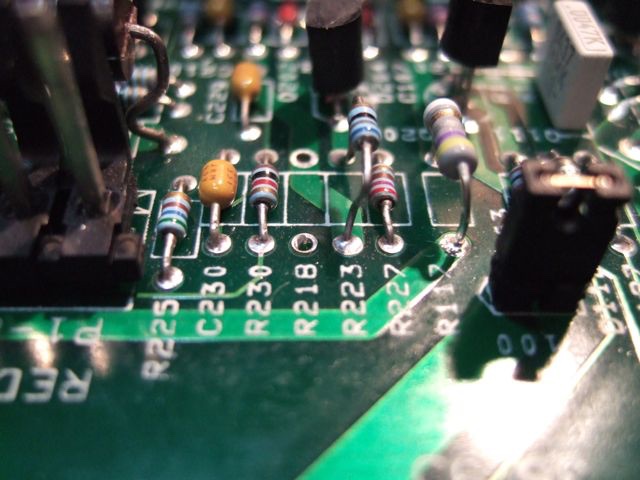
R118 is near test pionts , marking came off when using pliers to install:oops:

Look for the rest on the board and swap them all out , most are near the Jumper pins
Resistors in place see jumper pins near by !

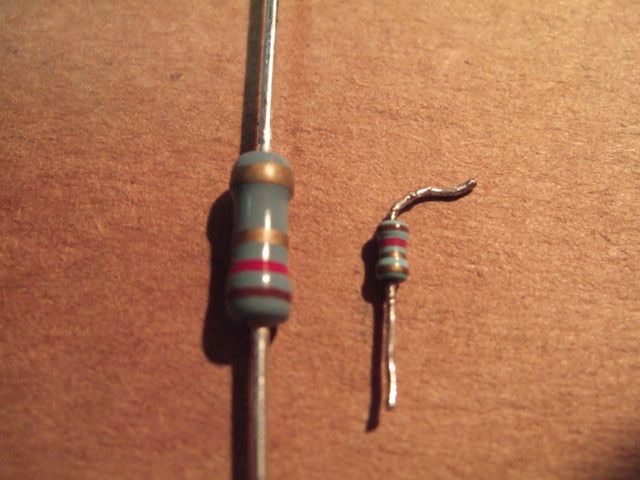
I got the 1.2 KOA resistors in and paul your right they are huge!!!! At least three times the size of original. I originaly could not find those so I was going to use a 1 ohm and a 2.2 ohm and put them in piggy back to make the 1.2 ohms.
These definitely were a B!@#ch to get in.
Comparison pic
It does make them look like mickey mouse resistors !
To make it easier to get to the resistors I removed the 22uf caps.
Depopulated cap locations

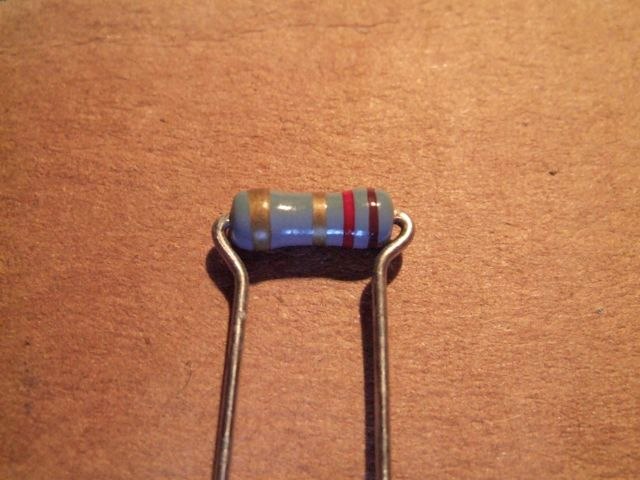
The thing that makes these hard to install is not the size of the resistor but the diameter of
the lead, very thick and hard to manipulate, its almost as big as the solder holes!!!
Paul sugested to put one end near the hole with all the lead throug and them angle the resistor
up and have the other end up in the air with a long lead. If thats easier for you it should be ok but
I like to keep leads as short as possible. This was a pain with these fat a$$ leads. but this is how i did them:
Bent leads about 6 mm spacing
Here are the GIANT resistors in place for two spots

I solder from the bottom so I make sure i hold the iron long enough for the solder to flow trough to
the other side:
Solder came up through!! Nice !!
Here are the four new resistors in their new home.
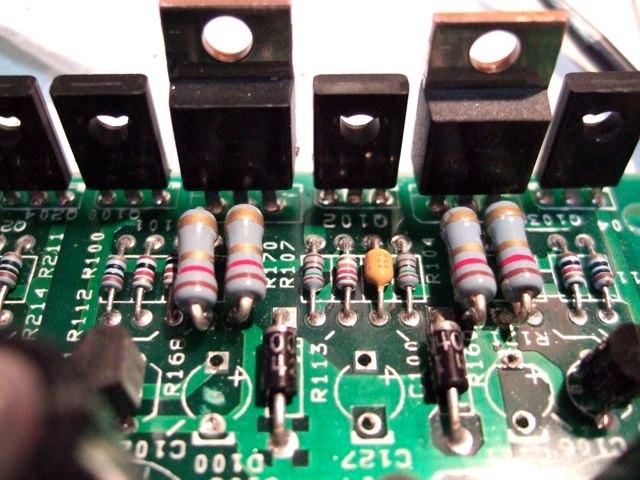
So just go through the rest and make sure the solder goes through on these, they take up most of the diameter
of the solder holes.
thats it for tonight, i need to work in the morning and am hitting the hay !
Athanasios
_________________
Don't blame your underwear for your crooked ass~ unknown Greek philosopher
"Republicans believe every day is the Fourth of July, but the Democrats believe every day is April 15." --- President Reagan
One Smart Dog!!!
Marquee High Performance Bellows now shipping!!
Marquee Modifications and Performance Enhancement
Marquee C-element and Bellow removal
Last edited by Nashou66 on Thu Jan 15, 2015 12:43 am; edited 3 times in total
|
|
| Back to top |
|
|
tse
Joined: 03 May 2006
Posts: 1014
Location: Sweatbucket, Fl.
|
| Link Posted: Sun Sep 21, 2008 5:12 pm Post subject: |
|
|
These are a neat alternative to fusible resistors. Polyswitch resettable fuses. If one "blows" you just turn off the power for a minute and the device resets itself. No resoldering resitors if you do a slip with the test probe or drop something in a bad place. Of course, if something is shorted, the "fuse" will just blow again when you turn on the power.
For 1 ohm resistors use RXEF075
For 2.2 ohm resistors use RXEF050
For 10 ohm resistors use RXEF020
For two 1 ohm resistors soldered in parallel use RXEF135
That should cover most of the resistor "fuses" used in the Marquee.
Attachment shows Marquee resistor "fuse" and RXE040 which is smaller than RXEF050 and a bit larger than RXEF020.
Scott
| Description: |
|
| Filesize: |
19.29 KB |
| Viewed: |
26617 Time(s) |

|
_________________
"Were we directed from Washington when to sow and when to reap, we would soon want bread."
Thomas Jefferson
|
|
| Back to top |
|
|
Nashou66
Joined: 12 Jan 2007
Posts: 16171
Location: West Seneca NY
|
|
| Back to top |
|
|
PaulB
Joined: 26 Oct 2007
Posts: 359
Location: Bonnie (but rainy) Scotland
|
| Link Posted: Sun Sep 21, 2008 6:39 pm Post subject: |
|
|
Never heard of these before, what a great idea, thanks Scott
_________________
Paul
|
|
| Back to top |
|
|
Nashou66
Joined: 12 Jan 2007
Posts: 16171
Location: West Seneca NY
|
|
| Back to top |
|
|
PaulB
Joined: 26 Oct 2007
Posts: 359
Location: Bonnie (but rainy) Scotland
|
| Link Posted: Sun Sep 21, 2008 6:44 pm Post subject: |
|
|
Just did a dry run of fitting the HUGE resistors, your method works a lot better when re-fitting the heatsink spring thing to the board Athanasios, definately the way to go (fiddly but better).
_________________
Paul
|
|
| Back to top |
|
|
Nashou66
Joined: 12 Jan 2007
Posts: 16171
Location: West Seneca NY
|
| Link Posted: Sun Sep 21, 2008 6:52 pm Post subject: |
|
|
| PaulB wrote: | | Just did a dry run of fitting the HUGE resistors, your method works a lot better when re-fitting the heatsink spring thing to the board Athanasios, definately the way to go (fiddly but better). |
Yep exactly what I was thinking, I would go ahead and bend all 24 before then go in and install them. It will make it for a more sane install  
Going to finish them when I get home form work 
Athanasios
_________________
Don't blame your underwear for your crooked ass~ unknown Greek philosopher
"Republicans believe every day is the Fourth of July, but the Democrats believe every day is April 15." --- President Reagan
One Smart Dog!!!
Marquee High Performance Bellows now shipping!!
Marquee Modifications and Performance Enhancement
Marquee C-element and Bellow removal
|
|
| Back to top |
|
|
Nashou66
Joined: 12 Jan 2007
Posts: 16171
Location: West Seneca NY
|
|
| Back to top |
|
|
Nashou66
Joined: 12 Jan 2007
Posts: 16171
Location: West Seneca NY
|
| Link Posted: Mon Sep 22, 2008 2:38 am Post subject: CVA Capacitor Upgrades |
|
|
Ok Now onto the capacitor upgrades. I first put in the 22uf 100VDC caps I removed to be able to work on the
1R2 resistors. These are larger that than the originals like on the VDM. Parts are listed in earlier thread.
18 of these.
New and Old

New 22uf caps in place

I also decided to change out the 6 4N7(4.7nf) Mylars and use Wima polypropylene caps from mouser
Part number there: 505-MKP20.047/100/5
Here is an online conversoin site i use to figure out capacitance conversions, it makes things much easier.
http://www.unitconversion.org/unit_converter/electrostatic-capacitance.html
4.7nf mylar cap to be removed

Wima poly cap in place

Dragnm made an interesting discovery, he noticed the reason most boards fail is due to
aged capacitors, this isnt what he discovered but led to him realizing that Electrohome
down sized the caps on the CVA for the 10uf ones, the older boards he has had 350 or
400VDC power rating and the newer boards only have 250VDC rated caps. If you look at
the PCB silk screening you can see that the circle for the caps are much larger if you have
the 250VDC caps.
EDIT:12/3/2011....The 10uf caps can be upgraded to 22uf 50v caps or even
a higher capacitance. Reason is I obtained the workings of Chris Stevens who was one of the
original Upgrade marquee guys and worked for Vidikron and ATI and a few others.
His notes use 22uf 50v caps here.
So we are going to go back up in value like we always do for most of the caps. But here the
newer panasonic caps I chose had the same physical size but a higher voltage rating and
better specs than the Rubycons were replacing.
12 of these.
Old 10uf 250VDC cap

New Panasonic capacitor 350 VDC rating

New caps in place, its the whole family!

Here is the completed board

Now on Both board make sure you re-flow all the solder joints for the output amps that are
on the heat sink and I also did the Connector pins for power and convergance coils, Also
clean the insulation pad that they were connected to with denatured
alcohol as Mike parker suggests, and apply either Petroleum jelly or Heat sink compound to
both sides for the insulator to make a good contact with the amps so they transfer thier heat
efficiently to the heat sink. Mike says the heat sink should get much hotter after this is done.
Clean both boards well with denatured alcohol, I also removed the jumper clips and cleaned
those pins with Deoxit and added the protectant then put the jumpers back on.
heat sink.
Now put it all back together sliding the boards back on up to the point or points you marked on
the heat sink. Thats it ! Good work, dont you feel better knowing you are helping your marquee
last another 10-25 years , lets hope right !
Athanasios
_________________
Don't blame your underwear for your crooked ass~ unknown Greek philosopher
"Republicans believe every day is the Fourth of July, but the Democrats believe every day is April 15." --- President Reagan
One Smart Dog!!!
Marquee High Performance Bellows now shipping!!
Marquee Modifications and Performance Enhancement
Marquee C-element and Bellow removal
Last edited by Nashou66 on Sun Dec 04, 2011 2:03 am; edited 1 time in total
|
|
| Back to top |
|
|
Nashou66
Joined: 12 Jan 2007
Posts: 16171
Location: West Seneca NY
|
| Link Posted: Tue Sep 23, 2008 5:17 pm Post subject: |
|
|
Hi Guys, I put it all back together and swapped out my Rear heats sink inmy test PJ for the upgraded one. All looks great. And as Mike says the heat sink feels hotter than before after tightening up those clamps and using Petroleum Jelly. One thing you have to do is Bend down the tabs on the clamp for the VDM as the new Caps are soooo big they get in the way of the clam as it is now. So bend the end of each tab almost straight so it doesnt push the caps out of place. Just did a convergence for 1080p and my satelite 720p(mostly for sports). I still have to figure out my Blu Player issue, it keeps introducing that squiggly, I dont get it with my other sources. I think I need to open it up and see if the HDMI ground is loose inside the player. Oh well hope everyone is almost done with this board it does take a lot of time. Now I have the One I removed to work on !! Geeze no rest for the wicked !!!
Athanasios
_________________
Don't blame your underwear for your crooked ass~ unknown Greek philosopher
"Republicans believe every day is the Fourth of July, but the Democrats believe every day is April 15." --- President Reagan
One Smart Dog!!!
Marquee High Performance Bellows now shipping!!
Marquee Modifications and Performance Enhancement
Marquee C-element and Bellow removal
Last edited by Nashou66 on Sun Oct 12, 2008 6:51 pm; edited 1 time in total
|
|
| Back to top |
|
|
AnalogRocks
Forum Moderator

Joined: 08 Mar 2006
Posts: 26690
Location: Toronto, Ontario, Canada
TV/Projector: Sony 1252Q, AMPRO 4000G
|
| Link Posted: Wed Sep 24, 2008 5:06 am Post subject: |
|
|
| Nashou66 wrote: | Hi Guys, I put it all back together and swapped out my Rear heats sink inmy test PJ for the upgraded one. All looks great. And as Mike says the heat sink feels haotter than before after tightening up those clamps and using Petroleum Jelly. One thing you have to do is Bend down the tabs on the clamp for the VDM as the new Caps are soooo big they get in the way of the clam as it is now. So bend the end of each tab almost straight so it doesnt push the caps out of place. Just did a convergence for 1080p and my satelite 720p(mostly for sports). I still have to figure out my Blu Player issue, it keeps introducing that squiggly, I dont get it with my other sources. I think I need to open it up and see if the HDMI ground is loose inside the player. Oh well hope everyone is almost done with this board it does take a lot of time. Now I have the One I removed to work on !! Geeze no rest for the wicked !!!
Athanasios |
Which Blu Ray player is introducing a squigly? We had a guy earlier today with a BR problem on an LG but only on regular DVD's.
See this thread:
http://www.curtpalme.com/forum/viewtopic.php?t=12505&start=20
TIA
Edit: 1 am Spelling
_________________
Tech support for nothing
CRT.
HD done right!
Last edited by AnalogRocks on Wed Sep 24, 2008 12:09 pm; edited 1 time in total
|
|
| Back to top |
|
|
Nashou66
Joined: 12 Jan 2007
Posts: 16171
Location: West Seneca NY
|
| Link Posted: Wed Sep 24, 2008 11:53 am Post subject: |
|
|
| AnalogRocks wrote: | | Nashou66 wrote: | Hi Guys, I put it all back together and swapped out my Rear heats sink inmy test PJ for the upgraded one. All looks great. And as Mike says the heat sink feels haotter than before after tightening up those clamps and using Petroleum Jelly. One thing you have to do is Bend down the tabs on the clamp for the VDM as the new Caps are soooo big they get in the way of the clam as it is now. So bend the end of each tab almost straight so it doesnt push the caps out of place. Just did a convergence for 1080p and my satelite 720p(mostly for sports). I still have to figure out my Blu Player issue, it keeps introducing that squiggly, I dont get it with my other sources. I think I need to open it up and see if the HDMI ground is loose inside the player. Oh well hope everyone is almost done with this board it does take a lot of time. Now I have the One I removed to work on !! Geeze no rest for the wicked !!!
Athanasios |
Whick Blu Ray player is introducing a squigly? We had a guy earlier today with a BR problem on an LG but only on regular DVD's.
See this thread:
http://www.curtpalme.com/forum/viewtopic.php?t=12505&start=20
TIA |
Its the LG BH100, I have a BH200 also I plan to test now, I like the analog out on the BH100. What it is causing ius the horizontal scan to not be lined up or timed correctly, Or thats how it seams, what you see is a wave or "squiggly" travel up
vertical images. So in effect its causing the horizontal scan to not be layed down in their correct spots casing the image to look like it has the squiggly on vertical edges like text,fences,building edges ect. It aslo does it in one of two ways: continuously some time others it pulses every few seconds. The isolation Transformer did not help. Could i some how look for it with my scope connected to the hdmi case and to ground of the power outlet? What is the proper way to look for it. I think it is a ground loop problem internally on the player not throuhg my whole sytem as every thing else is working great after
I installed the 5KVA Isolation Transformer inbetween my main panel box and Home theaters Sub Panel. I know this is off topic here but it is very annoying as I like to test my upgrades with blue ray.
Athanasios
_________________
Don't blame your underwear for your crooked ass~ unknown Greek philosopher
"Republicans believe every day is the Fourth of July, but the Democrats believe every day is April 15." --- President Reagan
One Smart Dog!!!
Marquee High Performance Bellows now shipping!!
Marquee Modifications and Performance Enhancement
Marquee C-element and Bellow removal
|
|
| Back to top |
|
|
geisemann
Guest
|
| Link Posted: Fri Oct 24, 2008 5:39 am Post subject: VIM |
|
|
I was send a email to make some tips here.
I can share some of my Marquee Mods I have done.
I cant read 15 pages right now I have so much work with getting these airforce 909 projectors repaired. I have over 10 projectors I am repairing.
What page is the VIM I can make some suggestions on what to modify to make the picture better?
Couple of quick tips
The marquee heat sinks insulators dry out. When replacing the the boards make sure you use lots of grease on the transistors when you slide the boards back in.
_ Fan mod Not sure why you are using a regulator I didnt look that close but the supply allready regulates the voltage so a simple thermo resistor circurt or simple resistor will lower the voltage. I recommend thermo that will move the fans up a notch when the heat is heavy in the power supply.
- The stock fans are quite excellent once you lower the voltage, replaceing them with new fans makes very little improvement.
- You need to isolate the fans from the chasis with rubber that will lower the noise from bearing noise and syncro motor pulses though the metal acting like a speaker.
- Do not use filter this will hamper air flow and can cause static build up. Also will clog easy and make it difficult to replace. Filters will increase noise levels and if the humidity is low enough it can cause some static discharges that can effect performance.
http://www.eisemann-theater.com/images/Powersupply-modification.jpg
I use only 2 screws and use rubber on all 4 legs. This requires you to drill out the chassis to mount the rubber.
GREG
www.eisemann-theater.com
|
|
| Back to top |
|
|
Nashou66
Joined: 12 Jan 2007
Posts: 16171
Location: West Seneca NY
|
| Link Posted: Fri Oct 24, 2008 12:32 pm Post subject: |
|
|
Thanks for the tips Greg, I have not got to the Vim yet. I plan to do the HDM next replacing all the electrolytics. The I'll save the Vim for last . Also I will try some of your tips you send me via email. I appreciate you allowing us to use "some" of your methods here. I know you cant share them all but any will help out. You can keep the secretes for your mods if anyone wants to get them from you. If you want to maybe add some info for the VNB its on page 4 here. Just post here any other things we should look at or shoot me an email and I can make the changes and give it a shot and add to the mods I have already done on it.
| Quote: | | _ Fan mod Not sure why you are using a regulator I didnt look that close but the supply allready regulates the voltage so a simple thermo resistor circurt or simple resistor will lower the voltage. I recommend thermo that will move the fans up a notch when the heat is heavy in the power supply. |
Well the new fans are considerably quieter and are 12 volt. The power from the LVPS to the stocck fans are 12 volts in standby but jump to 24 when turned on, hence the 12 voltage regulator. I tried it with the resistor but it would not run in standby .
Athanasios
_________________
Don't blame your underwear for your crooked ass~ unknown Greek philosopher
"Republicans believe every day is the Fourth of July, but the Democrats believe every day is April 15." --- President Reagan
One Smart Dog!!!
Marquee High Performance Bellows now shipping!!
Marquee Modifications and Performance Enhancement
Marquee C-element and Bellow removal
|
|
| Back to top |
|
|
Ohmess
Joined: 11 Sep 2008
Posts: 242
Location: Vienna, VA
|
| Link Posted: Fri Oct 24, 2008 5:15 pm Post subject: Re: VIM |
|
|
| geisemann wrote: |
The marquee heat sinks insulators dry out. When replacing the the boards make sure you use lots of grease on the transistors when you slide the boards back in. |
I have a question on the heat sinks. The prior owner of my machine put a layer of what looks like duct tape between the heat sinks and the transistors. This makes it more difficult to slide the boards in, and appears to be contrary to the advice of getting a tight seal so as to encourage heat transfer. Thoughts?
Last edited by Ohmess on Fri Oct 24, 2008 5:26 pm; edited 1 time in total
|
|
| Back to top |
|
|
|
|
|
|
|
|
You cannot post new topics in this forum
You cannot reply to topics in this forum
You cannot edit your posts in this forum
You cannot delete your posts in this forum
You cannot vote in polls in this forum
You cannot attach files in this forum
You can download files in this forum
|
Forum powered by phpBB © phpBB Group
|
|


