kal
Forum Administrator

Joined: 06 Mar 2006
Posts: 17860
Location: Ottawa, Canada
TV/Projector: JVC DLA-NZ7

|
 Link Posted: Mon May 26, 2008 7:46 pm Post subject: HOW-TO: Re-repairing your Xbox 360 Link Posted: Mon May 26, 2008 7:46 pm Post subject: HOW-TO: Re-repairing your Xbox 360 |
 |
|
Curt offers an Xbox360 Repair service. Here are instructions for fixing the most common re-occurring problem yourself if you continue to have problems!
Re-repairing your Xbox 360
Written by: Curt Palme
May 26, 2008
Now that Ive repaired about 40 of these Xboxes, Ill share some repair tricks, primarily so that you can re-repair your own Xbox without having to send it back out for repair.
Theory of the failure
The common consensus of the cause of the red ring of death (RROD) and no video problems is that there are two main chips on the circuit board of the Xbox that overheat and lift off the PC board. These chips are glued onto the PC board, and each chip has 64 or 128 contact points on the underside of the chip. These contact points are not accessible, as they are directly under the chip.
Over time, heat buildup causes the PC board to warp slightly, and if even one of the contact points between the chip and PC board is broken, the RROD occurs, the box freezes, or you get a black screen with no video.
The Cure
Its pretty common knowledge that the X shaped clamps that hold the heatsinks to the chips cause the warping of the PC board, so the common cure is to replace the spring loaded X clamps with bolts to provide more even pressure between the chip and PC board. Over time however, the PC board will continue to warp slightly, and the failure may return after a few hours, weeks or months of game play. Some Xboxes appear to be permanently repaired and do not fail again after the first repair.
We here also put the multispeed fans into full speed mode which makes the Xbox a bit noisier, but the Xbox runs cooler, and we also modify the air ducting within the unit to redirect more air over the video processor chip, that seems to run hotter than the main CPU.
The Re-Repair
We have found that most re-repairs simply consist of changing the tension of the bolts that hold the heatsinks in place, to change the pressure between the chip and the PC board. Heres how to do that:
Opening the Xbox:
There are a few tricks to get the Xbox open. You will need:
-small flat blade jewelers screwdriver
-Torx screwdriver
-Philips screwdriver
-8mm nutdriver (for older repairs)
-20 minutes, and a bit of patience.
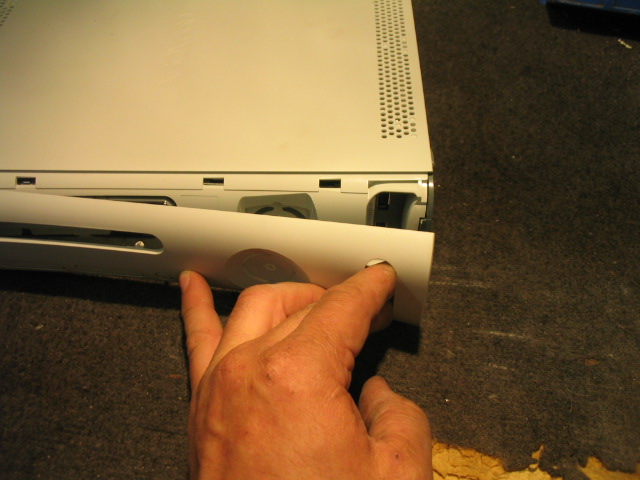
The first step to get your 360 apart is to take the front face plate off. It simply snaps onto the Xbox, and is best pulled off by putting your fingers into the controller port, and pull the faceplate off.
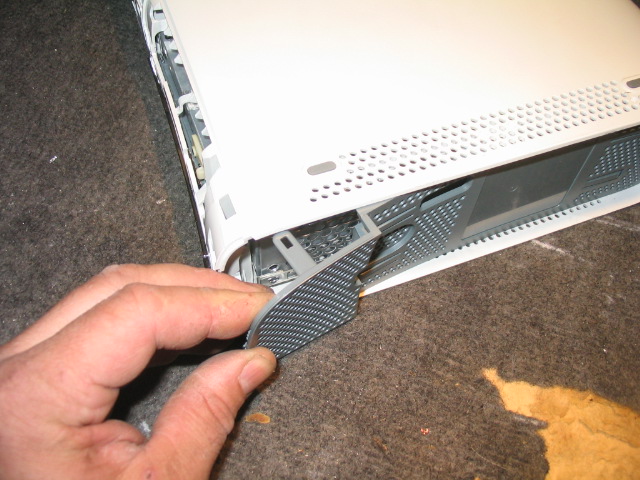
The next step is to take the side panels off. Remove any accessories from your Xbox, including the hard drive. Take a very small jewelers screwdriver, and while gently pulling on the front of the gray side panel, insert the screwdriver into the vent holes as shown to release the three tabs each on the top and bottom of the case. The side panels will slowly lift off the Xbox.


Once the side panels have come off, the next step is to separate the top and bottom clamshell case parts. There are a total of 7 small slots along the back of the Xbox that will unlock tabs holding the top and bottom covers together. Press each tab in sequence while putting pressure between the top and bottom case halves, and the covers will separate along the back of the Xbox:

(note the size of the screwdriver, its very small. Too large of a flat blade will not go deep enough into the Xbox to release the tabs. Youll hear a small click as the tabs release.)

There are three additional tabs along the front of the Xbox that release with a screwdriver pushed under the tab:


Once all three tabs are pushed, the bottom of the case will come off the Xbox.
Now, on all of the later Xboxes that weve repaired, weve installed Philips screws that you can access without taking the set further apart. With the power off and unplugged, try slightly tightening and loosening the Philips screws so that the problem goes away.

How tight or how loose? Well, theres no good answer for that, whatever works.
If that does not solve the problem, then continue below:
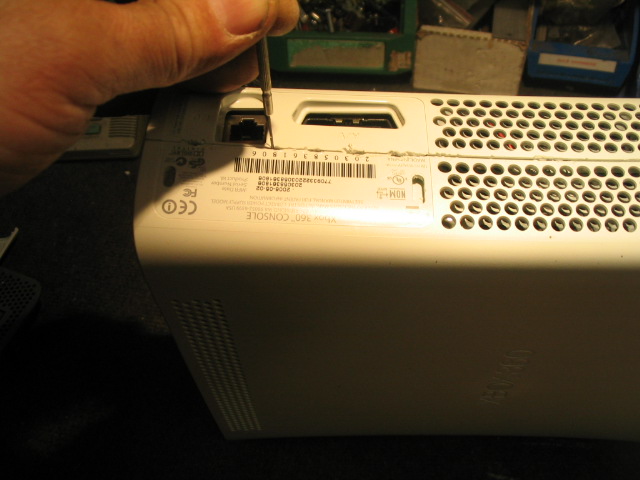
Remove the top case cover of the Xbox by removing 6 Torx screws from the bottom cover as shown:
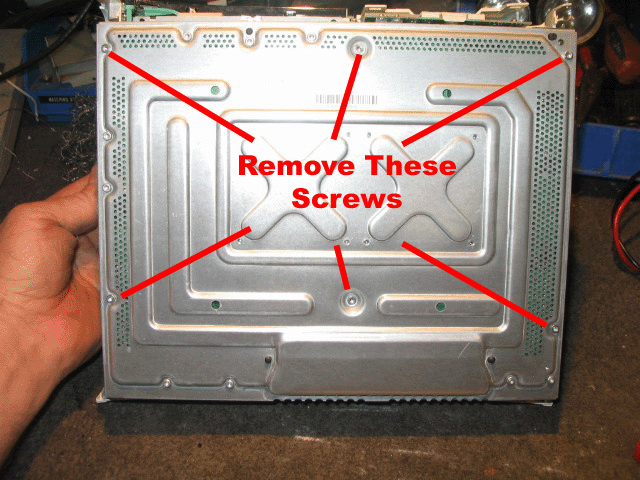
The top cover will then lift off.
Disconnect the fan connector at the back of the Xbox. Its a 4 pin connector with a little plastic tab on one side that releases the plug. Pull it out.

With the fans unplugged, power up the Xbox. Let it sit, but watch the front LEDs. Within 2-4 minutes of powering up, the Xbox will shut down, and the two left LEDs will flash red. This indicates an overheating condition. Immediately unplug the Xbox and tighten the 8 Philips screws slightly as shown above. Plug the fans back in, and power up.
What youve done is overheated the two main processing chips on the Xbox to reflow the solder connections between the chips and the main PC board. This should now bring your Xbox to life again. If not, then some playing around with the Philips screw tensions should get it to work.
Once in a while, the box is beyond repair unfortunately. At that point you need to buy a new Xbox. Below are some links (hover over for prices and more information):
Xbox 360 Elite System Console Includes 120GB Hard Drive

Xbox 360 Console Includes 20GB Hard Drive

Xbox 360 Core Arcade Bundle

If you really never want to see this problem again, we suggest:
Playstation 3 40GB


Curt
_________________

Support our site by using our affiliate links. We thank you!
My basement/HT/bar/brewery build 2.0
|
|


