CurtPalme.com Home Theater sales, calibration, service, and discussion forum. Hundreds of free manuals & setup tips.


Sign up and receive the latest newsletters by email!     Join the Forum discussions!    
    Site Map  
Home Products
For Sale
Referral
List
Photo
Gallery
Links Contact
Us
CRT Primer
Troubleshooting Tips
Mounting Methods
Definitive CRT
Projector Setup Guide
Tube/Raster Setup
Tube Condition (Wear)
Advanced Procedures
Projector
Specifications
Projector Rankings
Video Processors
Ampro 1500/2000
Ampro 2300/2600
Ampro 3600/4600
Barco (Older Analog)
Barco 70x/Cine7  
Barco 500/800/801
Barco 808/Cine8
Barco 120x/Cine9
Dwin 500/700
Electrohome ECP 
Electrohome Marquee 
Mitsubishi
NEC PG
NEC XG
Panasonic 108x
Runco
Seleco
Sony 10xx
Sony 125x/127x
Sony 1292
Sony D50
Sony G70
Sony G90
Zenith 895/900
Zenith 1200


Zenith PRO 841x/851x

      >> Introduction 
      >> Layout and Setup Tips 
      >> Focus Block Replacement 
      >> CRT Tube Replacement 
      >> Manuals / Downloads 


CRT Tube Replacement Procedure for Zenith PRO 851


Here’s how to change out a CRT in a Zenith PRO 851. It’s not really harder than any other CRT projector, but knowing how the set comes apart on this one is the key to a successful CRT change.

The first step is to remove the large front plastic shroud that covers the CRT tubes and lens assemblies. The front panel is held on with screws on the front and bottom of the plastic bezel. Once these screws are taken out, the bezel pulls off the front of the set exposing the tubes as shown below:


Next, take off the keypad and mounting strip by removing one screw at each end of the metal strip. Swing the keypad to the side of the set to facilitate access to the lens and tube mounting screws.

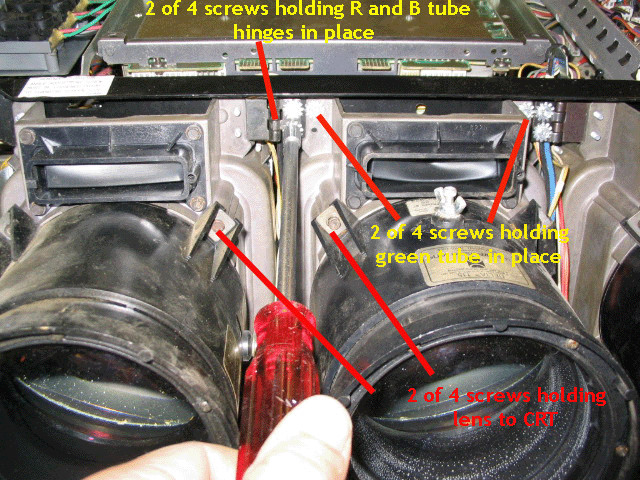
As with many CRT projectors, each lens is held on with four screws, one in each corner of the lens. Once the screws are taken out, in this case 14” hex bolts, the lenses will come off, exposing the tube face. You’ll be able to tell the amount of tube wear on the sets once the lenses are taken off.

Now to the tricky part: The green tube MUST be removed first regardless of which tube needs to be changed in the set. Note that an AKB (auto white balance) circuit controls the master brightness of the tubes, and usually a massive color shift will result if one or two used tubes with significant hours are installed at the same time as one or two new tubes. This color shift cannot be corrected, so it’s a good idea to replace all three tubes at the same time.

The green tube is held in with four ¼” bolts only as shown in the photo below. The green tube is not on hinges and bolts right to the frame of the set. Before you remove the green tube, slide the CRT socket off the back of the tube and loosen the yoke. Follow the thick red HV wire to the focus block and unscrew the HV lead and pull it free. Free up the HV lead from the wire ties or holders and leave it loose in the set. There is a gray wire that goes from the CRT socket to the top of the green tube. This is a ground wire, and two ground straps also connect from this ground point to similar ground points on the R and B tubes. Remove all of these ground screws and straps.


You might also want to loosen the video input board as shown in the first photo above. That is simply to allow for easier removal of the green tube. As you pull the green tube out the front of the set, make sure the yoke and CRT socket slide off the back of the tube. The green tube and attached HV wire will then come out the front of the set.

The R and B tubes remove in a similar fashion, but there are a total of six screws that hold these tubes in place. There are 4 screws that hold hinges that facilitate lens toe-in for the R and B tubes. Take those screws out as shown above. There is an obvious screw that fits through the top metal rail of the chassis.


What isn’t as obvious is that there is a bolt at the bottom of the chassis that holds the bottom of the tube in place.


A long nut-driver or Philips screwdriver is needed to remove this bolt. I do not install this bolt with the new tube as the rest of the screws hold the tube in place just fine. Once the tubes are all pulled out of the set, you will get an assembly as shown below. Depending on how you order the replacement tube from VDC, you’ll need to transfer the hinges and top mounting hardware to the new tube. You’ll most likely also will need to transfer the back metal shield over to the new tube.


The installation of the new tubes is exactly the reverse of the removal. Remember to make sure you slide the yoke onto the tube neck as you’re sliding the tube into the chassis, as the yoke is too large to slide it on after the tube is bolted into the set. Make sure that the CRT sockets are well out of the way when installing the tube so it does not put pressure on the tube neck and snaps it while you’re putting it into place.

Route all of the wires neatly, connect all three HV leads to the focus block, reinstall the CRT sockets, ground wires, lenses and now you need to do an alignment and focusing of the tubes.

Did you find this information useful? Please consider making a donation to help defray the cost of managing and hosting future articles, tips, and documents.     
Or purchase from Amazon.com and a small percentage automatically goes to support this site at no extra cost to you! Visit their Blu-ray and 4K UHD stores for sales. Want to show off your home theater? See our Blu-ray Release List & Must-Have Titles. Shop at Amazon.com and support our site!


© Copyright CurtPalme.com. All Rights Reserved.